
Succulents are celebrated for their resilience and low-maintenance nature, but even the toughest plants can show signs of distress. One of the most common concerns among indoor gardeners is noticing their once-vibrant succulent turning yellow. This discoloration isn’t just a cosmetic issue—it’s a warning sign that something in the plant’s environment or care routine has gone wrong.
Yellowing leaves on a succulent typically indicate stress, often rooted in watering habits, light exposure, soil conditions, or pests. The good news? If caught early, most yellowing succulents can be revived with targeted adjustments. Understanding the underlying cause is the first step toward recovery. With prompt action and proper care, you can restore your plant’s health—and prevent future issues.
Common Causes of Yellowing in Succulents
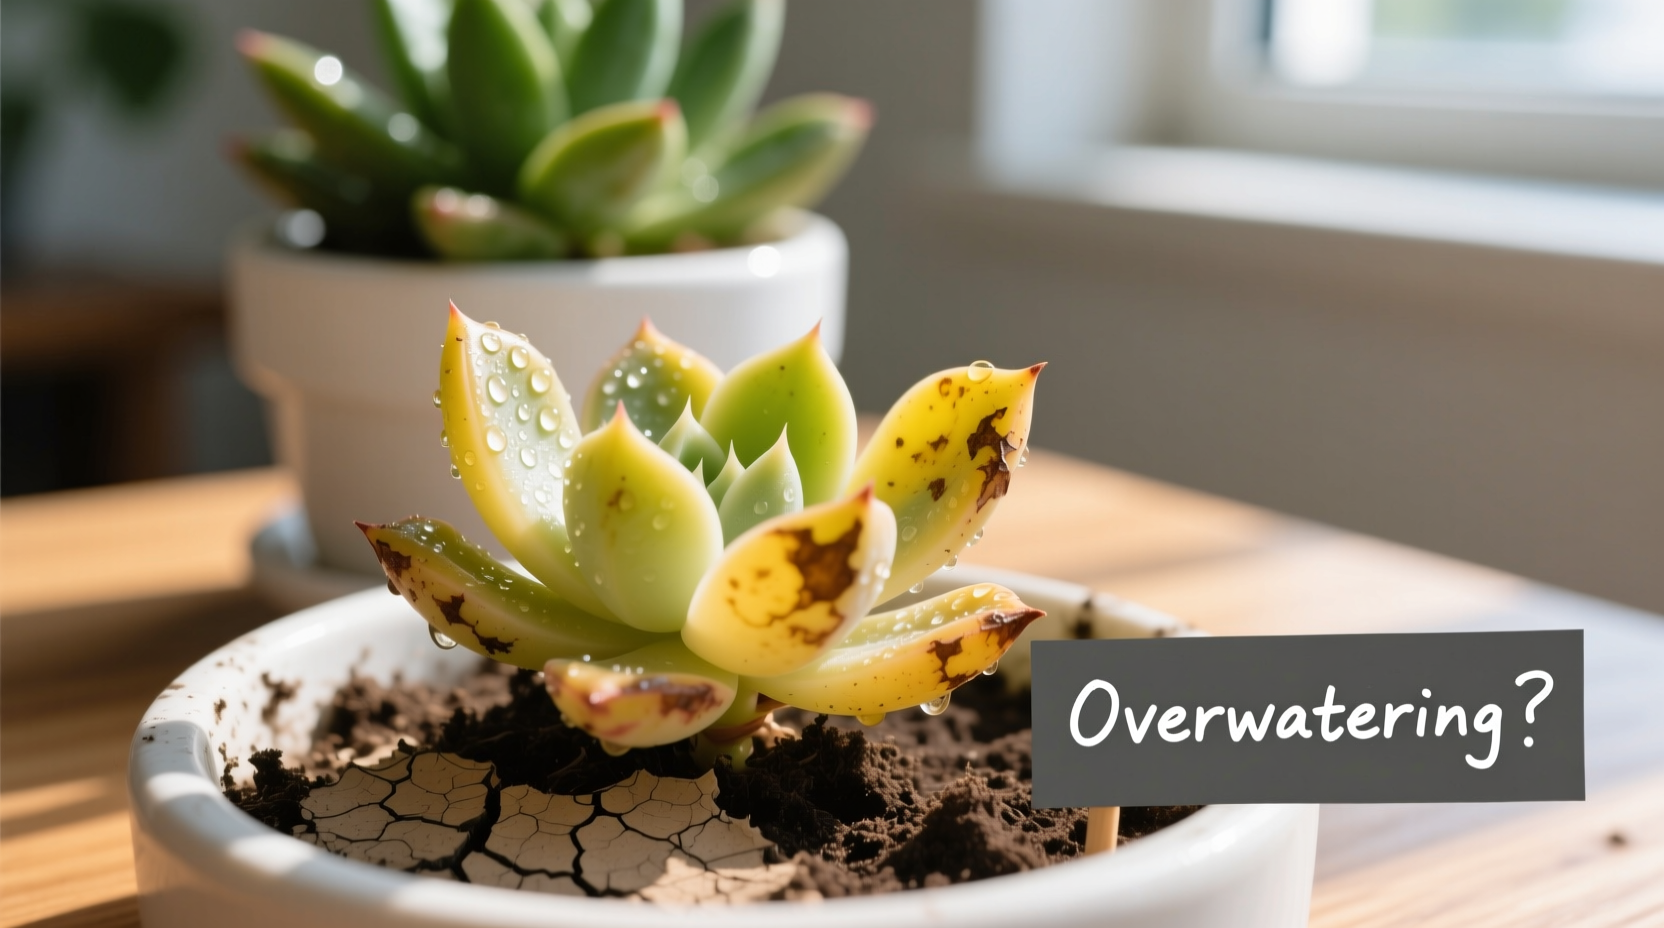
Unlike many houseplants, succulents store water in their leaves, stems, and roots, making them highly sensitive to moisture imbalances. Yellowing is rarely due to a single factor; more often, it results from a combination of environmental stressors. Identifying the root cause requires careful observation of both the plant and its surroundings.
- Overwatering: The leading cause of yellow succulents. Excess moisture leads to root rot, which prevents nutrient uptake and causes leaves to swell, turn translucent, then yellow or black.
- Underwatering: Less common but possible. Leaves may yellow at the base and feel dry, crispy, or shriveled.
- Poor Drainage: Even with correct watering, compacted or non-porous soil traps water around roots, mimicking overwatering.
- Inadequate Light: Too little light causes etiolation—stretching and pale, weak growth. Leaves may yellow due to reduced photosynthesis.
- Excessive Direct Sunlight: Sudden exposure to intense sun can scorch leaves, causing yellow or brown patches.
- Pests: Mealybugs, spider mites, or scale insects feed on sap, weakening the plant and disrupting nutrient flow.
- Nutrient Imbalance: Over-fertilizing or using rich soils can burn roots and alter pH, leading to chlorosis (yellowing between leaf veins).
- Pot Size & Material: Pots that are too large hold excess moisture; plastic retains more water than terracotta.
Pinpointing the exact trigger often involves eliminating possibilities one by one. Start with the most likely culprit: watering habits.
Step-by-Step Guide to Reviving a Yellowing Succulent
Rescuing a yellowing succulent doesn’t require advanced gardening skills—just patience, observation, and timely intervention. Follow this timeline to stabilize and rehabilitate your plant.
- Stop Watering Immediately: If overwatering is suspected, halt all irrigation. Let the soil dry completely—this may take 7–14 days depending on pot size and humidity.
- Inspect the Roots: Carefully remove the plant from its pot. Healthy roots are firm and white or light tan. Rotten roots are dark, soft, and may smell foul. Trim away any decayed sections with sterilized scissors.
- Prune Damaged Leaves: Remove yellow, mushy, or fallen leaves. This reduces fungal risk and redirects energy to healthy growth.
- Repot in Fresh, Well-Draining Soil: Use a cactus or succulent mix with added perlite or pumice (at least 50% mineral grit). Choose a pot with drainage holes—terracotta is ideal for breathability.
- Allow a Healing Period: After repotting, wait 5–7 days before watering. This gives cut roots time to callous and prevents further rot.
- Adjust Lighting: Place the plant in bright, indirect light for 3–5 days to reduce stress. Gradually reintroduce it to direct sunlight if needed, increasing exposure by 30 minutes daily.
- Resume Watering Sparingly: Only when the soil is fully dry. For most indoor succulents, this means every 2–3 weeks during growing season (spring to fall), and once a month in winter.
This process may take several weeks, but visible improvement—such as new green growth or stabilized leaf color—usually appears within 10–14 days after correcting care practices.
Do’s and Don’ts: A Quick Reference Table
| Do | Don’t |
|---|---|
| Use pots with drainage holes | Use regular potting soil without amendments |
| Water only when soil is completely dry | Follow a fixed watering schedule regardless of conditions |
| Place near an east- or south-facing window | Keep in dim corners or under artificial light only |
| Fertilize lightly once in spring, if at all | Apply high-nitrogen fertilizers frequently |
| Check for pests monthly | Ignore sticky residue or cotton-like spots on leaves |
Real Example: How Sarah Saved Her Echeveria
Sarah noticed her prized blue Echeveria developing yellow lower leaves. At first, she assumed it was natural shedding—until the discoloration climbed upward and two leaves collapsed overnight. She posted a photo in a gardening forum, where experienced growers pointed out the soil surface was constantly damp despite “only watering once a week.”
Upon inspection, Sarah realized her decorative outer pot had no drainage, trapping water at the base. She removed the inner plastic liner and found soggy soil and blackened roots. Following advice, she repotted the Echeveria in a terracotta pot with a gritty mix, trimmed damaged tissue, and withheld water for ten days. Within three weeks, new rosettes formed, and the yellowing halted. Today, her plant thrives on a sunny windowsill with a strict “soak and dry” routine.
Sarah’s experience underscores a key truth: even attentive care can go wrong if the container or soil undermines it.
“Over 70% of succulent deaths I see in consultations trace back to poor drainage, not lack of knowledge. The right pot is as important as the right plant.” — Dr. Lena Torres, Horticulturist & Plant Stress Specialist
Prevention Checklist: Keep Your Succulents Green and Strong
Once your succulent recovers, maintaining its health requires consistency. Use this checklist to avoid future yellowing episodes:
- ✅ Check soil moisture weekly with a finger or wooden skewer—only water if the top 1–2 inches are dry.
- ✅ Ensure pots have at least one drainage hole; elevate them slightly to prevent water pooling.
- ✅ Rotate your succulent every few weeks for even light exposure and balanced growth.
- ✅ Clean leaves gently with a soft brush or cloth to remove dust and deter pests.
- ✅ Monitor seasonal changes—reduce watering in fall and winter when growth slows.
- ✅ Quarantine new plants for 2–3 weeks to prevent pest infestations.
- ✅ Avoid misting—succulents prefer deep, infrequent watering over frequent spritzing.
Frequently Asked Questions
Can a yellow succulent turn green again?
Individual yellow leaves will not revert to green. However, once the underlying issue is corrected, new growth should emerge healthy and green. Focus on saving the plant’s overall vitality rather than restoring discolored foliage.
Is bottom watering better for succulents?
Bottom watering can encourage deeper root development, but it’s not ideal for every situation. It works best in well-draining pots and should be limited to 10–15 minutes to prevent saturation. For plants showing signs of rot, top watering allows better control and soil monitoring.
Should I remove all yellow leaves at once?
No. Only remove leaves that are fully yellow, mushy, or detached. Premature removal can create open wounds that invite infection. Allow the plant to naturally shed stressed foliage as it recovers.
Final Steps to Long-Term Success
Reviving a yellowing succulent is more than a quick fix—it’s an opportunity to refine your plant care approach. These hardy plants thrive on simplicity: bright light, infrequent watering, and excellent drainage. By treating yellowing as a diagnostic signal rather than a death sentence, you gain insight into your plant’s needs and build confidence in your abilities.
Remember, every gardener faces setbacks. What matters is how you respond. With observation, adjustment, and a bit of patience, your succulent can not only survive but flourish. And once stabilized, it may even reward you with offsets or blooms—a testament to resilient life.


 浙公网安备
33010002000092号
浙公网安备
33010002000092号 浙B2-20120091-4
Comments
No comments yet. Why don't you start the discussion?