
It’s a common frustration: your Wi-Fi works perfectly in the living room but crawls or drops entirely when you go upstairs. You’re not imagining it—this is a real issue caused by physics, building materials, and router limitations. The good news? You don’t need to buy expensive mesh systems or hire technicians to solve it. With smart positioning, simple tweaks, and a few clever tricks, you can significantly improve upstairs Wi-Fi performance on a tight budget.
The root of the problem often lies in signal attenuation—the weakening of Wi-Fi signals as they pass through walls, floors, and appliances. Upper floors are especially vulnerable because most routers are placed near ground level, and each floor adds physical barriers like wood, concrete, and metal piping. Add in interference from microwaves, cordless phones, or neighboring networks, and it’s no surprise your bedroom stream buffers while the kitchen stays smooth.
Why Wi-Fi Weakens Upstairs: The Science Behind the Signal
Wi-Fi uses radio waves, typically on the 2.4 GHz or 5 GHz frequency bands. While both have strengths, they behave differently when navigating obstacles:
- 2.4 GHz: Travels farther and penetrates walls better but is slower and more prone to congestion from other devices.
- 5 GHz: Faster and less crowded, but has shorter range and struggles with solid objects like floors and drywall.
Most modern homes use dual-band routers that broadcast both frequencies. However, many devices automatically connect to the faster 5 GHz band—even if the signal is weak—leading to poor performance upstairs where that band rarely reaches effectively.
Additionally, construction materials play a major role. Concrete, brick, metal ducts, and even large mirrors or refrigerators can reflect or absorb signals. Floors add vertical distance and additional layers of obstruction. A router tucked in a basement or corner downstairs may simply not have enough power to maintain strong coverage two flights up.
“Signal degradation isn’t just about distance—it’s about what’s between you and the router. Even a single concrete wall can reduce signal strength by over 90%.” — Dr. Alan Torres, Network Engineer at MIT Lincoln Laboratory
Practical, Low-Cost Fixes to Eliminate Dead Zones
You don’t need a new router or a full home network overhaul to get reliable Wi-Fi upstairs. Start with these proven, affordable strategies:
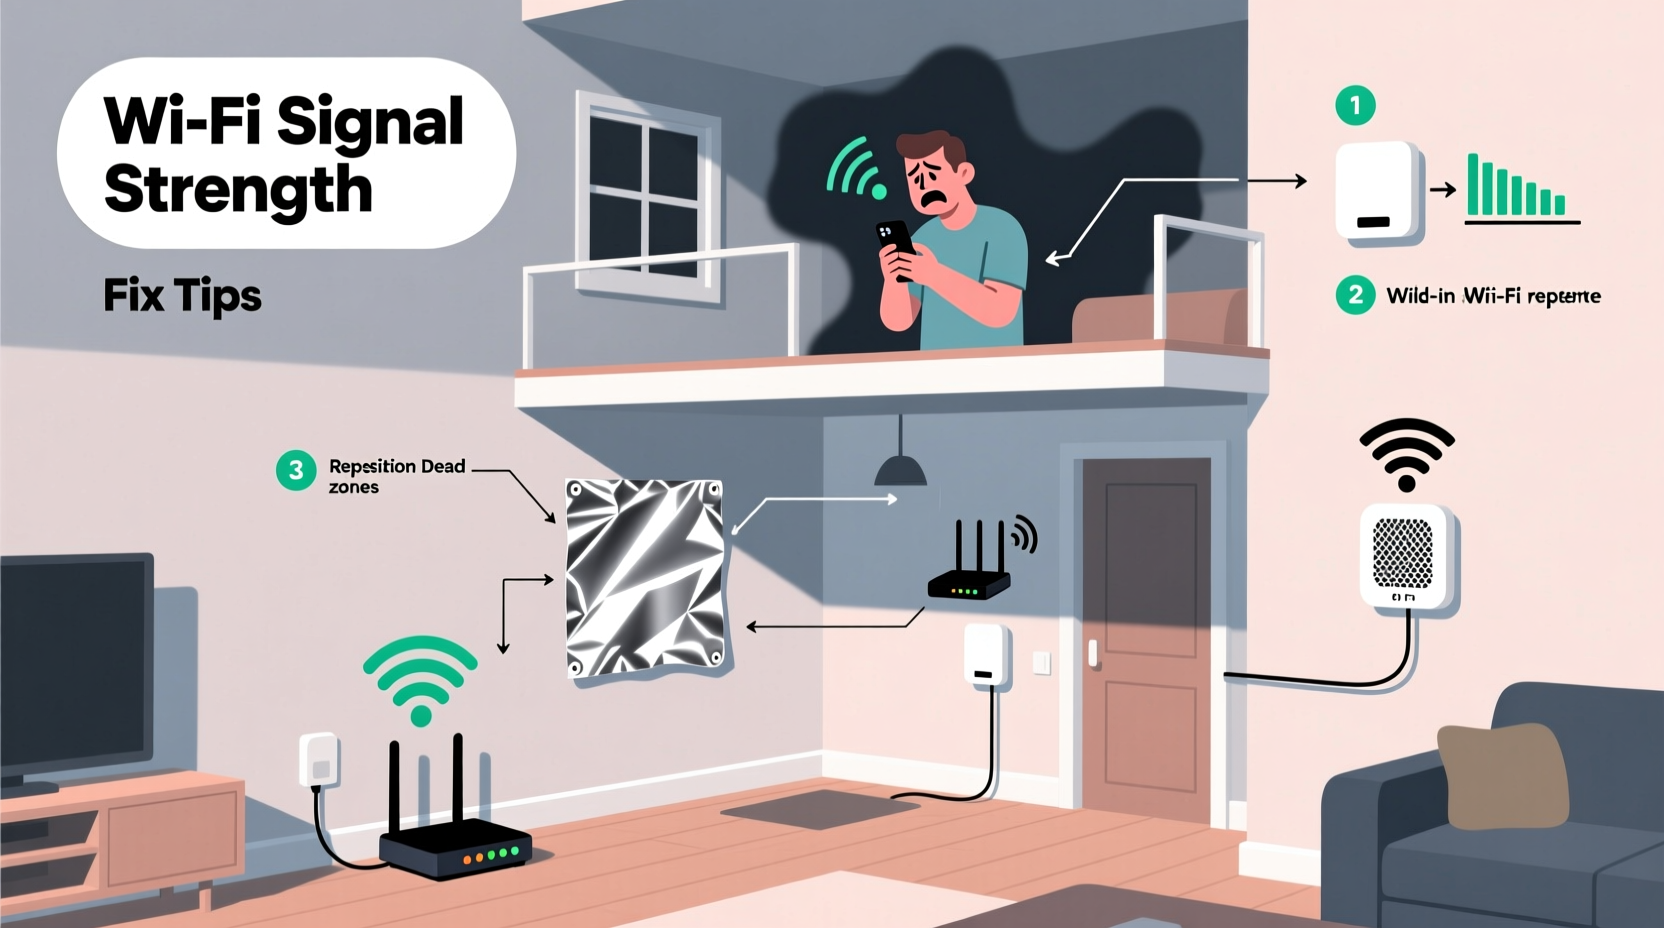
1. Reposition Your Router Strategically
The location of your router is the single biggest factor in coverage. Most people place it near their modem, often in a closet, basement, or behind furniture—places that block or weaken signals.
Ideally, place your router:
- In a central location, preferably on the first floor but elevated (e.g., on a shelf).
- Away from thick walls, large appliances, and metal objects.
- With antennas positioned vertically (if external) to maximize horizontal spread.
If possible, move the router closer to the stairs or install it midway between downstairs and upstairs to bridge the gap.
2. Use Aluminum Foil Reflectors (Yes, Really)
A DIY parabolic reflector made from cardboard and aluminum foil can direct your Wi-Fi signal upward. This low-cost hack focuses the omnidirectional broadcast toward the second floor instead of wasting energy behind the router.
- Cut a piece of cardboard into a curved shape (like a half-cylinder).
- Cover the inside with aluminum foil (shiny side out).
- Place it behind the router, curving forward around the antenna(s).
- Angle it slightly upward to push the signal toward the ceiling.
This won’t boost power, but it redirects existing signals more efficiently. Users report noticeable improvements in adjacent floors with this method alone.
3. Upgrade Firmware and Optimize Channel Settings
Old or outdated router firmware can cause inefficiencies, security flaws, and poor performance. Check your router manufacturer’s website for updates. Many models allow updates via a web interface (usually accessed by typing 192.168.1.1 or similar into a browser).
Also, consider changing your Wi-Fi channel:
- Use a free app like Wi-Fi Analyzer (Android) or NetSpot (Mac/Windows) to see which channels nearby networks are using.
- Switch your router to a less congested 2.4 GHz channel (preferably 1, 6, or 11).
- For 5 GHz, choose non-overlapping channels above 36 to avoid radar interference.
Reducing interference helps maintain stable speeds, especially during peak usage hours.
Budget-Friendly Hardware Hacks That Actually Work
Sometimes software tweaks aren’t enough. When repositioning and optimization fall short, consider these inexpensive hardware upgrades:
1. Use an Old Router as a Repeater (Free or $0 cost)
If you have an old router lying around, you can convert it into a Wi-Fi repeater using open-source firmware like DD-WRT or OpenWrt. This extends your network without buying new gear.
Steps to set up a DD-WRT repeater:
- Check if your old router is compatible with DD-WRT (visit dd-wrt.com/support/router-database).
- Flash the firmware via the router’s admin panel.
- Configure it in “Repeater” or “Repeater Bridge” mode.
- Place it halfway between your main router and the dead zone.
This creates a secondary access point that rebroadcasts your signal upstairs. It may take some technical effort, but once configured, it runs autonomously.
2. Invest in a Wi-Fi Extender Under $40
Not all extenders are created equal, but budget models from brands like TP-Link, Netgear, or Amazon Basics can effectively eliminate upstairs dead zones when properly placed.
Key tips:
- Don’t place the extender too far from the main router—ideally within strong signal range.
- Plug it directly into a wall outlet; avoid power strips that can interfere.
- Use the same SSID (network name) for seamless roaming, or separate names to control connections manually.
| Solution | Cost | Effectiveness | Best For |
|---|---|---|---|
| Router Relocation | $0 | ★★★★☆ | Homes with open layouts |
| Aluminum Foil Reflector | $1–$2 | ★★★☆☆ | Immediate directional boost |
| Old Router as Repeater | $0–$10 (cables) | ★★★★☆ | Tech-savvy users |
| Budget Wi-Fi Extender | $25–$40 | ★★★★☆ | Most households |
| Metal Mesh Signal Booster | $5–$10 | ★★★☆☆ | DIY enthusiasts |
3. Try a Canned Heat Trick (Seriously)
A lesser-known trick involves placing your router near a large empty metal can (like a coffee tin) lined with aluminum foil. The can acts as a waveguide, focusing signals in one direction. While not ideal for whole-home coverage, it can help beam a stronger signal up the stairs when angled correctly.
Real-Life Example: Fixing a Two-Story Home Without Spending a Dime
Consider Sarah, a remote worker living in a 1920s two-story house. Her router was in the basement near the cable entry point. Upstairs, her laptop struggled to load emails, and video calls frequently froze.
She couldn’t afford a mesh system, so she tried this sequence:
- Moved the router from the basement to a shelf on the first floor, centered near the staircase.
- Created an aluminum foil reflector shaped like a half-moon and placed it behind the router, angling upward.
- Changed her 2.4 GHz channel from 6 to 1 after discovering neighborhood congestion.
- Connected her laptop manually to the 2.4 GHz network instead of letting it auto-switch.
Result: Her upstairs signal improved from -78 dBm (poor) to -62 dBm (good), and Zoom calls stabilized. Total cost: $0. Time invested: under two hours.
Sarah’s case shows that strategic adjustments matter more than expensive gear.
Step-by-Step Action Plan to Fix Upstairs Wi-Fi
Follow this timeline to systematically eliminate dead zones:
- Day 1 – Assess & Measure
Use a Wi-Fi analyzer app to test signal strength upstairs. Note the current dBm reading (below -70 is weak). - Day 2 – Reposition Router
Move the router to a central, elevated spot on the lower floor. Keep it away from obstructions. - Day 3 – Optimize Settings
Log into your router settings. Update firmware, change to a less crowded channel, and ensure both bands are enabled. - Day 4 – Build a Signal Reflector
Create a foil-based reflector and position it to direct signals upstairs. - Day 5 – Test & Adjust
Re-measure signal strength. If still weak, consider setting up an old router as a repeater or purchasing a budget extender.
Within a week, most homes see measurable improvement without exceeding a $40 total spend.
FAQ
Can I use multiple Wi-Fi extenders cheaply?
Yes, but avoid chaining more than two. Each extender halves available bandwidth due to repeating overhead. Instead, focus on optimal placement of one well-positioned extender or repeater.
Why does my phone show full bars but slow internet?
Full bars indicate signal strength, not speed. You might have a strong but congested or interfered connection. Try switching to 2.4 GHz for reliability or rebooting your router to clear temporary issues.
Will a better router antenna help?
If your router has removable antennas, upgrading to high-gain models (5–9 dBi) can improve vertical reach. However, this only works if the internal radio supports it. For most users, repositioning is more effective than antenna upgrades.
Final Thoughts: Better Wi-Fi Starts With Smart Habits
Slow Wi-Fi upstairs isn’t a life sentence. It’s a solvable engineering challenge—one that doesn’t require deep pockets. By understanding how signals travel, making thoughtful adjustments, and leveraging low-cost tools, you can transform spotty connections into reliable coverage.
The key is starting small: reposition, optimize, redirect. These foundational steps often deliver 70–80% of the improvement you’d get from expensive solutions. Only after exhausting them should you consider pricier options.


 浙公网安备
33010002000092号
浙公网安备
33010002000092号 浙B2-20120091-4
Comments
No comments yet. Why don't you start the discussion?