
It’s a common frustration: your internet works perfectly in the living room downstairs, but when you head upstairs, streaming buffers, video calls lag, and downloads crawl. You’re not imagining it—WiFi signals often weaken significantly on upper floors. This isn’t just bad luck; it’s physics, building materials, and router placement combining to degrade performance where you need it most. The good news? Most of these issues are fixable with practical, low-cost solutions.
Understanding why WiFi weakens between floors allows you to make informed decisions about how to improve coverage. From structural interference to outdated hardware, several factors contribute to inconsistent signal strength. This guide breaks down the science behind the problem and provides a step-by-step approach to restoring fast, reliable WiFi throughout your home.
The Science Behind WiFi Signal Degradation Between Floors
WiFi operates using radio waves, typically on the 2.4 GHz or 5 GHz frequency bands. These waves travel through the air but interact poorly with dense materials like concrete, brick, metal, and even water (yes, including the water in your walls and body). When a signal moves from one floor to another, it must pass through multiple obstacles:
- Floor joists and subflooring
- Drywall, insulation, and vapor barriers
- Pipes, electrical wiring, and HVAC ducts
- Appliances and furniture
Each layer absorbs or reflects part of the signal. The higher the frequency, the worse the penetration. While 5 GHz offers faster speeds, it has shorter range and weaker wall/floor penetration compared to 2.4 GHz. So if your upstairs devices are connecting via 5 GHz, they may experience more dropouts despite being closer to optimal bandwidth.
“WiFi doesn’t travel through floors as efficiently as people assume. A single concrete slab can reduce signal strength by up to 90%.” — Dr. Alan Reed, RF Engineering Consultant
Additionally, interference from neighboring networks—especially in apartment buildings or densely populated neighborhoods—can further degrade performance. The combination of physical obstructions and electromagnetic noise creates a perfect storm for poor upstairs connectivity.
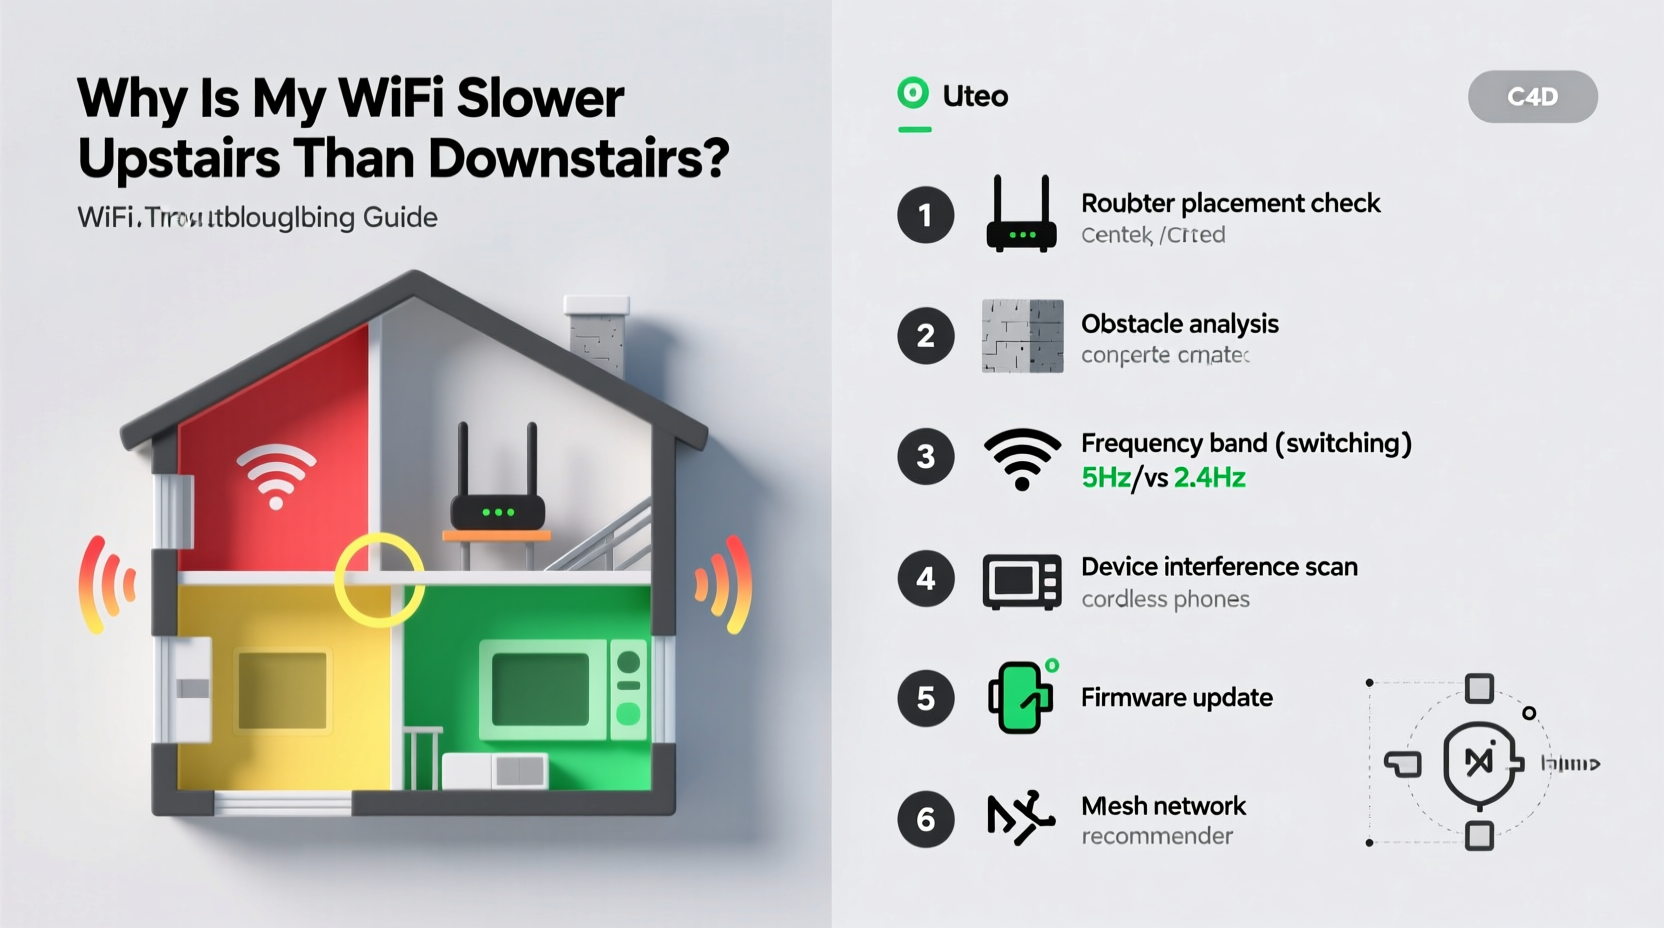
Step-by-Step Troubleshooting Guide
Before investing in new equipment, follow this logical sequence to diagnose and resolve the issue:
- Test your current speed both upstairs and downstairs. Use a tool like Speedtest.net or Fast.com to measure download, upload, and ping values at different locations. Note the differences.
- Check which band you're connected to. On your device, look for whether you're on 2.4 GHz or 5 GHz. Switch manually if possible and retest speeds.
- Restart your router and modem. Power cycle both devices by unplugging them for 30 seconds, then restarting. This clears temporary glitches.
- Reposition your router. Move it away from corners, metal objects, appliances, and thick walls. Elevate it off the ground and center it in your home if possible.
- Scan for interference sources. Cordless phones, baby monitors, microwaves, and Bluetooth devices operate on similar frequencies and can disrupt WiFi.
- Update your router’s firmware. Log into your router’s admin panel (usually via 192.168.1.1 or 192.168.0.1) and check for updates.
- Change your WiFi channel. In crowded areas, overlapping channels cause congestion. Use a WiFi analyzer app to find the least busy channel and set it manually in your router settings.
Do’s and Don’ts of Router Placement
| Do’s | Don’ts |
|---|---|
| Elevate the router (on a shelf or desk) | Place it on the floor or inside a cabinet |
| Center it in your home, ideally near the middle floor | Keep it in a basement or attic corner |
| Position antennas vertically for horizontal coverage | Lay antennas flat or point them randomly |
| Keep it away from large metal objects and appliances | Nestle it beside a refrigerator or microwave |
| Ensure ventilation to prevent overheating | Block airflow with books or clutter |
Solutions That Actually Work: Boosting Upstairs WiFi
If basic troubleshooting fails, consider upgrading your network infrastructure. Not all extenders and mesh systems are created equal, so choose based on your home’s layout and usage needs.
WiFi Extenders (Repeaters)
A WiFi extender picks up your existing signal and rebroadcasts it. They’re affordable and easy to install but have limitations: they halve bandwidth because they use the same channel to receive and transmit. Best used in small homes or as a temporary fix.
Mesh WiFi Systems
Mesh networks use multiple nodes placed throughout the house to create a seamless, unified WiFi zone. Unlike extenders, mesh systems use dedicated backhaul channels (some even use tri-band radios), preserving speed. Brands like Google Nest Wifi, Eero, and TP-Link Deco offer strong coverage for multi-story homes.
Powerline Adapters with WiFi
These devices send internet signals through your home’s electrical wiring. One adapter plugs near your router and connects via Ethernet; another plugs in upstairs and broadcasts WiFi. Effective in older homes where wireless signals struggle, though performance depends on circuit quality.
Access Points (APs) with Ethernet Backhaul
For maximum performance, install a wired access point upstairs connected directly to your router via Ethernet cable. This bypasses wireless limitations entirely. Requires running cables, but delivers full-speed, low-latency WiFi on the upper floor.
Real-World Example: Fixing a Two-Story Home’s WiFi
Consider Sarah, who lives in a 1920s two-story colonial house. Her router sat in the basement family room, surrounded by stone foundation walls. Downstairs, her phone showed full bars and 150 Mbps speeds. Upstairs in the master bedroom, the signal dropped to one bar, and video calls frequently froze.
She followed the troubleshooting steps: moved the router to the main floor closet, updated firmware, and changed to a less congested channel. Speed improved slightly, but still only reached 30 Mbps upstairs.
Next, she invested in a mesh system—two-node Eero setup. She placed the primary unit near the modem and the second node halfway up the staircase. After setup, her upstairs speed jumped to 110 Mbps with consistent signal. Streaming, gaming, and remote work became smooth and reliable.
This case illustrates that while placement helps, older homes with thick walls often require modern networking solutions for full coverage.
Checklist: How to Improve Upstairs WiFi Performance
- ✅ Test internet speeds on both floors using a reliable speed test tool
- ✅ Restart your router and modem to clear temporary issues
- ✅ Reposition the router to a central, elevated, unobstructed location
- ✅ Identify and minimize sources of interference (microwaves, cordless phones)
- ✅ Switch to the 2.4 GHz band temporarily for better penetration
- ✅ Update router firmware through the admin interface
- ✅ Change WiFi channel to avoid congestion (use apps like NetSpot or WiFi Analyzer)
- ✅ Install a mesh WiFi system or range extender if needed
- ✅ Consider powerline adapters if wiring is impractical
- ✅ For best results, install a wired access point upstairs via Ethernet
Frequently Asked Questions
Why is my WiFi strong downstairs but weak upstairs?
Signals weaken when passing through floors, especially those made of concrete, wood, or insulation. Additional interference from appliances and neighboring networks compounds the issue. The 5 GHz band, while faster, penetrates walls poorly, making upstairs connections unstable.
Will a WiFi extender solve my upstairs speed issues?
It can help, but with trade-offs. Extenders rebroadcast the signal, often reducing bandwidth by half. They also create a separate network name (SSID) unless configured otherwise. For better performance, a mesh system or wired access point is recommended.
Can I use my own router with a mesh system?
Yes, but only if it supports bridge mode or AP mode. Otherwise, you risk double NAT conflicts. Many users disable the built-in WiFi on their ISP-provided router and connect the mesh system via Ethernet for optimal control and performance.
Conclusion: Take Control of Your Home Network
Slow WiFi upstairs isn’t inevitable—it’s a solvable engineering challenge. By understanding how signals behave and applying strategic fixes, you can achieve consistent, high-speed internet on every floor of your home. Start with simple adjustments like router placement and channel optimization. If those fall short, invest in a mesh system or wired solution tailored to your space.
Don’t settle for buffering videos or dropped Zoom calls. A few hours of troubleshooting and a modest investment can transform your connectivity and digital experience. Your upstairs rooms deserve the same reliable internet as the rest of your home.


 浙公网安备
33010002000092号
浙公网安备
33010002000092号 浙B2-20120091-4
Comments
No comments yet. Why don't you start the discussion?