
Sourdough bread has become a symbol of artisanal baking—a crusty, tangy loaf that seems to radiate health and craftsmanship. But behind its rustic charm lies a process that humbles even experienced bakers. Unlike commercial yeast breads, sourdough relies entirely on wild fermentation, making it unpredictable, sensitive, and deeply dependent on environment and timing. Many beginners dive in with enthusiasm only to end up with dense bricks, collapsed loaves, or starters that refuse to rise. The truth is, sourdough isn’t inherently difficult—but it does demand attention to detail, patience, and an understanding of its unique biology.
The challenges aren’t just technical; they’re also psychological. Sourdough doesn’t conform to rigid schedules. It responds to temperature, hydration, flour quality, and microbial balance. When things go wrong—and they often do—it’s rarely due to one single mistake. Instead, failure usually stems from a chain of small oversights. By identifying the most common pitfalls, you can move beyond frustration and start producing loaves that are not only edible but exceptional.
The Science Behind the Struggle
Sourdough is a living system. At its core is a starter—a mixture of flour and water teeming with wild yeast and lactic acid bacteria. These microorganisms feed on starches, producing carbon dioxide (which leavens the bread) and organic acids (which give sourdough its distinctive flavor). This natural fermentation is slower and less predictable than using commercial yeast, which is why sourdough feels like more of a craft than a recipe.
The difficulty begins here: unlike a packet of instant yeast, your starter is alive and variable. Its strength depends on how recently it was fed, what kind of flour it's made from, ambient temperature, and even the microbes present in your kitchen. A weak or underfed starter won't produce enough gas to lift the dough, leading to flat, dense bread. On the other hand, an overripe starter introduces too much acidity, weakening gluten structure and causing collapse.
Temperature plays a critical role. Yeast activity doubles roughly every 10°C (18°F) increase in temperature. In a cold kitchen, fermentation slows dramatically. In a warm one, it accelerates—sometimes too quickly. Beginners often misjudge bulk fermentation time because they rely on the clock rather than observing physical cues like volume increase and bubble formation.
“Sourdough doesn’t follow recipes—it follows rhythms. Learning to read the dough is more important than memorizing steps.” — Ken Forkish, author of *The Elements of Pizza* and sourdough expert
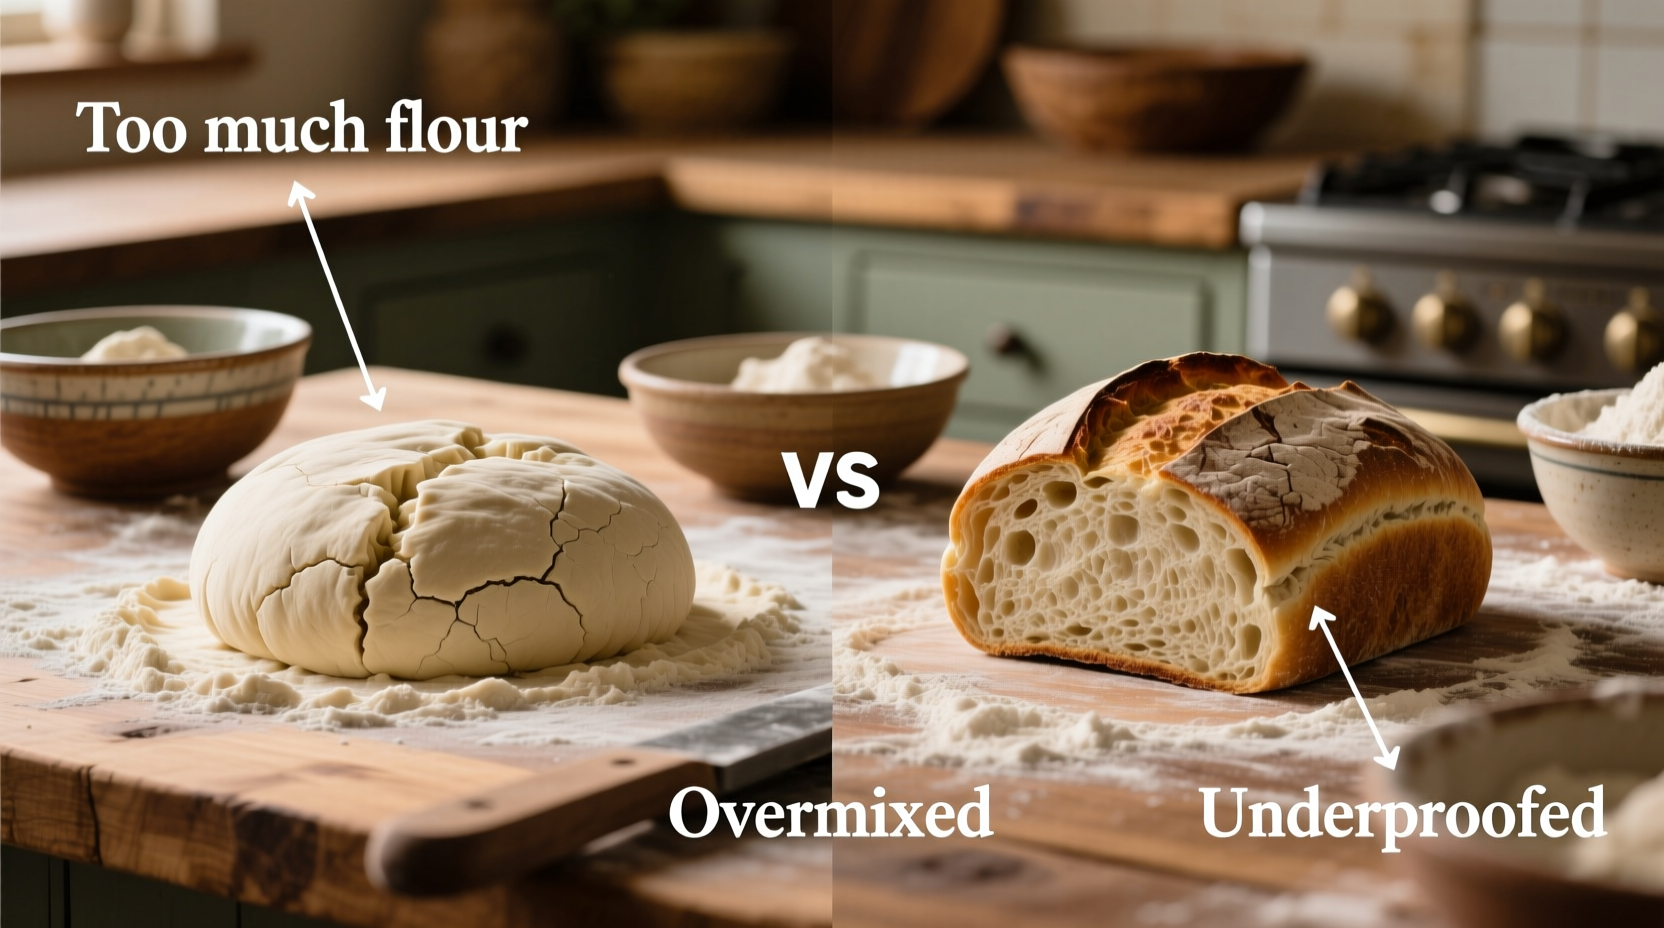
Top 5 Common Mistakes Beginners Make
1. Using an Immature or Unhealthy Starter
One of the most frequent reasons for failed sourdough is baking with a starter that isn’t ready. A new starter may look bubbly after a few days, but appearance can be deceiving. True maturity takes 7–14 days of consistent feeding and requires a stable population of both yeast and bacteria. An immature starter lacks the strength to leaven bread effectively.
Even established starters can falter if neglected. Refrigerating a starter without proper revival, skipping feeds, or using chlorinated water can all weaken microbial activity. Baking with a sluggish starter leads to poor rise and lackluster flavor.
2. Incorrect Hydration Levels
Hydration refers to the ratio of water to flour in a dough, expressed as a percentage. A 75% hydration dough means 75g of water per 100g of flour. High hydration (70%+) creates an open crumb but is harder to handle. Low hydration (<65%) yields a denser loaf that’s easier to shape.
Beginners often copy popular recipes without adjusting for flour type. Whole grain flours absorb more water than white flour. If you substitute whole wheat for all-purpose without increasing water, the dough becomes dry and stiff, limiting expansion during baking.
Conversely, adding too much water without developing sufficient gluten strength results in a slack dough that spreads instead of rising. Mastering hydration requires practice and adaptation to your ingredients and climate.
3. Underdeveloped Gluten Structure
Gluten is the protein network that traps gas and allows dough to rise. In sourdough, where fermentation is long and slow, gluten development must happen early—during mixing and bulk fermentation. Without adequate strength, the dough collapses under its own weight.
Many beginners mix the dough briefly and assume fermentation will do the rest. But while fermentation enhances flavor and texture, it doesn’t build structure. Techniques like coil folds or stretch-and-folds every 30 minutes during the first two hours of bulk fermentation help align gluten strands and create resilience.
4. Poor Shaping Technique
Shaping isn’t just about aesthetics—it’s functional. A well-shaped loaf has surface tension that helps it hold its form during proofing and oven spring. Poor shaping leads to flat, pancake-like loaves.
Common errors include tearing the dough surface, not degassing properly before shaping, or failing to tighten the skin during final shaping. Beginners often rush this step or avoid handling the dough for fear of “killing” it. In reality, gentle but confident handling is essential.
5. Inadequate Oven Spring Preparation
Oven spring—the rapid rise during the first 15 minutes of baking—is crucial for achieving height and openness in the crumb. It requires three elements: strong dough structure, sufficient gas retention, and steam in the oven.
Many home ovens lack the steam injection systems of professional decks. Without steam, the crust sets too quickly, restricting expansion. Similarly, scoring the loaf improperly—or not at all—prevents controlled expansion and can cause blowouts on the sides.
Do’s and Don’ts: Sourdough Success Checklist
| Do | Don’t |
|---|---|
| Feed your starter regularly and use it at peak activity (4–8 hours after feeding) | Use a starter straight from the fridge without refreshing it |
| Weigh ingredients with a digital scale for accuracy | Rely on cup measurements, which vary significantly |
| Perform stretch-and-folds every 30 minutes during early bulk fermentation | Mix once and walk away, expecting magic |
| Proof in a banneton (proofing basket) to support shape | Let shaped dough sit uncovered on a flat surface |
| Bake in a preheated Dutch oven to trap steam | Bake on a bare tray without steam generation |
| Score the loaf deeply (½ inch) with a sharp blade | Use a dull knife or skip scoring altogether |
A Realistic Beginner Journey: Maria’s First Loaf
Maria, a home cook in Portland, decided to try sourdough during a weekend off. She followed a popular online recipe: equal parts flour and water, fed daily for a week. On day eight, her starter bubbled vigorously, so she assumed it was ready. She mixed the dough, let it ferment for 12 hours, shaped it loosely, and baked it in a cold Dutch oven.
The result? A dense, gummy loaf with no oven spring and a sour taste bordering on vinegar. Discouraged, she almost gave up—until she reviewed each step.
She learned her starter, while bubbly, wasn’t strong enough. After switching to twice-daily feedings with whole rye flour, it passed the float test consistently. She began using a scale, added four sets of coil folds, and started preheating her Dutch oven for at least 45 minutes. Her second attempt still wasn’t perfect, but the third loaf had a crisp crust, an open crumb, and a balanced tang.
Maria’s story reflects a universal truth: sourdough mastery is iterative. Each failure teaches something vital. The key is analyzing what went wrong—not blaming yourself.
Step-by-Step Guide to Avoiding Common Pitfalls
- Day 1–7: Build a Strong Starter
Create a 1:1:1 mix of filtered water, whole grain flour (rye or whole wheat), and all-purpose flour. Feed twice daily at room temperature. Discard half before each feed. Look for consistent doubling within 6–8 hours. - Day 8+: Test & Use Your Starter
When your starter reliably rises and falls, perform a float test. Use it when it’s at peak volume—usually 6–8 hours after feeding. - Mix Dough with Precision
Weigh all ingredients. Autolyse (rest) flour and water for 30–60 minutes before adding salt and starter to improve gluten development. - Bulk Fermentation: Watch, Don’t Clock
Allow dough to rise at room temperature (72–78°F) for 4–6 hours, performing 3–4 sets of stretch-and-folds in the first half. Stop when the dough has increased by ~50%, shows bubbles, and jiggles like jelly. - Shape with Tension
Pre-shape into a round, rest 20–30 minutes, then final shape with tight surface tension. Place seam-side up in a floured banneton. - Final Proof: Choose Wisely
Proof at room temperature for 1–2 hours, or refrigerate overnight (cold retard) for better flavor and easier handling. - Bake for Maximum Oven Spring
Preheat Dutch oven at 450°F for 45 minutes. Score loaf deeply, transfer carefully, cover, and bake 20 minutes. Uncover and bake 20–25 more minutes until deep golden brown.
Frequently Asked Questions
Why is my sourdough bread so dense?
Density usually results from insufficient gas production or poor oven spring. Check your starter’s strength, ensure proper gluten development through folding, and verify your bulk fermentation time. Under-proofing or over-proofing can both lead to dense crumb.
Can I use all-purpose flour for sourdough?
Yes, all-purpose flour works well, especially for beginners. It has moderate protein content (around 10–12%), which balances strength and extensibility. For more complex flavor, gradually introduce whole grains like whole wheat or rye in small percentages (10–20%).
How do I know when my dough is over-proofed?
An over-proofed dough feels fragile, collapses when touched, and lacks elasticity. During baking, it spreads out instead of rising. To prevent this, shorten bulk fermentation or use colder water. Cold retarding in the fridge slows fermentation and reduces risk.
Mastering the Process, One Loaf at a Time
Sourdough bread isn’t hard because it’s complicated—it’s challenging because it’s alive. It resists automation, defies exact replication, and demands presence. The same recipe behaves differently in winter versus summer, in Denver versus Miami, in a drafty kitchen versus a warm pantry. That variability is not a flaw; it’s the essence of the craft.
The mistakes beginners make are not failures—they’re necessary feedback. Each collapsed loaf teaches about gluten, each sour bite reveals fermentation imbalance, and each successful rise builds confidence. The journey from beginner to skilled baker isn’t linear, but cumulative. It’s measured not in perfection, but in progress.
With the right knowledge, tools, and mindset, anyone can make great sourdough. Start small. Focus on one variable at a time. Trust the process, observe the dough, and keep baking.


 浙公网安备
33010002000092号
浙公网安备
33010002000092号 浙B2-20120091-4
Comments
No comments yet. Why don't you start the discussion?