
When upgrading your vehicle with enhanced visibility for safer reversing, two popular options stand out: wireless backup cameras and rearview mirror displays. Both offer valuable safety improvements, but they differ significantly in installation complexity. For drivers who prefer DIY solutions or want to avoid costly professional labor, understanding the ease of installation between these systems is crucial. This article breaks down each option’s setup process, required tools, common challenges, and overall accessibility—so you can make an informed decision based on your technical comfort level and vehicle type.
Understanding the Core Differences
Before diving into installation, it's essential to understand what sets wireless backup cameras and rearview mirror display systems apart at a functional level.
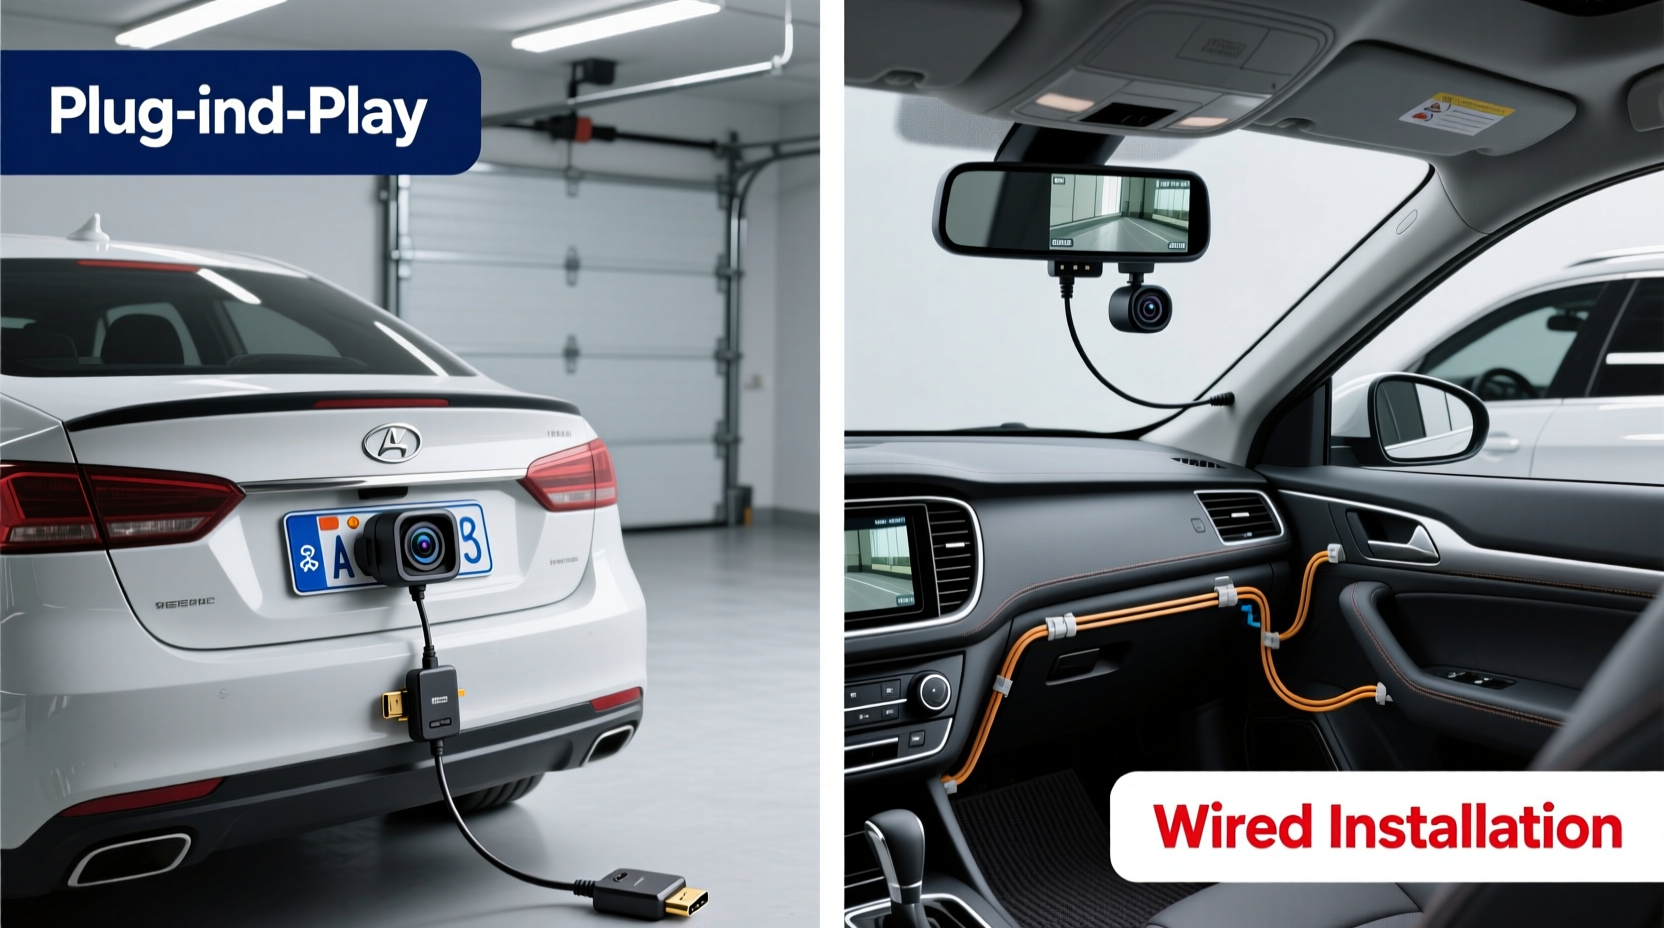
A wireless backup camera typically consists of a standalone camera mounted on the rear of the vehicle (often near the license plate or tailgate) that transmits video via Wi-Fi or radio frequency to a separate monitor placed inside the cabin—commonly on the dashboard or windshield. The key feature here is the absence of a physical video cable between the camera and display unit.
In contrast, a rearview mirror display integrates a digital screen directly into the existing rearview mirror housing. When reverse gear is engaged, the mirror switches from reflecting the rear window to showing a live feed from a connected backup camera. While some models are wireless, many still require wired connections for both power and video signal transmission from the camera to the mirror unit.
The integration level is the primary differentiator: mirror displays aim to replace or enhance an existing component, while wireless backup cameras add a new element to your interior setup.
Installation Complexity: Step-by-Step Breakdown
Wireless Backup Camera Installation
Installing a wireless backup camera generally follows this sequence:
- Mount the camera: Attach the camera to the rear of the vehicle using adhesive, screws, or a license plate bracket. Choose a location with a clear view and protection from direct rain exposure.
- Power the camera: Connect the camera’s power wire to a reverse light circuit. This ensures the camera activates only when the vehicle is in reverse. Splicing into the reverse light wiring usually requires stripping insulation, twisting wires together, and securing them with wire connectors or soldering.
- Install the monitor: Place the display unit on the dashboard or suction-cup it to the windshield. Route the power cord to the cigarette lighter or hardwire it to the fuse box if preferred.
- Pair devices: Turn on the system and pair the camera with the monitor following the manufacturer’s instructions—usually automatic, but sometimes requiring manual syncing.
This process typically takes 30 to 60 minutes for someone with basic hand tools and minimal electrical experience. Most kits come with detailed diagrams and color-coded wires, reducing confusion.
Rearview Mirror Display Installation
The installation of a rearview mirror display is more involved due to its integration with existing components:
- Remove the original mirror: Carefully detach the factory mirror from the windshield mount. This often involves gently prying off a plastic cover and unscrewing or unclipping the base.
- Route camera wiring through the vehicle: Run the camera cable from the rear bumper, through the trunk liner, along the roof lining, down the A-pillar, and into the cabin near the mirror. This step requires removing trim panels and feeding wires through tight spaces—a task that can be time-consuming and frustrating without proper tools like a fish tape.
- Connect camera to display: Link the video output from the rear camera to the input port on the back of the mirror unit. If the system isn’t truly wireless, this connection will be physical (e.g., RCA or proprietary connector).
- Power the mirror unit: Connect the mirror’s power wires to a constant and switched source—often tapped from the fuse box or headlight switch—to maintain functionality as both a mirror and display.
- Reinstall and test: Secure the new mirror onto the windshield mount and verify all features work: rear camera activation in reverse, ambient light sensing, and daytime mirror clarity.
Depending on the vehicle model and routing difficulty, this process can take anywhere from 1.5 to 3 hours—even for experienced DIYers. Some high-end models integrate with factory infotainment systems, adding software pairing steps that may require coding tools or dealership access.
Comparative Analysis: What Makes One Easier Than the Other?
To evaluate ease of installation objectively, consider four key factors: wiring complexity, physical access, tool requirements, and risk of damage.
| Factor | Wireless Backup Camera | Rearview Mirror Display |
|---|---|---|
| Wiring Needs | Minimal; only power wires for camera and monitor | Extensive; full run from rear to front, plus power and video connections |
| Trim Removal | None or minimal (only at rear) | Required (trunk, roof lining, pillars) |
| Tools Required | Screwdriver, wire stripper, electrical tape | Fish tape, trim removal tools, multimeter, possibly soldering iron |
| Installation Time | 30–60 minutes | 1.5–3+ hours |
| Risk of Damage | Low (external mounting) | Moderate to high (interior trim, paint, glass) |
| Technical Skill Level | Beginner-friendly | Intermediate to advanced |
From this comparison, the advantage in ease of installation clearly favors wireless backup cameras. Their modular design allows users to avoid invasive procedures and complex routing. Rearview mirror displays, while sleeker and less obtrusive once installed, demand greater precision and patience during setup.
Real-World Example: Two Drivers, Two Experiences
Consider the experiences of two car owners installing similar systems in identical SUVs.
Case Study: Sarah installs a wireless backup camera
Sarah, a first-time installer with no prior automotive experience, purchased a budget-friendly wireless kit online. She watched a 10-minute YouTube tutorial, gathered her tools, and began working after work. She mounted the camera using the included bracket, spliced into the reverse light wire using butt connectors, and plugged the monitor into the 12V socket. Total time: 45 minutes. No trim was removed, and she reported feeling confident throughout the process.
Case Study: James installs a rearview mirror display
James, mechanically inclined but not an electrician, opted for a premium mirror display to maintain a clean interior look. He spent over two hours routing the camera cable from the rear bumper up through the trunk, across the roof, and down to the mirror. He accidentally cracked a plastic clip during trim removal and had to order a replacement. Though satisfied with the final result, he admitted the job was “more involved than expected” and would recommend professional help for most users.
These scenarios highlight how user background and expectations shape the installation experience. For simplicity and speed, wireless systems win decisively.
Expert Insight: What Technicians Recommend
“While integrated mirror displays offer superior aesthetics and usability, we see far more warranty claims related to improper installation—especially damaged trim and faulty wire routing. For the average consumer, a well-designed wireless system provides 90% of the benefit with 50% of the effort.” — Mark Reynolds, ASE-Certified Auto Electrician with 18 years of experience
Professional installers consistently emphasize that convenience should not be underestimated. A system that’s easy to set up correctly the first time reduces long-term reliability issues caused by poor connections or stress on wiring.
Actionable Checklist: Preparing for Your Installation
Whether you choose a wireless camera or mirror display, use this checklist to ensure a smooth process:
- ✅ Read the full instruction manual before starting
- ✅ Gather necessary tools: screwdrivers, wire strippers, crimp connectors, electrical tape, multimeter
- ✅ Test the camera and display before final mounting
- ✅ Identify the correct reverse light wire using a test light or multimeter
- ✅ Plan cable routes to minimize visibility and prevent snagging
- ✅ Label wires during disassembly to avoid confusion
- ✅ Double-check all connections for tightness and insulation
- ✅ Clean surfaces thoroughly before applying adhesives
Frequently Asked Questions
Can I install a rearview mirror display without removing interior panels?
No—not if it requires a wired camera connection. The cable must travel from the rear of the vehicle to the front, which means going through or behind trim panels. Truly wireless mirror displays exist but are rare and may suffer from signal interference.
Do wireless backup cameras have lag or interference issues?
Lower-quality models can experience slight delays (up to half a second) or static in areas with heavy wireless traffic. However, modern 5.8GHz systems offer stable performance in most conditions. Always check reviews for mentions of signal reliability.
Will either system void my vehicle warranty?
Generally, no—unless damage occurs during installation. According to the Magnuson-Moss Warranty Act, manufacturers cannot void a warranty simply because an aftermarket part is installed, provided it doesn’t cause the failure being repaired.
Final Recommendation: Matching Solution to Skill Level
If your priority is quick, hassle-free installation with minimal risk, a wireless backup camera is the better choice. It offers plug-and-play simplicity, broad compatibility, and flexibility in monitor placement. It’s ideal for renters, older vehicles, or anyone uncomfortable opening up their car’s interior.
Conversely, if you value seamless integration, a clutter-free dashboard, and plan to keep the vehicle long-term, investing in a rearview mirror display makes sense—even if it means spending extra time or hiring a professional for installation.
Technology has made both options more accessible than ever, but the fundamental trade-off remains: convenience versus integration. For most drivers, especially those new to automotive upgrades, starting with a wireless backup camera provides a rewarding entry point into vehicle safety tech—without the frustration.


 浙公网安备
33010002000092号
浙公网安备
33010002000092号 浙B2-20120091-4
Comments
No comments yet. Why don't you start the discussion?