


Top categories

Baby Food

Kids Accessories

Promotional Toys

Baby Supplies & Products

Baby Care

Blocks & Model Building Toys

Baby Clothing

Puzzle & Games

Toddler Clothing
Baby Furniture

Maternity Clothes

Kids Shoes

Balloons

Stuffed Animals & Plush Toys

Toy Vehicle

Outdoor Toys & Structures
About products and suppliers
Introduction
Embarking on a DIY project can be a thrilling experience, but it requires the right tools and knowledge to ensure success. One such indispensable tool is the circular saw, a versatile device that can make your woodworking tasks significantly easier. This comprehensive guide will walk you through the basics of a circular saw, its various types, key components, and their functions. We will also delve into the crucial safety measures to observe, how to maintain your circular saw, and the techniques to master for effective cutting. Whether you're a seasoned DIY enthusiast or a beginner, this guide will equip you with the necessary knowledge to use a circular saw effectively and safely.
Understanding the Basics of a Circular Saw
A circular saw is a versatile tool essential for DIY projects. Its primary function is to make straight cuts on lumber. The base of the circular saw, known as the shoe, rests on the material being cut. For a regular straight cut, the shoe and the blade are at a 90-degree angle. The angle can be adjusted to make a bevel cut. Understanding its parts and their functions makes using a circular saw easier and more efficient.
Different Types of Circular Saws
There are various types of circular saws available on the market, each designed for specific tasks. Some are powerful tools for heavy-duty tasks, while others are cordless saws offering mobility and convenience. There are also compact and lightweight models, ideal for smaller jobs. Some circular saws are designed for concrete work, while others are ideal for woodworking. Choosing the right type depends on your specific needs and the nature of your project.
Key Components and Their Functions
Each circular saw model has unique components that enhance its functionality. For instance, some models are lightweight and perfect for household tasks. Others offer precision with their laser and depth adjustment system. Some models are two-in-one sanding stations with an adjustable tabletop and belt angle. There are also models that minimize water splash, allowing for indoor use. Each model has specific features designed to optimize performance and ease of use.
Safety Measures When Using a Circular Saw
Before starting to cut with a circular saw, certain safety measures should be taken. It's crucial to understand how to work safely with a circular saw and what to avoid when cutting. Be aware of electrical hazards and know when lockout is required to control electrical or other energized hazards. Although every effort is made to ensure safety, it's important to stay informed and cautious.
Personal Protective Equipment (PPE)
When operating a circular saw, wearing proper Personal Protective Equipment (PPE) is crucial. Eye protection, such as goggles or safety glasses with side protection, is a must. Depending on the task, face protection may also be recommended. Closed-toed work shoes with a good tread provide stability. Dust masks and hearing protection may be necessary, especially when cutting materials that generate dust. Remember, safety should never be compromised when using power tools like a circular saw.
Safe Operating Procedures
The circular saw is perhaps the most commonly used and abused power saw among professional tradesmen. Familiarity should not breed carelessness. The following are specific safety 'musts' when using any portable circular saw. Not doing so is considered dangerous. Kickback is a sudden reaction to a pinched blade, causing an uncontrolled portable tool to lift up and out of the work piece toward the operator. Kickback is the result of tool misuse and/or incorrect operating procedures or conditions. Take these specific precautions to help prevent kickback when using any type of circular saw.
Maintaining Your Circular Saw
Maintaining your circular saw is crucial for its longevity and performance. Regularly check the tool's tightening, including the shoe, handles, and blade arbor bolt. Ensure the oil level is as recommended by the manufacturer to avoid gear wear and motor strain. Keep your circular saw dust-free by using compressed air to clean the inner brushes and internal parts. The 'shoe' or 'base plate' should be free from gnarled metal that can snag on the material and bind. Regular maintenance will keep your circular saw running like new.
Routine Cleaning and Inspection
Maintaining your circular saw involves routine cleaning and inspection. Over time, sawdust accumulates in the body’s crevices and vents. Use compressed air to clean off the inner brushes and internal parts of the saw. Also, check the oil level in your circular saw. Be careful not to use an oil type or amount different than what the manufacturer recommends, as this could void your warranty. A well-lubricated circular saw performs optimally. Under-oiled saws can wear down the gears, strain the motor, and shorten the life of your circular saw.
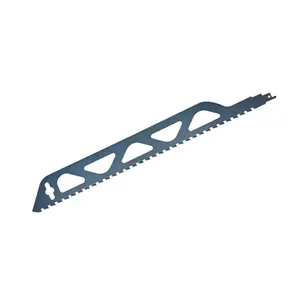
Replacing Blades and Parts
Replacing blades on a circular saw can sometimes be a challenge, especially if the model doesn't have a spindle lock. A common method is using a Phillips screwdriver through one of the holes in the blade to secure it while adjusting the blade nut. However, if the blade doesn't have holes, you can use a heavy rag, glove, or a vise-clamp to secure the blade. Remember, the bolt is often reverse threaded, so be careful not to tighten it further. If these methods fail, consider using a special wrench to hold the hexagonal piece on the shaft near the motor while unscrewing the nut.
Mastering Cutting Techniques
Mastering cutting techniques with a circular saw involves understanding different cuts. Straight cuts require aligning the blade and keeping it on track. If the saw wanders, stop, let the blade stop spinning, then start again. Bevel cuts, or angled cuts, are easier to start by retracting the blade guard. Once a few inches into the cut, slowly release the blade guard. For plunge cuts, or rip cuts, hold the board in place while you rip it. A good alternative to clamping is to tack the board down to your sawhorses. Remember, practice makes perfect.
Straight Cuts
A circular saw can't make perfectly straight cuts by itself. It needs assistance from a fence or cutting guide. There are several ways to make straight cuts with a circular saw: using a speed square, a DIY circular saw cutting guide, or a commercial cutting guide. These tools help the saw make straight, accurate cuts, enhancing the precision of your DIY projects.
Bevel Cuts
Cutting bevels beyond the 45° limit of a circular saw can be challenging. Consider building a fence with a 90° bracket that allows you to set the angle as desired. The saw runs along the top of the bracket with the blade set to match the desired bevel and depth. If the work piece is large, the attachment to the saw could be L-shaped and hook over the back side of the bracket.
Plunge Cuts
Plunge cuts are a vital technique when using a circular saw. To perform a plunge cut, position the saw on the rear stop, switch it on, and slowly lower it into the material. Then, saw up to the second stop. Once reached, carefully remove the saw. Repeat as needed. For short sides, a jigsaw is recommended as they're not long enough for a plunge cut using the circular saw. The plunge cut must be finished at the corners using the jigsaw. This technique allows for the perfect cut-out for applications like ventilation grilles.
Conclusion
Mastering the use of a circular saw can significantly enhance your DIY projects, making them more efficient and enjoyable. Understanding the different types of circular saws, their components, and their functions is key to choosing the right tool for your task. Prioritizing safety measures and maintaining your tool will ensure longevity and safe operation. Mastering different cutting techniques, from straight cuts to bevel and plunge cuts, will allow you to tackle a variety of projects with precision and confidence. Remember, practice is key, and with time, you'll find yourself handling the circular saw like a pro, bringing your DIY projects to life with ease and efficiency.

Trade Assurance
Source on Alibaba.com
Sell on Alibaba.com


 浙公网安备 33010002000092号
 浙B2-20120091-4