
Knowing your computer’s exact hardware and software configuration is essential whether you're upgrading components, troubleshooting performance issues, installing new software, or selling your machine. While many users rely on basic system information, a thorough understanding of your specs requires deliberate exploration across multiple layers of your device. This guide walks you through each method available on Windows, macOS, and Linux to extract accurate, detailed specifications—no guesswork involved.
Why Accurate System Information Matters
Manufacturers often provide generic labels like “Intel Core i5” or “8GB RAM,” but those don’t reveal critical details such as generation, speed, or memory type. For example, an Intel Core i5 from 2013 performs significantly worse than one from 2022, even if both are labeled the same. Similarly, DDR3 and DDR4 RAM have different speeds and compatibility requirements. Without precise data, you risk buying incompatible upgrades or misdiagnosing problems.
“Accurate system specs are the foundation of any smart upgrade or repair decision.” — David Lin, Senior Hardware Analyst at TechInsight Labs
Beyond upgrades, developers, IT professionals, and gamers need exact GPU models, driver versions, and thermal behavior to ensure compatibility and optimize performance. Relying solely on pre-installed labels can lead to costly mistakes.
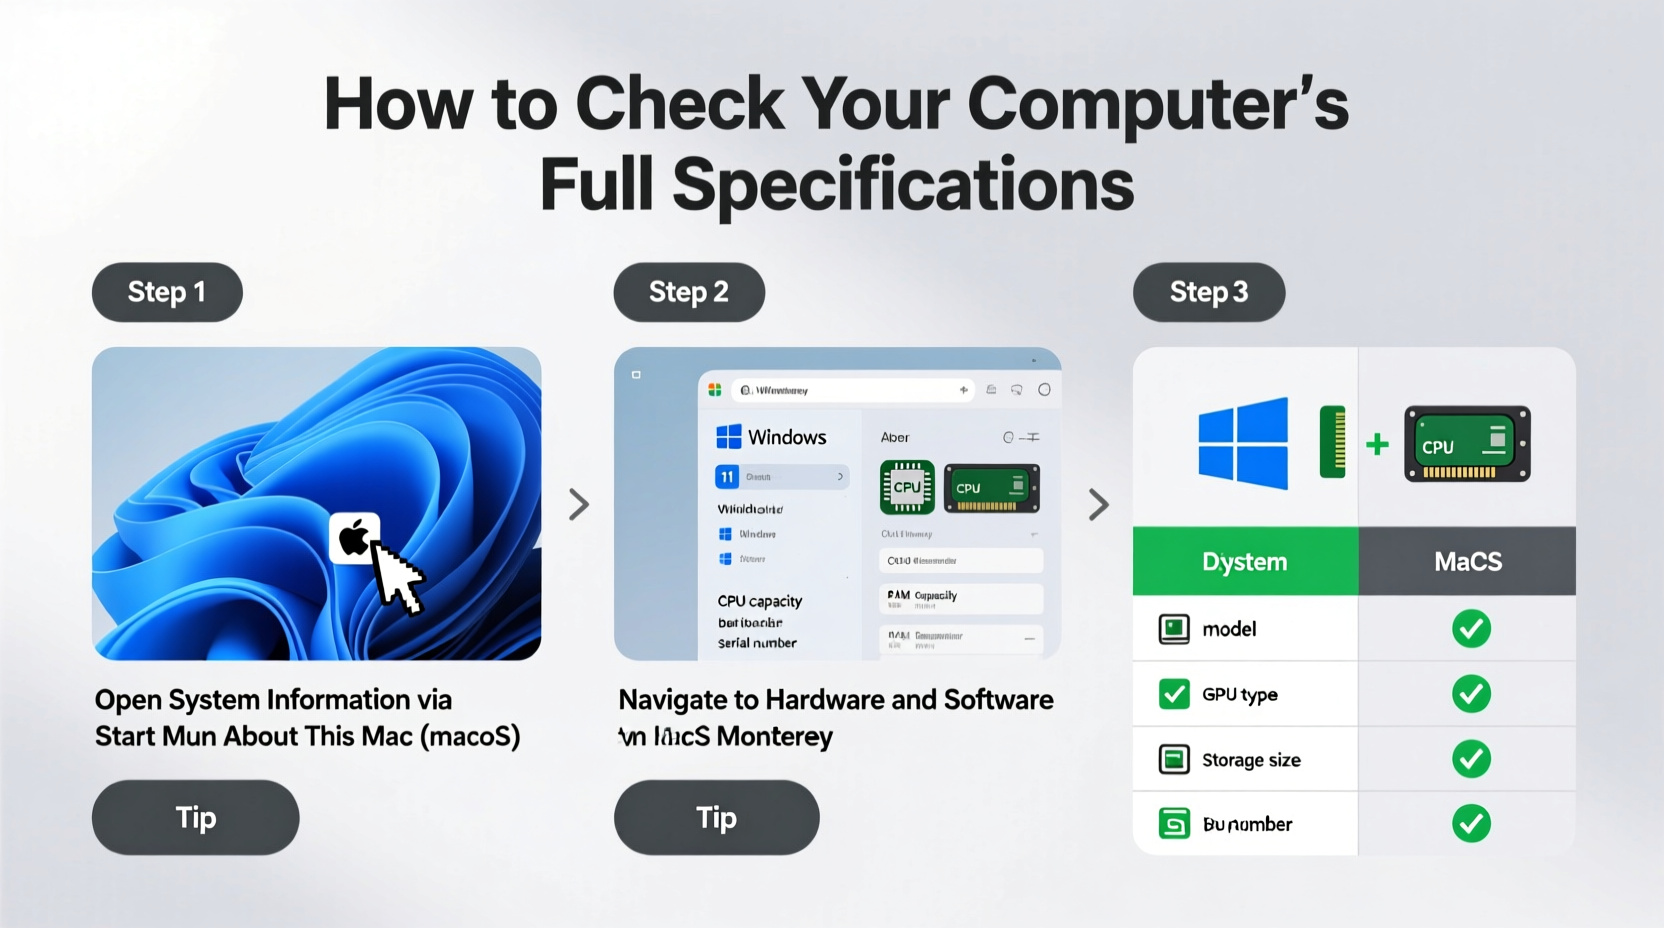
Step-by-Step Methods by Operating System
The process for retrieving full specifications varies depending on your OS. Below are reliable methods for each major platform.
Windows: Built-in Tools and Third-Party Utilities
- System Settings (Basic Info): Press Win + I, go to System > About. This shows device name, processor, installed RAM, and Windows version.
- System Information Tool: Press Win + R, type
msinfo32, and press Enter. This reveals BIOS version, motherboard model, boot device, and more. - Task Manager (Real-Time Performance): Press Ctrl + Shift + Esc, navigate to the Performance tab. View live CPU, memory, disk, and GPU usage with model names.
- DirectX Diagnostic Tool: Press Win + R, type
dxdiag, then Enter. Displays detailed graphics card info, sound devices, and input peripherals. - Command Line (Advanced Users): Open Command Prompt as admin and run:
wmic cpu get name– CPU modelwmic memorychip get capacity,speed– RAM size and speedwmic diskdrive get model,size– Storage drives
wmic commands in bulk and redirect output to a text file using
> specs.txt for easy sharing.
macOS: Apple Menu and Terminal Commands
- About This Mac: Click the Apple logo in the top-left corner and select About This Mac. Shows chip (e.g., M1, M2), macOS version, and total memory.
- System Report: In the same window, click System Report… for in-depth breakdowns including serial numbers, USB devices, and Wi-Fi capabilities.
- Terminal (Detailed Hardware): Open Terminal and use:
system_profiler SPHardwareDataType– Processor, memory, and serial infosystem_profiler SPPCIDataType– PCI devices like GPUs and network cardsdiskutil list– All connected storage volumes
Linux: Command-Line Power
Linux offers granular control via terminal commands. Most distributions support the following:
lscpu– CPU architecture, cores, threads, and clock speedfree -h– Human-readable RAM usage and total memorylshw -short– Compact list of all hardware componentslspci | grep -i vga– Graphics card modellsblk– Block devices (SSDs, HDDs, USB drives)dmidecode– Deep system-level data (requires sudo)
For user-friendly alternatives, install GUI tools like HardInfo or Neofetch, which display elegant summaries in terminal or desktop format.
Third-Party Tools for Comprehensive Analysis
While built-in utilities cover most needs, third-party applications offer enhanced visualization, benchmarking, and export options.
| Tool | Platform | Key Features | Best For |
|---|---|---|---|
| CPU-Z | Windows | Detailed CPU, motherboard, RAM, and cache info | Overclockers & upgraders |
| GPU-Z | Windows | Graphics card sensors, clocks, voltage, BIOS | Gamers & miners |
| Speccy | Windows | Color-coded temperature monitoring and component list | Troubleshooting |
| Belarc Advisor | Windows | Generates a detailed profile including software licenses | IT audits |
| HWInfo | Windows, Linux | Extensive sensor monitoring and logging | Professionals & system admins |
Common Mistakes When Checking Specs
Even experienced users fall into traps that compromise accuracy. Avoid these pitfalls:
- Misreading integrated vs. dedicated graphics: Many laptops list both Intel UHD (integrated) and NVIDIA (dedicated). Ensure you’re using the correct GPU for demanding tasks.
- Ignoring virtualization settings: Some tools report virtual machines instead of physical hardware. Confirm you’re analyzing bare-metal systems when needed.
- Trusting manufacturer labels too much: OEMs sometimes underclock or use non-standard RAM configurations not visible in basic menus.
- Not updating drivers before testing: Outdated GPU drivers may hide actual VRAM or supported features.
Mini Case Study: The Misidentified Laptop GPU
Sarah purchased a used laptop advertised as having an “NVIDIA GTX 1650.” After installing games, she noticed poor frame rates. Running dxdiag showed only Intel UHD graphics. Further investigation with GPU-Z revealed the GTX 1650 existed but was disabled in BIOS. Enabling it restored expected performance. The seller hadn’t realized the GPU was turned off—a common issue with refurbished units. Sarah saved money and gained full capability simply by verifying her specs thoroughly.
Checklist: How to Fully Audit Your Computer’s Specifications
Follow this checklist to document every key component accurately:
- ✅ Identify operating system and build number
- ✅ Record CPU model, core count, and clock speed
- ✅ Note RAM type (DDR3/DDR4/DDR5), amount, and speed
- ✅ List all storage drives with capacity and interface (SATA/NVMe)
- ✅ Determine GPU(s): integrated and discrete models
- ✅ Check BIOS/UEFI version and firmware date
- ✅ Document motherboard model (if applicable)
- ✅ Verify network adapters: Wi-Fi standard and Bluetooth version
- ✅ Export results using screenshots or reports (e.g., Belarc, Speccy)
- ✅ Store the report in a secure location for future reference
Frequently Asked Questions
How do I know if my RAM is DDR4 or DDR5?
On Windows, use CPU-Z and go to the “Memory” tab. The “Type” field will display DDR4 or DDR5. On macOS, check “System Report > Memory” for “Type” information. Linux users can run sudo dmidecode -t memory and look for “Type” under each memory device.
Can I check my specs without installing software?
Yes. All major operating systems include built-in tools: Windows has msinfo32 and dxdiag, macOS offers “About This Mac,” and Linux provides command-line utilities like lscpu and free. These require no downloads and are completely safe.
Why does my task manager show less RAM than I installed?
This can happen due to integrated graphics reserving memory, BIOS settings, or hardware limitations. Also, 32-bit systems cap usable RAM at around 3.2–3.5 GB. Ensure you’re running a 64-bit OS and check BIOS for memory remapping options.
Conclusion: Take Control of Your Tech Knowledge
Understanding your computer’s true specifications empowers smarter decisions—from choosing compatible upgrades to diagnosing slowdowns. You don’t need advanced technical training; just the right tools and a systematic approach. Whether you’re a casual user, a creative professional, or managing a fleet of devices, accurate hardware knowledge is foundational. Don’t assume—verify. Run the diagnostics, save the reports, and keep them accessible. The next time you upgrade, troubleshoot, or sell your device, you’ll be prepared with confidence and precision.


 浙公网安备
33010002000092号
浙公网安备
33010002000092号 浙B2-20120091-4
Comments
No comments yet. Why don't you start the discussion?