
Carpet damage from spills, pet accidents, or heavy furniture can leave unsightly stains or worn areas that disrupt the appearance of your floor. While replacing an entire carpet is costly and time-consuming, a well-executed patch repair offers a practical and nearly invisible solution. With the right tools and attention to detail, you can replace a damaged section so seamlessly that even a trained eye might miss it. This guide walks you through every stage—from selecting donor material to final blending—ensuring professional results on a DIY budget.
Assessing the Damage and Planning Your Repair
Before reaching for a utility knife, evaluate the extent of the damage. Small burns, localized stains, or minor tears are ideal candidates for patching. However, if the wear spans multiple seams or affects padding beneath, consider whether a larger replacement or full reinstallation is more appropriate.
Identify a donor area—typically a closet, under a bed, or behind a door—where removing a piece won’t be noticeable. The goal is to extract a patch that matches in color, texture, and pile direction. Even carpets from the same roll can exhibit slight shading differences due to manufacturing batches or aging.
Essential Tools and Materials
Gathering the correct supplies ensures precision and reduces the risk of mistakes. Here’s what you’ll need:
- Sharp utility knife or carpet cutter
- Carpenter’s square or straightedge ruler
- Chalk or masking tape (for marking)
- Seam tape (heat-activated adhesive tape)
- Iron or heat sealer
- Dry ironing cloth (cotton fabric barrier)
- Carpet knee kicker or blunt stick
- Duct tape (temporary hold)
- Vacuum cleaner
- Donor carpet piece (with padding, if possible)
Using dull blades or improvised tools increases the chance of jagged edges and misalignment, which compromise the final look. Invest in a fresh blade for clean cuts.
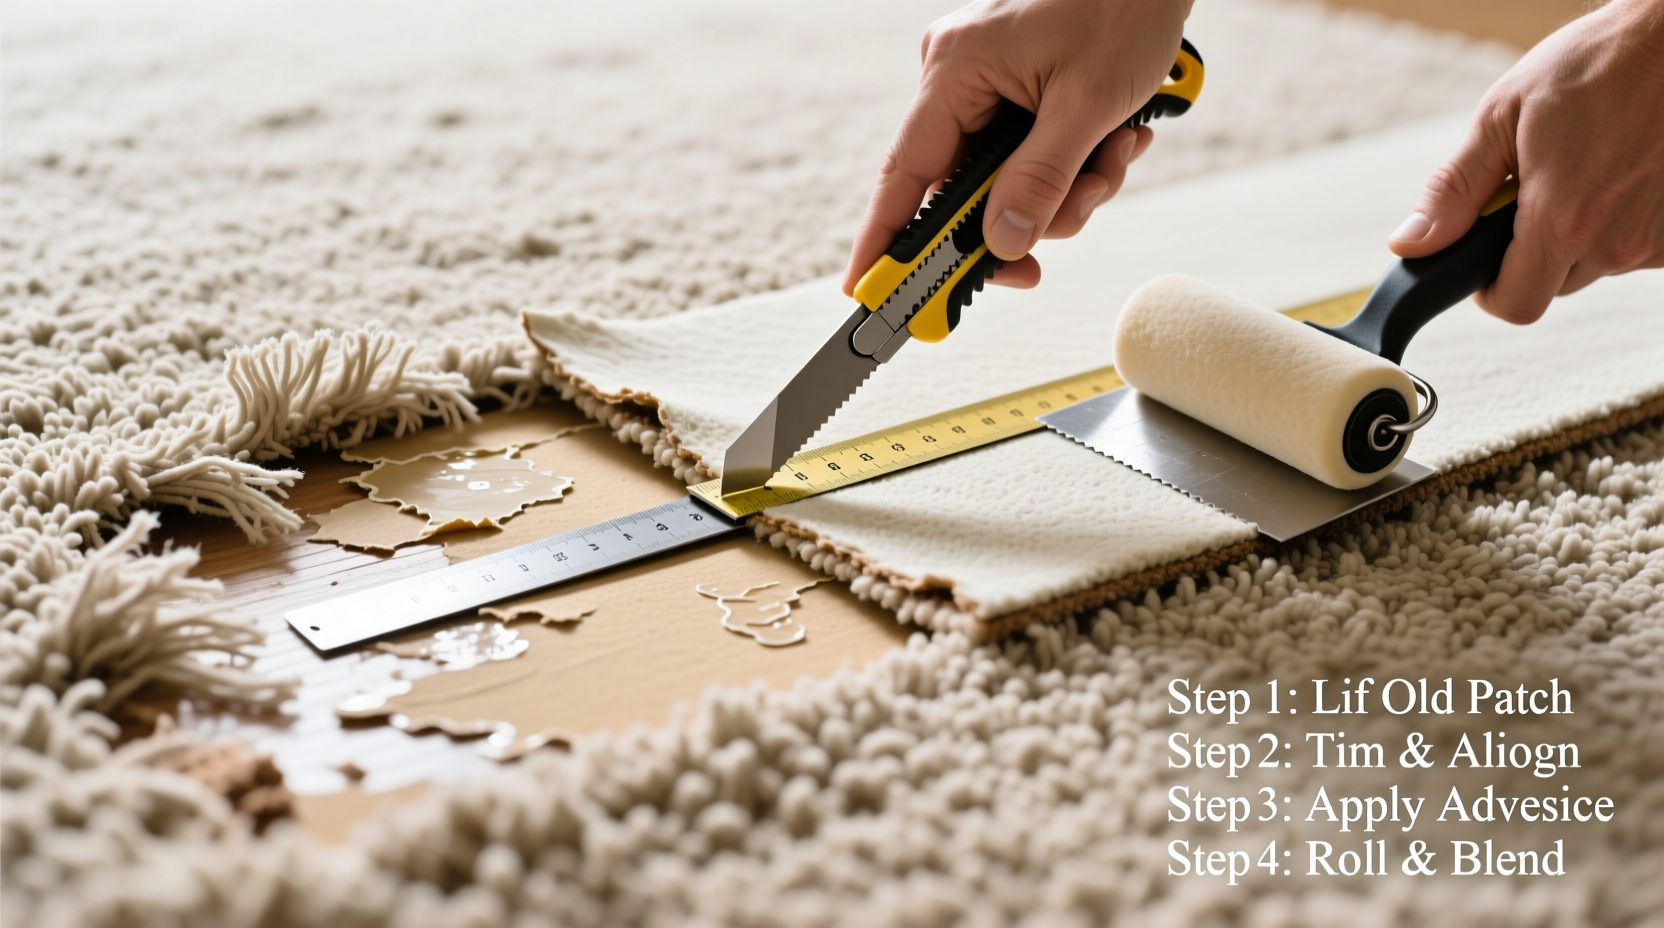
Step-by-Step Patch Replacement Process
- Mark and remove the damaged section: Use a carpenter’s square to outline a rectangular or square area around the damage. Score along the lines with a utility knife, pressing firmly to cut through both carpet and padding. Lift out the damaged piece carefully.
- Prepare the donor patch: Lay the removed piece on top of the donor area. Trace its shape, adding ½ inch extra on all sides. Cut this larger piece from the donor zone, ensuring the pile runs in the same direction as the main carpet.
- Test-fit the new patch: Place the donor piece into the repaired area. It should fit snugly without gaps or overlaps. Trim minimally if needed, always cutting from the back to preserve edge integrity.
- Apply seam tape: Slide heat-activated seam tape beneath the existing carpet edges inside the hole. Center it so half lies under the original carpet and half under where the patch will sit.
- Position and bond the patch: Align the donor patch precisely over the opening. Cover the seam with a dry cotton cloth, then pass a hot iron (set to wool or medium heat) over the joint. The heat melts the adhesive, fusing the patch to the original carpet. Apply steady pressure for 10–15 seconds per section.
- Seam compression and blending: Once cooled, use a carpet knee kicker or blunt stick to push the seam gently, flattening any raised edges. Vacuum lightly across the seam to help fibers settle and blend.
“Precision in cutting and attention to pile direction are what separate amateur attempts from invisible repairs.” — Marcus Lin, Certified Floor Installer & Trainer
Do’s and Don’ts of Carpet Patching
| Do’s | Don’ts |
|---|---|
| Match the pile direction exactly | Use mismatched carpet from different rooms or batches |
| Cut with sharp, controlled strokes | Pull or tear the carpet during removal |
| Let the adhesive cool completely before walking | Walk on the seam immediately after ironing |
| Vacuum after repair to blend fibers | Apply excessive heat, which can scorch backing |
| Work in a well-lit space | Attempt patching on severely frayed or delaminated carpet |
Real-World Example: Repairing a Pet Accident in a Living Room
Sarah noticed a persistent stain near her dining area caused by a puppy accident. Despite cleaning, the odor lingered, and the fibers were matted. Instead of replacing the entire living room carpet, she chose to patch it. She removed a 12” x 12” section from a seldom-used hallway closet, ensuring the pattern and pile matched. After following the step-by-step process—including careful ironing and post-repair vacuuming—the patch was undetectable. A month later, guests commented on how fresh the carpet looked, unaware a repair had been made.
Ensuring Long-Term Durability
A successful patch isn’t just about immediate appearance—it must endure foot traffic and cleaning. To extend the life of your repair:
- Avoid placing heavy furniture directly on the seam for at least 48 hours.
- Use a carpet protector spray around the area to resist future staining.
- Rotate rugs periodically to prevent uneven wear near patched zones.
- Inspect the seam quarterly for lifting or separation, especially in high-moisture areas.
If the original carpet has significant wear, consider deep-cleaning the entire surface after the repair to unify the appearance. Slight tonal differences become less obvious when the whole floor shares a consistent level of aging.
Frequently Asked Questions
Can I patch wall-to-wall carpet without visible seams?
Yes, if the donor carpet matches perfectly in color, texture, and pile direction, and you follow precise cutting and bonding techniques. Lighting plays a role—diffused light helps conceal seams better than direct overhead lighting.
What if I don’t have a donor piece from the same carpet?
Try checking leftover carpet stored by the homeowner or builder. If unavailable, consider using a rug remnant that closely matches. Alternatively, decorative rugs can be strategically placed over imperfect patches.
Is heat-sealing safe for all carpet types?
Most synthetic carpets (nylon, polyester, olefin) respond well to heat-activated tape. Natural fiber carpets like wool may require specialty adhesives. Always test a small, inconspicuous area first to avoid melting or discoloration.
Final Checklist for a Flawless Carpet Patch
- ✔ Assess damage and confirm patch suitability
- ✔ Locate and prepare a matching donor area
- ✔ Mark and cut out damaged section cleanly
- ✔ Cut donor patch ½ inch larger than the hole
- ✔ Insert seam tape under original carpet edges
- ✔ Fit and align patch with pile direction
- ✔ Iron seam with protective cloth to activate adhesive
- ✔ Cool completely, then compress and blend the seam
- ✔ Vacuum and inspect under multiple lighting conditions
- ✔ Monitor for durability over the next few weeks
Take Action and Restore Your Floors Today
A damaged carpet doesn’t mean a ruined room. With patience and the right approach, a patch repair can restore both function and aesthetics, often at a fraction of the cost of replacement. Whether you're fixing a spill, burn, or pet-related wear, the techniques outlined here empower you to achieve results that reflect care and craftsmanship. Don’t let a small flaw dictate a big expense—grab your tools, follow the steps, and take pride in a job done right.


 浙公网安备
33010002000092号
浙公网安备
33010002000092号 浙B2-20120091-4
Comments
No comments yet. Why don't you start the discussion?