
Lighting has evolved far beyond simple on/off functionality. Today’s LED technology offers dynamic, programmable options that transform spaces with color, rhythm, and motion. Among the most discussed innovations are addressable LEDs and standard LED strings. While both deliver illumination, their capabilities diverge dramatically—especially when it comes to creating custom animations. Understanding these differences is essential for hobbyists, artists, event planners, and smart home enthusiasts who want full creative control over their lighting displays.
Standard LED strings have long dominated holiday décor and ambient lighting due to their affordability and ease of use. But as demand grows for personalized light shows, interactive installations, and synchronized effects, addressable LEDs are rising in popularity. The core distinction lies in control: one treats all lights as a single unit, while the other empowers each individual LED to behave independently. This article explores that contrast in depth, offering practical insights into performance, setup, and real-world applications.
How Standard LED Strings Work
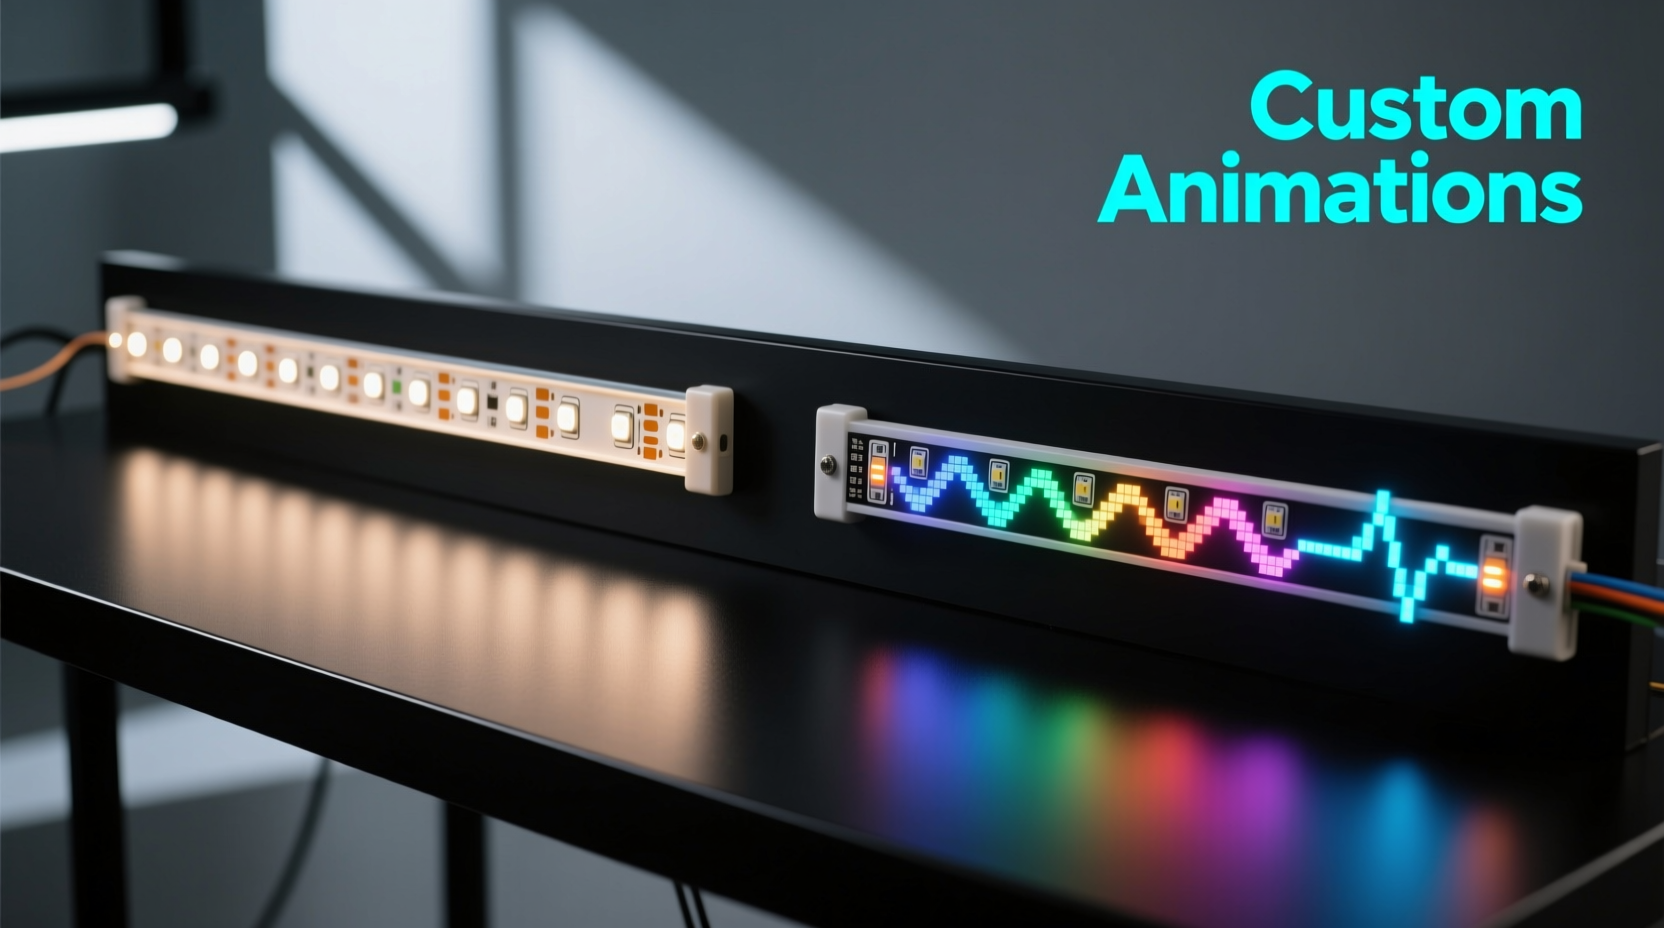
Standard LED strings, often referred to as \"dumb\" or non-addressable strips, operate as a unified circuit. All LEDs on the strip receive the same power and signal simultaneously. When you change the color or brightness, every bulb responds in kind. These are commonly found in pre-lit garlands, curtain lights, and basic under-cabinet lighting.
These systems typically use analog signaling—either through pulse-width modulation (PWM) or direct voltage changes—to adjust overall brightness or shift colors across the entire strip. Some RGB versions allow color cycling via a remote or controller, but transitions apply uniformly. There’s no way to make one section red while another pulses blue unless physically segmented with multiple controllers.
The simplicity of standard strings makes them ideal for users seeking plug-and-play solutions. They require minimal technical knowledge, are widely available, and cost significantly less than their addressable counterparts. However, this convenience comes at the expense of flexibility.
The Power of Addressable LEDs
Addressable LEDs, such as those based on the WS2812B (commonly branded as NeoPixels), SK6812, or APA102 chips, function more like pixels in a digital display. Each LED contains an embedded microcontroller that allows it to be individually addressed and controlled via digital signals sent from a central source—typically an Arduino, Raspberry Pi, or ESP32.
This architecture enables granular manipulation: you can set the brightness, color, and timing of each diode independently. Want a rainbow wave that flows smoothly down a strip? Or a strobe effect that starts at one end and chases toward the other? With addressable LEDs, these animations aren’t just possible—they’re straightforward to program using open-source libraries like FastLED or Adafruit_NeoPixel.
The data-driven nature of addressable strips means they rely on precise timing protocols. For example, the WS2812B uses a single-wire communication system where high and low voltage pulses encode 24-bit color values (8 bits each for red, green, and blue). A slight timing error can corrupt the entire chain, which demands stable power and clean code—but rewards with unmatched visual versatility.
“With addressable LEDs, lighting becomes a storytelling medium. You're not just illuminating space—you're choreographing emotion.” — Lin Zhao, Interactive Installation Artist
Key Differences: A Practical Comparison
| Feature | Standard LED Strings | Addressable LEDs |
|---|---|---|
| Individual Control | No – all LEDs act together | Yes – each LED can be uniquely programmed |
| Animation Flexibility | Limited to preset modes (fade, flash, cycle) | Full custom animations (waves, chases, rain effects) |
| Control Interface | IR remote, wall switch, or manual dimmer | Microcontroller + software (e.g., Arduino IDE) |
| Power Requirements | Low to moderate; usually 5V–12V DC | Higher; requires stable 5V supply with adequate amperage |
| Cost per Meter | $2–$8 | $10–$25+ |
| Installation Complexity | Beginner-friendly | Moderate to advanced; involves wiring and coding |
| Best Use Cases | Ambient lighting, seasonal décor, mood lighting | Custom art pieces, stage effects, smart homes, gaming setups |
The table above illustrates why someone might choose one type over the other. If your goal is consistent glow with minimal effort, standard strings suffice. But if you aim to synchronize lights with music, simulate fireflies, or build responsive environments, only addressable LEDs offer the necessary precision.
Creating Custom Animations: A Step-by-Step Approach
Designing custom animations with addressable LEDs involves both hardware assembly and software programming. Below is a streamlined guide to help you get started:
- Select Your Components: Choose an addressable LED strip (e.g., WS2812B) and a compatible microcontroller (Arduino Uno, ESP32, or Raspberry Pi Pico).
- Plan Your Layout: Determine the length of the strip and how it will be mounted. Consider voltage drop over long runs—inject power every 2–3 meters.
- Wire the System: Connect the data line (usually labeled DIN) to a digital pin on the controller. Ensure common ground between power supply and controller. Use capacitors (1000µF) near the strip’s power input to prevent surges.
- Install Software Libraries: In Arduino IDE, install the FastLED or Adafruit_NeoPixel library via the Library Manager.
- Write Animation Code: Start with basic patterns like color wipes or breathing effects. Example:
#include <FastLED.h> #define LED_PIN 6 #define NUM_LEDS 30 CRGB leds[NUM_LEDS]; void setup() { FastLED.addLeds<WS2812B, LED_PIN, GRB>(leds, NUM_LEDS); } void loop() { // Rainbow animation fill_rainbow(leds, NUM_LEDS, millis()/10); FastLED.show(); delay(20); } - Test and Refine: Upload the sketch and observe behavior. Adjust timing, colors, or logic until the desired effect emerges.
- Expand Functionality: Add sensors (sound, motion) or connect to Wi-Fi for remote control via apps like WLED or Home Assistant.
Real-World Application: A Home Theater Lighting Project
Consider Mark, a DIY enthusiast who wanted immersive lighting for his basement home theater. He initially installed standard RGB LED strips around the screen and ceiling. While functional, he was frustrated by the lack of synchronization—the lights couldn’t react to movie scenes or audio cues.
He upgraded to addressable LEDs, replacing the old strip with a 5-meter WS2812B model connected to an ESP32 running WLED firmware. Using a free tool called AtmoOrb, he captured screen edge colors and mapped them to the LEDs in real time. Now, during action sequences, red flashes ripple outward; in ocean scenes, cool blues pulse gently. The result? A cinematic experience that extends beyond the screen.
Mark also added voice control via Alexa and scheduled sunrise/sunset dimming. What began as basic mood lighting became a responsive environment tailored to his viewing habits—all made possible by switching from standard to addressable LEDs.
Common Pitfalls and How to Avoid Them
Despite their advantages, addressable LEDs introduce new challenges. Here’s a checklist to ensure success:
- ✅ Use a Dedicated Power Supply: Don’t power long strips from the microcontroller’s onboard regulator. Use an external 5V supply rated for at least 2A per meter at full white.
- ✅ Prevent Voltage Drop: For runs over 2 meters, inject power at multiple points to maintain brightness consistency.
- ✅ Ground Everything Together: Shared grounding between power supply, microcontroller, and LED strip prevents signal noise.
- ✅ Add Capacitors and Resistors: Place a 1000µF capacitor across the power lines near the strip’s start, and a 220–470Ω resistor on the data line to smooth signal spikes.
- ✅ Start Small: Begin with 10–15 LEDs to test code and wiring before scaling up.
- ❌ Don’t Chain Too Many Without Planning: Long chains increase susceptibility to data corruption. Consider using level shifters or differential signaling for large installations.
“Most failures in addressable LED projects stem from poor power delivery—not bad code.” — Raj Patel, Embedded Systems Engineer
Frequently Asked Questions
Can I mix addressable and standard LEDs on the same project?
Yes, but they must be powered and controlled separately. You can combine them in a single installation—for instance, using standard LEDs for ambient backlighting and addressable ones for animated borders—but they won’t share control signals or respond to the same commands.
Are addressable LEDs worth the extra cost?
If you value customization, yes. For static or simple lighting needs, the investment may not be justified. However, once you begin exploring animations, music synchronization, or automation, the flexibility pays for itself in creative potential.
Do I need to know how to code to use addressable LEDs?
Basic understanding helps, but tools like WLED, Jinx!, or Lightpack provide user-friendly interfaces with prebuilt effects and drag-and-drop configuration. You can achieve advanced results without writing a single line of code—though learning basics unlocks full potential.
Final Thoughts and Next Steps
The choice between addressable LEDs and standard strings ultimately hinges on intent. If your objective is effortless illumination with pleasing color shifts, standard LED strings remain a reliable, economical option. But if you envision lighting as an expressive tool—one capable of dancing to music, reacting to movement, or painting stories across walls—then addressable LEDs are not just preferable; they’re transformative.
Modern platforms have lowered the barrier to entry. With affordable hardware, open-source software, and vibrant online communities, anyone can begin experimenting. Whether you're enhancing a workspace, designing an art piece, or building a smart home ecosystem, the ability to craft custom animations opens a world of creative possibility.


 浙公网安备
33010002000092号
浙公网安备
33010002000092号 浙B2-20120091-4
Comments
No comments yet. Why don't you start the discussion?