
Building your own PC can be one of the most rewarding tech experiences—offering customization, cost savings, and a deeper understanding of how computers work. But for beginners, the process is fraught with potential pitfalls. From incompatible components to overlooked power requirements, a single misstep can lead to frustration, wasted money, or even hardware damage. The key to success lies not just in assembling parts, but in careful planning, research, and attention to detail.
This guide walks through the essential steps of building a PC while highlighting the most common errors and how to avoid them. Whether you're upgrading from a prebuilt system or diving into DIY computing for the first time, this roadmap will help ensure your build runs smoothly—from selection to startup.
Plan Your Build Before You Buy Anything
The foundation of a successful PC build starts long before you touch a screwdriver. Begin by defining your purpose: gaming, video editing, programming, general use? Each use case demands different priorities in component selection. A 4K video editor needs strong CPU and storage performance, while a gamer may prioritize GPU and RAM speed.
Once your goals are clear, set a realistic budget. Allocate funds across core components: CPU, motherboard, GPU, RAM, storage, power supply, and case. Avoid overspending on one part at the expense of another. For example, pairing a high-end GPU with a budget motherboard that lacks PCIe 4.0 support can bottleneck performance.
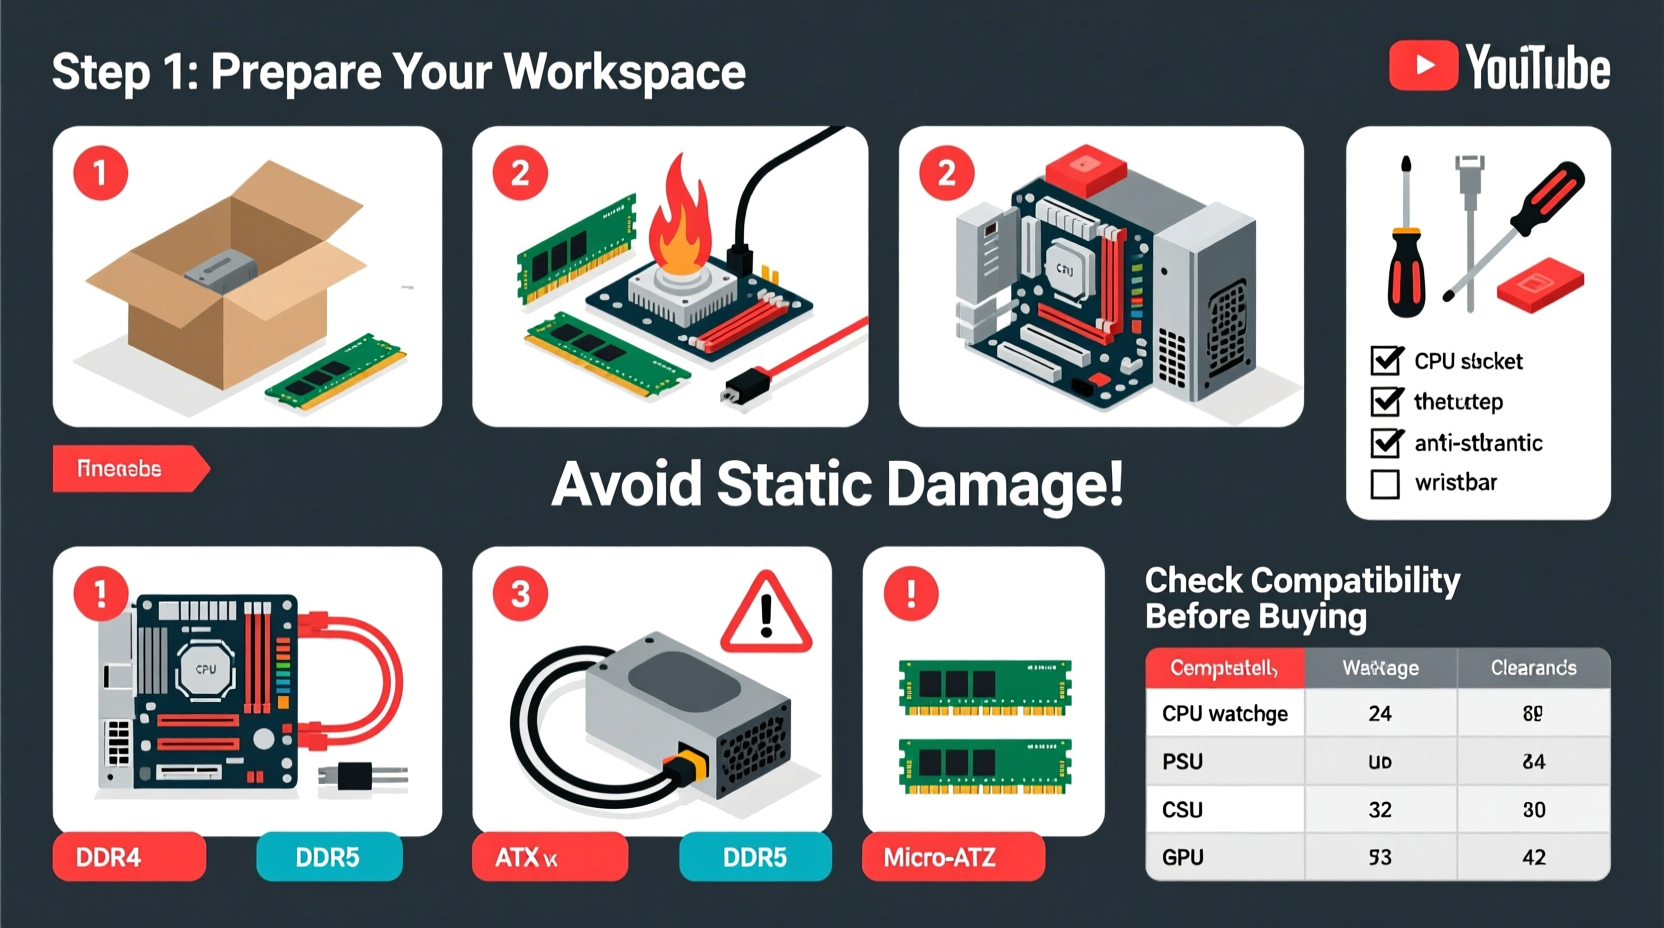
Avoid Critical Compatibility Issues
One of the most frequent beginner mistakes is assuming all parts fit together. They don’t. Compatibility spans multiple dimensions: physical size, electrical interface, and firmware support. Here’s where to focus:
Socket Type and Motherboard Compatibility
The CPU must match the motherboard's socket type. Intel and AMD use different sockets, and even within brands, sockets change across generations. For example, an AMD Ryzen 5 5600X requires an AM4 socket, while newer Ryzen 7000 series CPUs need AM5. Installing the wrong CPU can permanently damage both the processor and motherboard.
RAM and Motherboard Support
Not all RAM works with every motherboard. Check whether your board supports DDR4 or DDR5, and verify the maximum supported speed (e.g., 3200MHz, 6000MHz). Some motherboards also have limitations on total RAM capacity or require specific dual-channel configurations.
GPU and Case Clearance
Modern graphics cards can be massive. Measure your case’s internal space—or consult manufacturer specs—to ensure your chosen GPU fits. Also confirm that your power supply has the correct PCIe power connectors (6-pin, 8-pin, or 12VHPWR).
Power Supply (PSU) Requirements
Underestimating power needs is a common oversight. High-end GPUs like the NVIDIA RTX 4070 or AMD RX 7800 XT can draw over 250 watts alone. Add CPU, drives, and peripherals, and your total system load may exceed 500W. Always choose a PSU with headroom—ideally 15–20% more than your estimated peak draw—and ensure it’s 80 Plus certified for efficiency and reliability.
“Over half of failed builds I’ve seen stem from mismatched components. Spend two hours researching compatibility—it saves eight hours of troubleshooting.” — David Lin, Hardware Engineer at TechBuild Labs
Step-by-Step Assembly Guide
With compatible parts in hand, follow this logical sequence to assemble your PC safely and efficiently.
- Prepare your workspace: Use a clean, static-free surface. Ground yourself by touching a metal object or wearing an anti-static wrist strap.
- Install the CPU: Open the socket lever on the motherboard, align the CPU (match the triangle marker), gently place it in, and close the lever. Do not force it.
- Mount the CPU cooler: Apply thermal paste if not pre-applied, then secure the cooler using included brackets. Connect the fan cable to the CPU_FAN header.
- Insert RAM: Press down firmly on both ends until the clips click into place. For dual-channel performance, use the recommended slots (often A2 and B2).
- Mount the motherboard: Secure standoffs in the case, align the I/O shield, and screw in the motherboard carefully.
- Install the PSU: Slide it into place (fan down or rear, depending on case), and secure it with screws.
- Install storage: M.2 SSDs plug directly into the motherboard; SATA drives mount in drive bays and connect via SATA data and power cables.
- Install the GPU: Remove case slot covers, insert the card into the top PCIe x16 slot, and secure it with screws. Connect required power cables from the PSU.
- Connect front panel cables: Link power switch, reset, USB, and audio headers as per your motherboard manual. This step often trips up beginners due to tiny labels and tight spacing.
- Double-check all connections: Ensure no loose screws, obstructed airflow, or dangling cables near fans.
Common Mistakes and How to Avoid Them
Even experienced builders make errors. Beginners face unique challenges that can be avoided with awareness.
| Mistake | Why It Happens | How to Avoid |
|---|---|---|
| Buying a case too small for the GPU | Focusing on aesthetics without checking dimensions | Check GPU length vs. case max GPU clearance in specs |
| Forgetting the CPU cooler | Assuming coolers come standard (many don’t) | Verify if CPU includes a stock cooler; otherwise, buy one |
| Using incorrect thermal paste amount | Applying too much or too little | Use a pea-sized drop in the center for optimal spread |
| Plugging monitor into motherboard instead of GPU | Not realizing integrated graphics disable discrete GPU output | Always connect display cable to GPU ports when using a dedicated graphics card |
| Overlooking BIOS updates | New CPUs may not work with older motherboard BIOS versions | Check motherboard QVL list; update BIOS using flash-back feature if available |
Real Example: Sarah’s First Build Gone Wrong
Sarah bought a Ryzen 7 5800X and a B550 motherboard, excited to start her first build. She assembled everything neatly but couldn’t get past the black screen. After days of frustration, she discovered her motherboard’s BIOS version didn’t support the CPU out of the box. Her local store offered a BIOS flashback service, which resolved the issue—but it delayed her project by a week. Had she checked the motherboard’s CPU support list before buying, she could have either selected a compatible board or updated the BIOS beforehand.
Essential Pre-Build Checklist
Before purchasing any component, run through this checklist to minimize risk:
- ✅ Define primary use (gaming, productivity, streaming)
- ✅ Set a total budget with wiggle room (~10%)
- ✅ Confirm CPU and motherboard socket compatibility
- ✅ Verify RAM type (DDR4/DDR5) and speed support
- ✅ Check GPU length against case specifications
- ✅ Ensure PSU has enough wattage and correct connectors
- ✅ Confirm case supports motherboard form factor (ATX, mATX, ITX)
- ✅ Include a CPU cooler (especially for non-\"F\" CPUs)
- ✅ Download motherboard manual and BIOS update instructions
- ✅ Gather tools: Phillips screwdriver, zip ties, anti-static mat/wristband
Frequently Asked Questions
Can I use an old power supply with a new GPU?
Only if it meets the wattage and connector requirements. Older PSUs may lack modern PCIe power connectors or fail under sustained load. If your PSU is over five years old or below 80 Plus Bronze, consider replacing it.
Do I need to install Windows myself?
Yes. You’ll need a USB drive (8GB+) and a valid Windows license. Download the Media Creation Tool from Microsoft’s website to create a bootable installer. The installation process takes about 20–30 minutes.
What should I do if the PC doesn’t turn on?
First, double-check the power switch connection to the motherboard. Then verify the PSU is switched on and plugged in. Disconnect all non-essential devices and try a minimal boot (CPU, one RAM stick, GPU). Listen for beep codes or check debug LEDs if your board has them.
Final Thoughts and Next Steps
Building a PC is more than a technical task—it’s a learning experience that empowers you to understand, upgrade, and troubleshoot your own technology. By focusing on compatibility, preparation, and methodical assembly, you dramatically reduce the risk of costly mistakes. Remember, patience pays off: spending extra time researching now prevents headaches later.
Your first build might not be perfect, but each step teaches something valuable. Once your system boots successfully, take pride in what you’ve accomplished. From there, you can fine-tune settings, optimize cooling, or plan your next upgrade with confidence.


 浙公网安备
33010002000092号
浙公网安备
33010002000092号 浙B2-20120091-4
Comments
No comments yet. Why don't you start the discussion?