
A cluttered, inefficient pantry can make meal prep frustrating and daily cooking feel like a scavenger hunt. For homes with limited square footage—especially in urban apartments or older kitchens—maximizing every inch of storage is essential. The good news? Even the smallest pantry can become highly functional with smart organization focused on vertical space. By rethinking how you use height, depth, and accessibility, you can transform a cramped cupboard into a streamlined, intuitive storage system that saves time and reduces waste.
Assess Your Space and Usage Patterns
Before adding shelves or buying bins, take a step back and evaluate how your current pantry functions—or doesn’t. Begin by emptying everything onto a clean surface. This allows you to see what you own, discard expired items, and identify duplicates. While everything is out, wipe down shelves and consider minor upgrades like adhesive shelf liners or LED strip lighting if visibility is an issue.
Next, categorize your inventory: dry goods (pasta, rice, grains), canned items, snacks, baking supplies, breakfast foods, oils and condiments, and infrequently used appliances or seasonal items. Grouping helps determine which categories need the most accessible spots and which can go higher or lower.
Observe how often you access certain items. Frequently used staples like olive oil, coffee, or cereal should be at eye level. Heavy items such as large bags of flour or pet food are safer and easier to lift from lower shelves. Lighter, rarely used items—like holiday spices or specialty flours—can occupy top shelves.
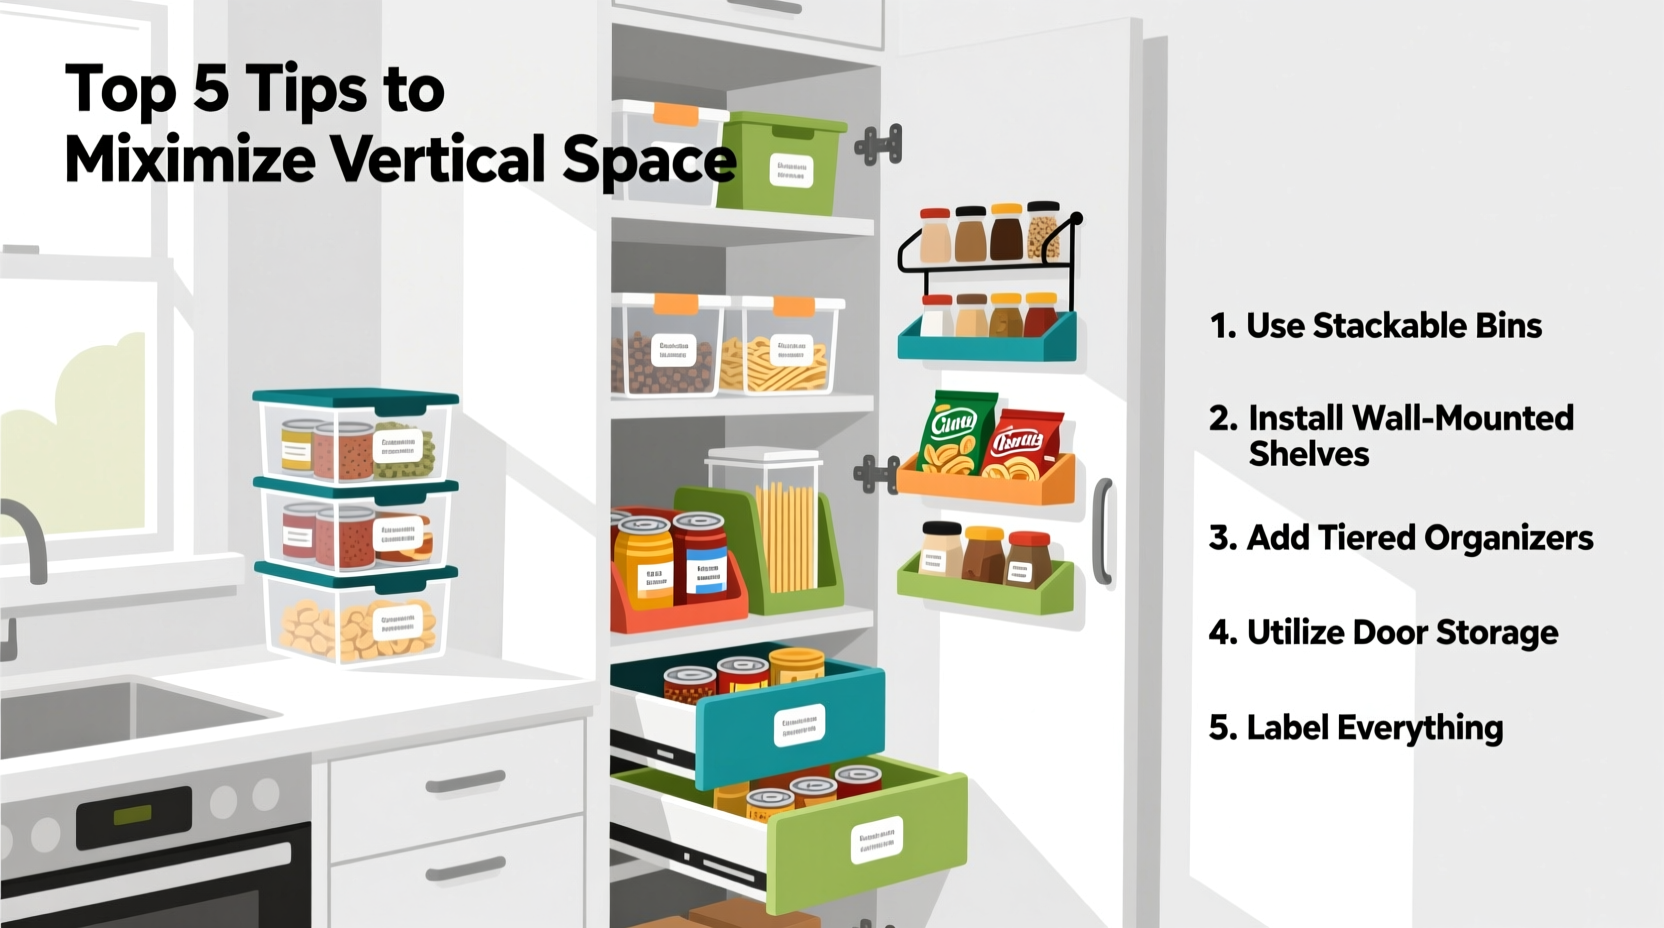
Maximize Vertical Storage with Tiered Shelving and Stackable Systems
Vertical space is often underutilized in pantries. Standard shelving units typically leave gaps between cans and boxes, creating dead zones where visibility and access are poor. The solution lies in tiered organization tools designed to create layers within a single shelf.
Consider installing risers or tiered shelf organizers—especially on lower and middle shelves—to stack smaller items like spice jars, snack bars, or tea boxes without blocking access to those behind. These risers work similarly to display shelves in retail stores, allowing you to “see through” to the back row.
For deeper shelves, pull-out vertical dividers help keep baking sheets, cutting boards, or even canned goods upright and visible. Alternatively, stackable clear bins allow you to create modular columns of related items. For example, one bin could hold all soup cans, another for pasta shapes, and a third for legumes.
If you're able to modify the pantry structure, adjustable shelving offers long-term flexibility. Install metal or wooden brackets that let you raise or lower shelves based on changing needs. Leaving 12–14 inches between shelves accommodates most containers while still enabling two-tier stacking.
“Most people lose up to 40% of their usable pantry space due to poor vertical planning. With simple adjustments, that same space can double its capacity.” — Laura Bennett, Kitchen Design Consultant at Urban Home Lab
Use Wall-Mounted and Door Solutions Strategically
The back of the pantry door and side walls are prime real estate for lightweight, frequently accessed items. Installing over-the-door organizers instantly adds storage without occupying shelf space.
Choose a door organizer with clear pockets for small items like seasoning packets, tea bags, drink mixes, or single-serve snacks. For heavier use, mount a slim wire rack or pegboard on the door or side wall. These can hold baskets, hooks for aprons or measuring cups, or magnetic strips for spice tins.
Wall-mounted rails—similar to those used in professional kitchens—allow you to hang baskets, utensils, or even small appliances. Pair them with labeled bins so each item has a designated home. Magnetic knife strips or spice racks also free up counter and drawer space while keeping essentials within reach.
Don’t overlook the ceiling either. In walk-in pantries, consider suspending a hanging fruit basket or wire rack from the ceiling to store onions, garlic, or potatoes—items that benefit from airflow and shouldn’t be kept in plastic.
Step-by-Step Guide: Installing Over-the-Door Storage
- Measure your door – Note height, width, and clearance when open.
- Choose the right organizer – Opt for no-drill options with sturdy over-the-top hooks if renting.
- Decide on layout – Reserve top pockets for light items, bottom for slightly heavier ones like sauce pouches.
- Label compartments – Use removable labels so you can adapt as needs change.
- Load gradually – Avoid overloading; ensure the door closes smoothly and doesn’t hit adjacent cabinets.
Optimize Containers and Labeling for Efficiency
Transferring dry goods from original packaging into uniform containers does more than look neat—it protects contents from pests, moisture, and light degradation. Use airtight, BPA-free containers made of glass or durable plastic. Square or rectangular bins maximize shelf space better than round ones by minimizing gaps.
Invest in a consistent set of containers in graduated sizes: small (4–8 oz) for spices, medium (32 oz) for pasta and rice, large (64+ oz) for flour and sugar. Many systems include built-in scoops or pour spouts for convenience.
Labeling is critical for maintaining order. Use a label maker, chalkboard tags, or waterproof stickers to mark contents and expiration dates. Color-coding by category (e.g., green for baking, blue for breakfast) speeds up identification, especially in households with multiple users.
| Item Type | Recommended Container | Storage Tip |
|---|---|---|
| Pasta & Noodles | Medium rectangular bin with lid | Store vertically using a file sorter for variety access |
| Flour & Sugar | Large airtight container with spout | Keep off floor; place on mid-level shelf |
| Spices | Small stackable jars | Arrange alphabetically or by cuisine type |
| Canned Goods | None (use shelf risers) | Rotate using FIFO method (First In, First Out) |
| Snacks | Clear mini bins with handles | Group by type: chips, granola bars, fruit pouches |
Create Zones for Daily Functionality
Just like a well-designed kitchen has work zones (prep, cooking, cleaning), your pantry benefits from dedicated activity areas. Zone-based organization reduces decision fatigue and streamlines routine tasks.
- Breakfast Station: Combine cereal, oatmeal, nut butter, bread, and coffee pods in one reachable section.
- Baking Hub: Store flour, sugar, baking powder, chocolate chips, and measuring tools together—ideally near the mixer or prep area.
- Kid-Friendly Shelf: Lower, easy-access zone with healthy grab-and-go snacks, juice boxes, and lunchbox staples.
- Emergency Reserve: Top or back shelf for extra toilet paper, batteries, or non-perishables for power outages.
- Dinner Prep Zone: Group ingredients for common meals—taco night, stir-fry, pasta—to speed up weeknight cooking.
Zoning works best when aligned with household habits. If you meal prep on Sundays, dedicate a bin or shelf to pre-portioned ingredients. If you cook family-style, store serving bowls and oven mitts inside the pantry near heavy pots.
Mini Case Study: Transforming a 24-Inch Pantry in a Brooklyn Apartment
Sophia, a freelance designer living in a 600-square-foot Brooklyn apartment, struggled with a narrow reach-in pantry just 24 inches wide. Canned goods were buried behind cereal boxes, and she often bought duplicates because she couldn’t see what she already had.
She began by removing everything and grouping items into five categories. She installed two adjustable shelves to create three distinct levels. On the bottom shelf, she placed a pull-out bin for potatoes and onions. The middle shelf got a tiered riser for canned tomatoes and beans, with a front-facing bin for everyday spices. The top shelf held stackable containers for grains and pasta.
On the door, she added a clear pocket organizer—one section for tea, another for instant soups and miso packets. She labeled all containers with a handheld label maker and created a “dinner duo” system: pairing pasta with sauce in matching bins for quick assembly.
The result? A fully functional pantry that cut her grocery list by 30% due to better visibility and reduced waste. “I actually enjoy opening my pantry now,” she said. “It feels like everything has a purpose and a place.”
Checklist: Pantry Organization in 7 Steps
- Empty the entire pantry and clean shelves thoroughly.
- Sort items into categories (dry goods, snacks, baking, etc.).
- Discard expired products and consolidate duplicates.
- Measure shelf dimensions and plan vertical layout.
- Install risers, bins, door organizers, and labeling system.
- Group items into functional zones based on usage.
- Implement a monthly review to maintain order and rotate stock.
Frequently Asked Questions
How high should I stack items in a small pantry?
Stack only as high as you can safely reach without a stool. For most adults, that’s about 72 inches from the floor. Reserve top shelves for lightweight, infrequently used items. Use step stools cautiously and never overload upper shelves with heavy containers.
Are glass containers better than plastic for pantry storage?
Glass offers superior durability, odor resistance, and eco-friendliness, but it’s heavier and breakable. Plastic is lighter and safer for households with children, but may stain or absorb smells over time. Choose based on your lifestyle—many people mix both: glass for stationary items like flour, plastic for portable snacks.
How do I prevent pests in a tightly packed pantry?
Transfer dry goods into sealed containers immediately after purchase. Avoid storing food in cardboard or thin plastic bags. Clean spills promptly and inspect for signs of ants or moths monthly. Place bay leaves or food-safe silica packs in corners to deter insects naturally.
Final Thoughts: Turn Constraints Into Opportunity
A small pantry isn’t a limitation—it’s an invitation to design smarter. When space is tight, every decision matters more. By focusing on verticality, consistency, and usability, you create a system that supports your daily life instead of complicating it. The goal isn’t perfection, but functionality: knowing exactly where to find the oats at 7 a.m. or grabbing dinner ingredients without rummaging.
Start small. Pick one shelf. Add one riser. Label one bin. Momentum builds quickly once you see the difference. Over time, your pantry becomes less of a storage problem and more of a quiet victory—a reflection of thoughtful choices and intentional living.


 浙公网安备
33010002000092号
浙公网安备
33010002000092号 浙B2-20120091-4
Comments
No comments yet. Why don't you start the discussion?