
A cluttered pantry can turn meal prep into a frustrating scavenger hunt. Even worse, it increases food waste when items get buried and forgotten. The solution? Clear containers paired with consistent labeling. This simple yet powerful combination transforms your pantry from chaotic to streamlined. When everything is visible and labeled, you save time, reduce stress, and make smarter use of your space. More than just an aesthetic upgrade, a well-organized pantry supports better eating habits and smarter grocery shopping.
Why Clear Containers Work Better Than Original Packaging
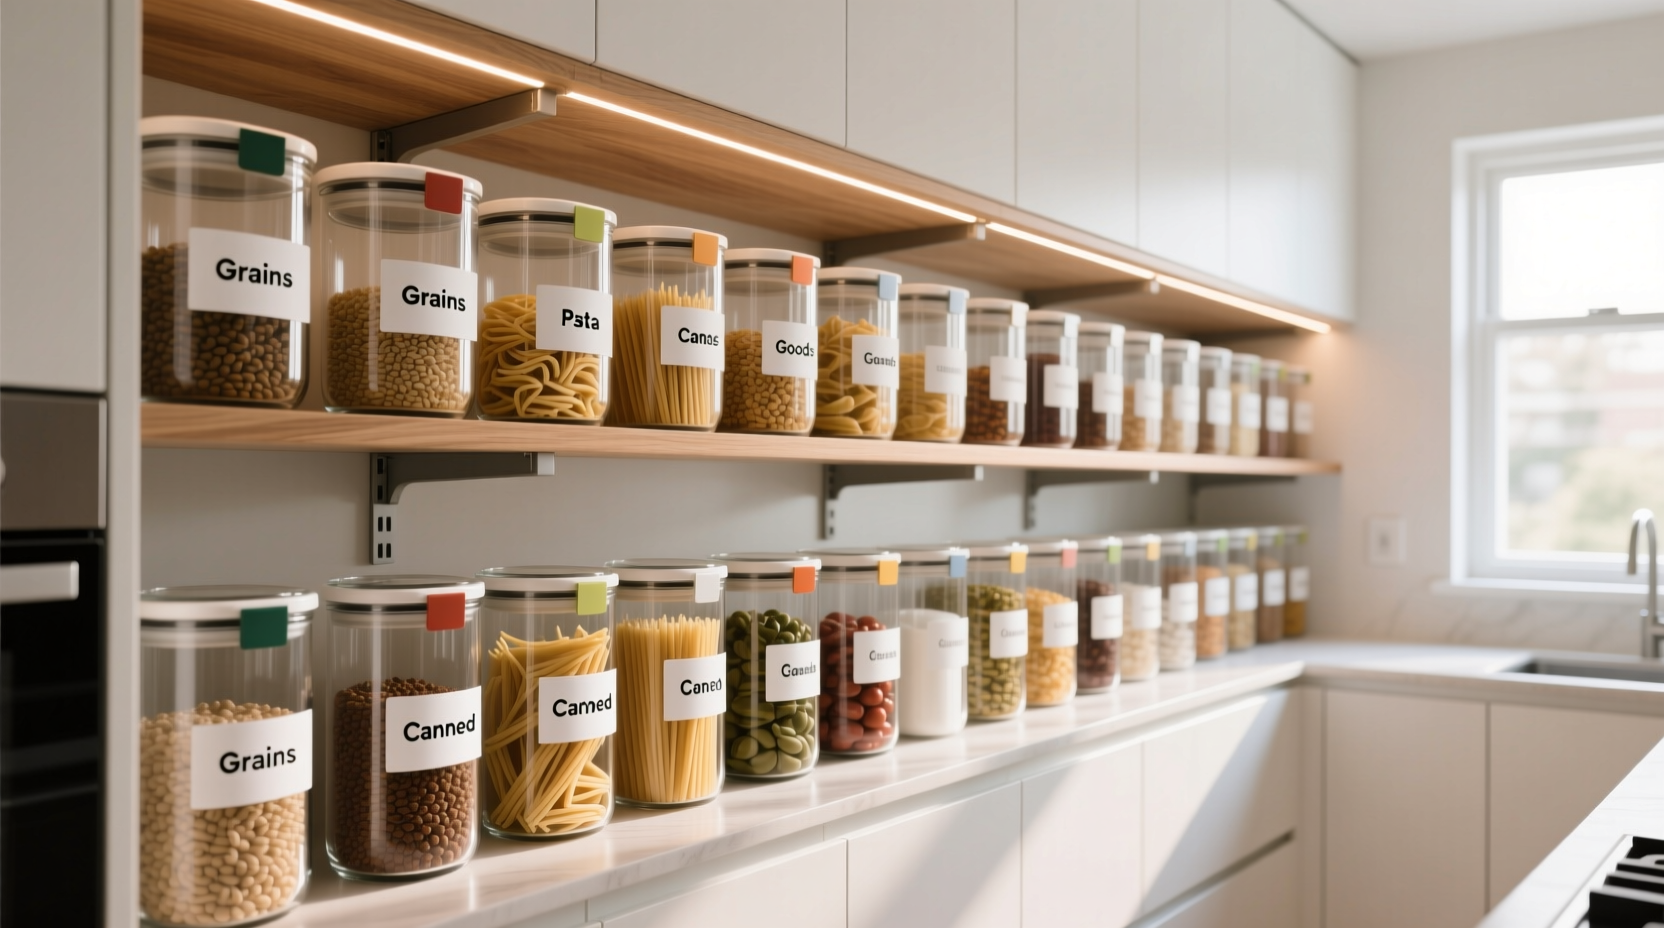
Packaging from grocery stores is rarely designed for long-term storage or easy identification. Cereal boxes crush easily, pasta bags tear, and snack wrappers obscure contents. Transferring dry goods into clear, airtight containers solves these problems while offering multiple benefits:
- Improved visibility: See exactly how much flour, rice, or lentils you have at a glance.
- Better freshness: Airtight seals prevent exposure to moisture, pests, and air, extending shelf life.
- Uniform appearance: Matching containers create visual harmony and make shelves look intentional.
- Easier stacking: Square or rectangular containers maximize vertical space and minimize gaps.
- Pest resistance: Sealed containers deter ants, weevils, and other common pantry invaders.
The Right Containers for Different Foods
Not all containers are created equal. Choosing the right type depends on what you're storing and how often you access it. Here’s a breakdown of optimal container types by food category:
| Food Type | Recommended Container | Features to Look For |
|---|---|---|
| Dry Goods (rice, pasta, quinoa) | Airtight plastic or glass with wide mouth | Stackable design, measurement markings inside |
| Flour & Sugar | Rectangular bins with flip-top lids | Spill-proof seal, large opening for scooping |
| Coffee & Tea | Opaque or tinted glass with one-way valve | Light-blocking material, resealable top |
| Snacks (chips, crackers) | Rigid plastic with clip-on lid | Air-tight closure, transparent front panel |
| Baking Supplies (baking soda, cocoa powder) | Small square jars with screw tops | Label-friendly surface, compact size |
Invest in a mix of sizes—small jars for spices, medium for nuts, large for bulk grains. Prioritize durability over price; high-quality containers last years and pay for themselves in reduced food waste.
Step-by-Step Guide to Pantry Organization
Reorganizing your pantry isn’t just about placing containers on shelves—it’s a process that requires planning, sorting, and consistency. Follow this six-step method for lasting results:
- Empty everything: Remove all items from your pantry. This allows you to assess what you own, check expiration dates, and clean the space thoroughly.
- Sort by category: Group similar items together—baking supplies, canned goods, snacks, breakfast foods, etc. Discard anything expired or unopened past its prime.
- Choose your containers: Measure shelf height and depth to ensure containers fit. Purchase enough to hold your most frequently used dry goods.
- Transfer and seal: Pour contents into containers, pressing out excess air before sealing. For added freshness, include silica gel packets in long-term storage bins.
- Label consistently: Use a label maker or waterproof stickers with bold, legible text. Include both the item name and expiration date if applicable.
- Arrange strategically: Place daily-use items at eye level, heavier containers on lower shelves, and rarely used supplies toward the back or top.
The Art and Science of Effective Labeling
Labels are more than decorative—they’re functional tools that maintain order. Poor labeling leads to confusion, double-purchasing, and wasted food. To get labeling right, consider these principles:
- Consistency: Use the same font, color scheme, and placement across all containers. This creates visual rhythm and makes scanning easier.
- Clarity: Write full names (“Brown Rice”) rather than abbreviations (“BR”). Avoid cursive or overly stylized fonts.
- Placement: Position labels on the front-facing side, centered or slightly above midpoint for quick recognition.
- Durability: Choose water-resistant labels or laminate them to withstand humidity and wiping.
- Date tracking: Add “Opened On” or “Use By” dates for perishable dry goods like nuts or ground spices.
For households with children or shared kitchens, consider adding icons alongside text—a wheat stalk for flour, a coffee bean for grounds—to improve accessibility.
“Clear containers without proper labels defeat the purpose. Consistent labeling turns organization into habit.” — Laura Simmons, Professional Home Organizer & Author of *The Minimal Pantry*
Checklist: Essential Tools for Pantry Success
Before starting your pantry overhaul, gather these essentials:
- Set of clear, airtight containers in various sizes
- Label maker or printable waterproof labels
- Permanent marker (for temporary labeling)
- Microfiber cloth and mild cleaner
- Lazy Susans or tiered shelf organizers (optional)
- Bin dividers or risers for small items
- Inventory notepad or digital list app
This toolkit ensures you’re prepared to sort, store, and sustain your system long after the initial setup.
Real Example: Transforming a Busy Family’s Pantry
The Thompson family of five struggled with constant dinner delays and duplicate grocery purchases. Their pantry was filled with half-open boxes, loose bags, and mystery powders in reused jars. After dedicating a Saturday morning to reorganization, they transferred all dry staples into uniform square containers and labeled each with a label maker. They grouped items by meal function: baking zone, breakfast station, lunch prep area, and snack corner.
Within two weeks, they noticed changes. Mornings were smoother because oatmeal and granola were clearly marked and accessible. Grocery trips became shorter because they could quickly scan their inventory list. Most importantly, their youngest child learned to identify and return items independently, reducing parental workload. Six months later, they reported a 30% drop in food waste and no longer buy double batches of pasta or rice.
Common Mistakes to Avoid
Even with good intentions, many people undermine their pantry systems through avoidable errors. Watch out for these pitfalls:
- Using mismatched containers: A hodgepodge of shapes and sizes wastes space and looks disorganized.
- Skipping labels: Without them, it’s hard to tell brown sugar from coconut sugar or cornstarch from powdered sugar.
- Overfilling shelves: Crowded spaces make it difficult to see contents and remove containers safely.
- Ignoring shelf height: Tall containers that touch the shelf above prevent easy access and cause spills.
- Forgetting rotation: Always place newer items behind older ones (FIFO: First In, First Out) to prevent expiration.
Frequently Asked Questions
Do I need to transfer everything into containers?
No—you don’t need to containerize every item. Keep factory-sealed cans, bottles, and non-perishable boxed goods as-is if they’re already labeled and stack well. Focus on items that benefit most: open bags, bulk purchases, and frequently used dry goods.
What’s the best way to label glass jars?
Waterproof vinyl labels or chalkboard-style sticker labels work best on glass. They resist moisture and wipe clean without peeling. If using a label maker, choose tapes rated for glass surfaces. Alternatively, write directly on the lid with a paint pen for a permanent solution.
How often should I reorganize my pantry?
Aim for a full refresh every 3–6 months. Conduct mini-audits monthly during grocery planning to check for expired items, low stock, or mislabeled containers. Seasonal changes (like switching to soup ingredients in winter) are excellent triggers for reassessment.
Conclusion: Turn Chaos Into Calm With Intentional Design
An organized pantry isn’t a luxury—it’s a practical foundation for a functional kitchen. By using clear containers and thoughtful labels, you eliminate guesswork, reduce waste, and make cooking more enjoyable. The effort invested pays off daily in saved time, fewer grocery trips, and greater confidence in your kitchen routines. Whether you live alone or feed a family of six, this system scales to fit your needs.


 浙公网安备
33010002000092号
浙公网安备
33010002000092号 浙B2-20120091-4
Comments
No comments yet. Why don't you start the discussion?