
Photographers often face a critical decision: invest in a brand-new lens or save money by purchasing a used one. While buying used can offer significant savings—sometimes up to 40% off retail—it also comes with risks. One of the most insidious threats to any lens, especially those stored in humid environments, is fungal growth. Fungus doesn’t just degrade image quality; it can permanently etch glass elements, rendering a lens unusable. Understanding how to spot early signs and knowing what to prioritize when comparing used versus new lenses is essential for protecting your gear and investment.
The Hidden Danger: Lens Fungus Explained
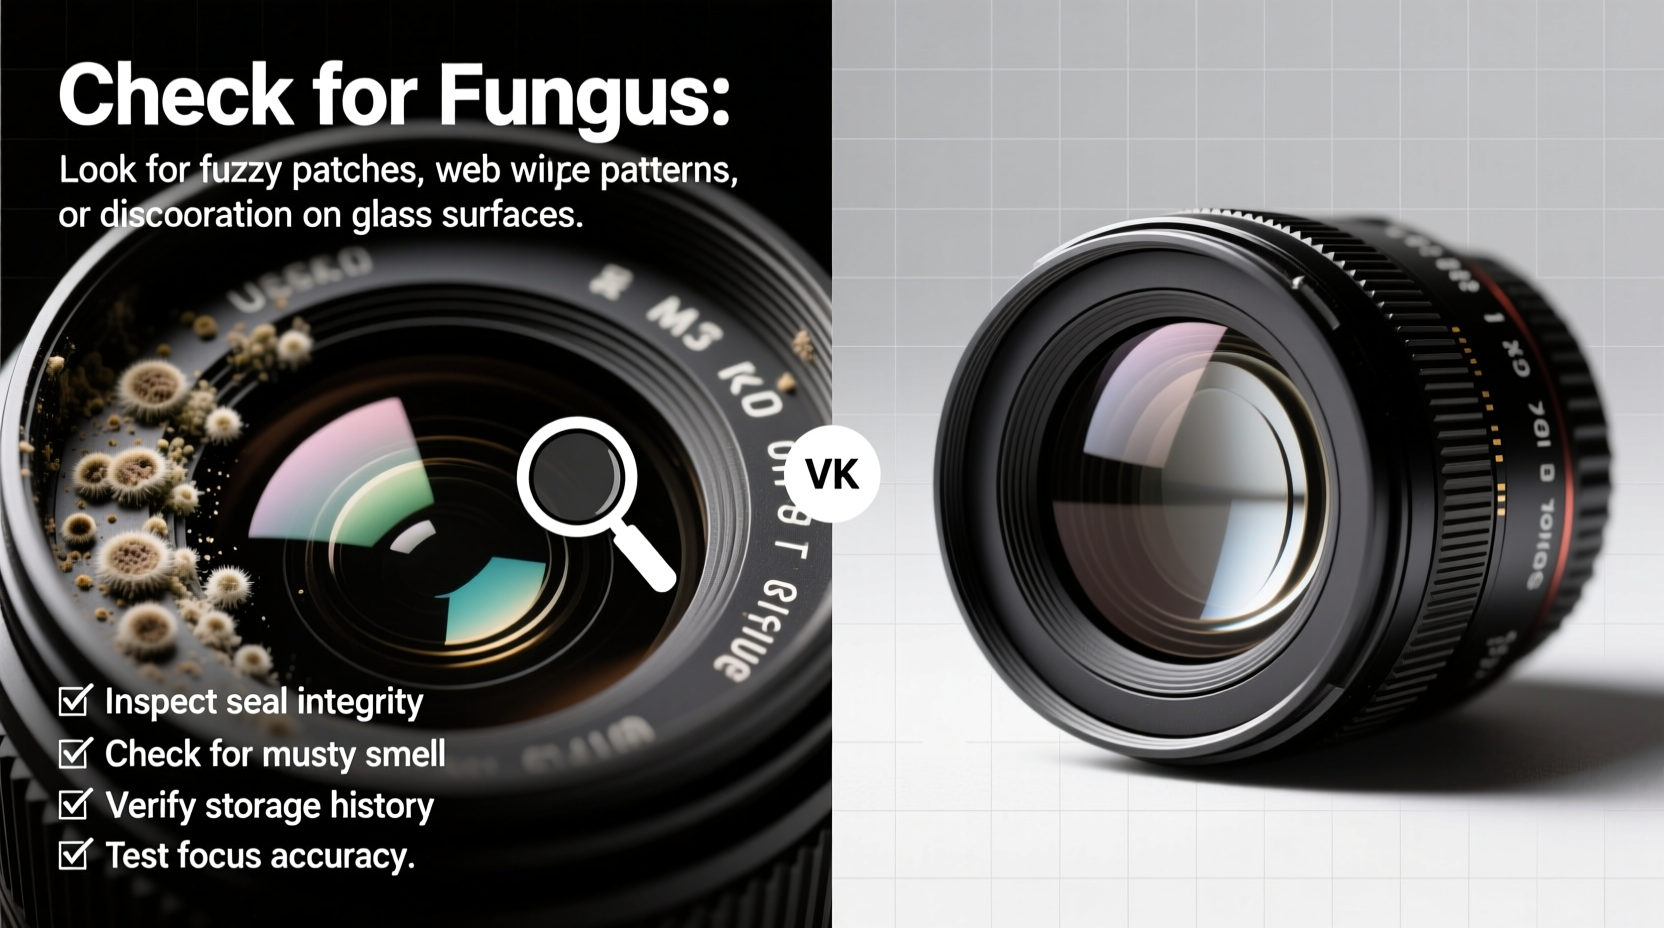
Fungal growth inside a camera lens occurs when microscopic spores enter through seals and find a hospitable environment—warmth, moisture, and organic residue from oils or dust. Once established, fungus spreads across internal glass elements in branching, web-like patterns. Initially, it may appear as faint white or gray speckles, but over time it darkens and becomes deeply embedded. Unlike surface dust, which can be cleaned, internal fungus cannot be fully removed without disassembling the lens—a costly and risky procedure that often isn't worth the expense.
Fungus affects optical performance by scattering light, reducing contrast, and creating soft spots in images. In advanced stages, it causes flare, haze, and noticeable loss of sharpness. The damage is irreversible if left unchecked, making prevention and early detection crucial.
“Fungus is like rust for optics. It starts small and invisible, but given time and humidity, it compromises clarity and devalues the lens permanently.” — David Tran, Professional Camera Technician with 15+ years in repair and restoration
Used vs New: Weighing the Trade-offs
Purchasing a new lens offers peace of mind: factory-fresh components, full warranty coverage, and no history of misuse or environmental exposure. However, prices can be steep, particularly for high-end prime or telephoto lenses. Used lenses, on the other hand, provide access to premium optics at lower price points—but only if they’re in good condition.
The key difference lies in risk exposure. A new lens has never been subjected to poor storage, accidental drops, or humid climates. A used lens might have endured all three. That’s why inspection protocols matter more than ever when buying secondhand.
| Factor | New Lens | Used Lens |
|---|---|---|
| Price | Higher (MSRP) | 30–50% lower |
| Fungus Risk | Negligible | Moderate to High (depends on storage) |
| Warranty | Full manufacturer coverage | Limited or none |
| Optical Condition | Guaranteed clean | Must be verified |
| Environmental History | Unknown (factory sealed) | Often unknown—critical to investigate |
How to Inspect a Used Lens for Fungus: A Step-by-Step Guide
Before handing over payment for a used lens, conduct a thorough inspection. This process should take no more than 10–15 minutes but could save you hundreds in future repairs—or prevent a bad purchase altogether.
- Examine the Exterior for Warning Signs
Check for musty odors, sticky focus rings, or cloudy seals around mount and filter threads. These may indicate prior moisture exposure. - Inspect Front and Rear Elements Under Light
Hold the lens up to a bright light source (preferably daylight). Rotate slowly and look for irregular web-like patterns, spider veins, or fuzzy patches on either side of each element. Use a magnifying loupe if available. - Backlight Test
Remove the lens from the camera, point the rear element toward a bright window or flashlight, and look through the front. Any branching lines or opaque clusters suggest internal fungus. - Check Internal Elements via Aperture View
Set aperture to f/16 or smaller, then peer into the lens. Move it under direct light while changing viewing angles. Fungus often hides near aperture blades or between cemented groups. - Test Shoot if Possible
Attach the lens to a camera and shoot a plain white wall or clear sky at various apertures. Review images at 100% zoom for softness, haze, or uneven contrast—potential signs of optical degradation from fungus. - Ask for Sample Images
If buying online, request real-world photos taken with the lens. Look for consistent softness, low microcontrast, or flare patterns that don’t align with known lens characteristics.
Even minor fungus can spread rapidly under warm, damp conditions. If you detect anything suspicious, walk away unless the price reflects the risk and you're prepared for potential servicing.
Real Example: A Cautionary Purchase from Southeast Asia
A travel photographer based in Bangkok bought a popular 70–200mm f/2.8 lens from a local resale shop. The exterior looked pristine, and autofocus functioned perfectly. He saved nearly $300 compared to retail. Within two months, he noticed increasing haze in backlit shots and inconsistent sharpness. Upon sending it to a technician, the report revealed extensive fungal growth between internal elements—likely developed during prior ownership in a poorly ventilated apartment near the coast. Cleaning would cost $180, and even then, residual etching remained. The lens never regained its original clarity.
This case underscores a vital lesson: functionality does not equal optical health. A lens can operate mechanically while suffering silent internal decay.
Prevention Tips: Protecting Your Investment After Purchase
Whether you buy new or used, proper care prevents fungus from taking hold. Even lenses stored in temperate climates aren’t immune if exposed to sudden humidity changes or improper storage.
- Store lenses in a dry environment with relative humidity below 50%. Use silica gel packs or electronic dry cabinets for long-term storage.
- Avoid leaving lenses in camera bags in cars, basements, or bathrooms—common hotspots for moisture buildup.
- Rotate your gear occasionally. Periodic use helps prevent stagnant air and allows you to catch early signs of mold.
- Never store lenses with filters tightly screwed on for extended periods; this traps moisture between surfaces.
- In humid regions, consider UV storage boxes designed for optics—they inhibit microbial growth using gentle ultraviolet light.
Do’s and Don’ts When Buying Used Lenses
| Action | Do | Don’t |
|---|---|---|
| Inspection | Use backlighting and magnification to examine internal glass | Rely solely on autofocus or cosmetic appearance |
| Seller Communication | Ask about storage conditions and usage history | Assume honesty without verification |
| Price Negotiation | Factor in potential cleaning or servicing costs | Overpay based on brand reputation alone |
| Post-Purchase Care | Quarantine and inspect before adding to main kit | Immediately use it on expensive shoots |
| Repair Consideration | Get quotes from reputable technicians before proceeding | Spend more than 50% of replacement value on cleaning |
Frequently Asked Questions
Can lens fungus spread to other lenses?
Yes. Fungal spores are airborne and thrive in similar conditions. If one lens develops fungus in a shared storage space, others are at increased risk—especially if stored together in airtight containers without desiccants.
Is it safe to buy a lens with “minor” fungus if the price is low?
Generally, no. “Minor” fungus today can become severe within months under normal storage. Cleaning services rarely restore lenses to factory condition, and the cost often exceeds half the value of a mid-range lens. Unless you're acquiring a rare or collectible model, it's better to pass.
Does cleaning the outside of a lens remove fungus?
No. Surface cleaning only removes dust and smudges. Fungus grows internally between glued glass elements and cannot be reached without professional disassembly. Wiping the exterior has no effect on existing infestations.
Final Checklist Before You Buy
- ✅ Visual Inspection
- Checked both ends under bright light for webbing or discoloration.
- ✅ Backlight Test Performed
- Held up to light source and rotated to view internal structures.
- ✅ Functionality Verified
- Autofocus, aperture control, and zoom (if applicable) tested.
- ✅ Seller History Reviewed
- Asked about storage location, duration of ownership, and reason for selling.
- ✅ Price Compared to Market Value
- Ensured discount accounts for age, wear, and potential hidden issues.
- ✅ Post-Purchase Plan in Place
- Ready to store in dry cabinet or use immediately with caution.
Conclusion: Make an Informed Decision, Not Just a Cheap One
Choosing between a new and used lens shouldn’t come down to price alone. Long-term value depends on optical integrity, durability, and resistance to environmental damage. Fungus is a silent killer—one that can turn a bargain into a burden. By learning how to detect early warning signs and insisting on rigorous inspection standards, you protect not only your equipment but also the quality of your work.
Whether you're upgrading your kit or starting fresh, treat every lens purchase like an investment in your craft. Take the extra time to verify condition, ask the right questions, and prioritize longevity over short-term savings. A well-maintained lens can last decades. One compromised by fungus may not last a season.


 浙公网安备
33010002000092号
浙公网安备
33010002000092号 浙B2-20120091-4
Comments
No comments yet. Why don't you start the discussion?