
Decorating for the holidays often means climbing ladders, stretching across gutters, and squinting at strings of lights from awkward angles. One of the most frustrating parts of hanging Christmas lights is ensuring they’re evenly spaced, straight, and visually balanced—especially when you're working alone. A growing number of homeowners and professional decorators are turning to technology to simplify this process. Among the tools gaining popularity: the ladder cam. But can it actually help you check Christmas light alignment from a distance? The answer is yes—with the right setup and expectations.
A ladder cam isn’t a standalone product sold under that name. Instead, it refers to any compact, mountable camera (like a smartphone, action cam, or home security device) temporarily attached to a ladder to provide a remote view of your work area. When used strategically, this setup allows you to see how your lights look from the ground without repeatedly climbing up and down. It’s not just convenient—it’s also safer, reducing fall risks during what is already one of the most hazardous seasonal activities.
How a Ladder Cam Works in Practice
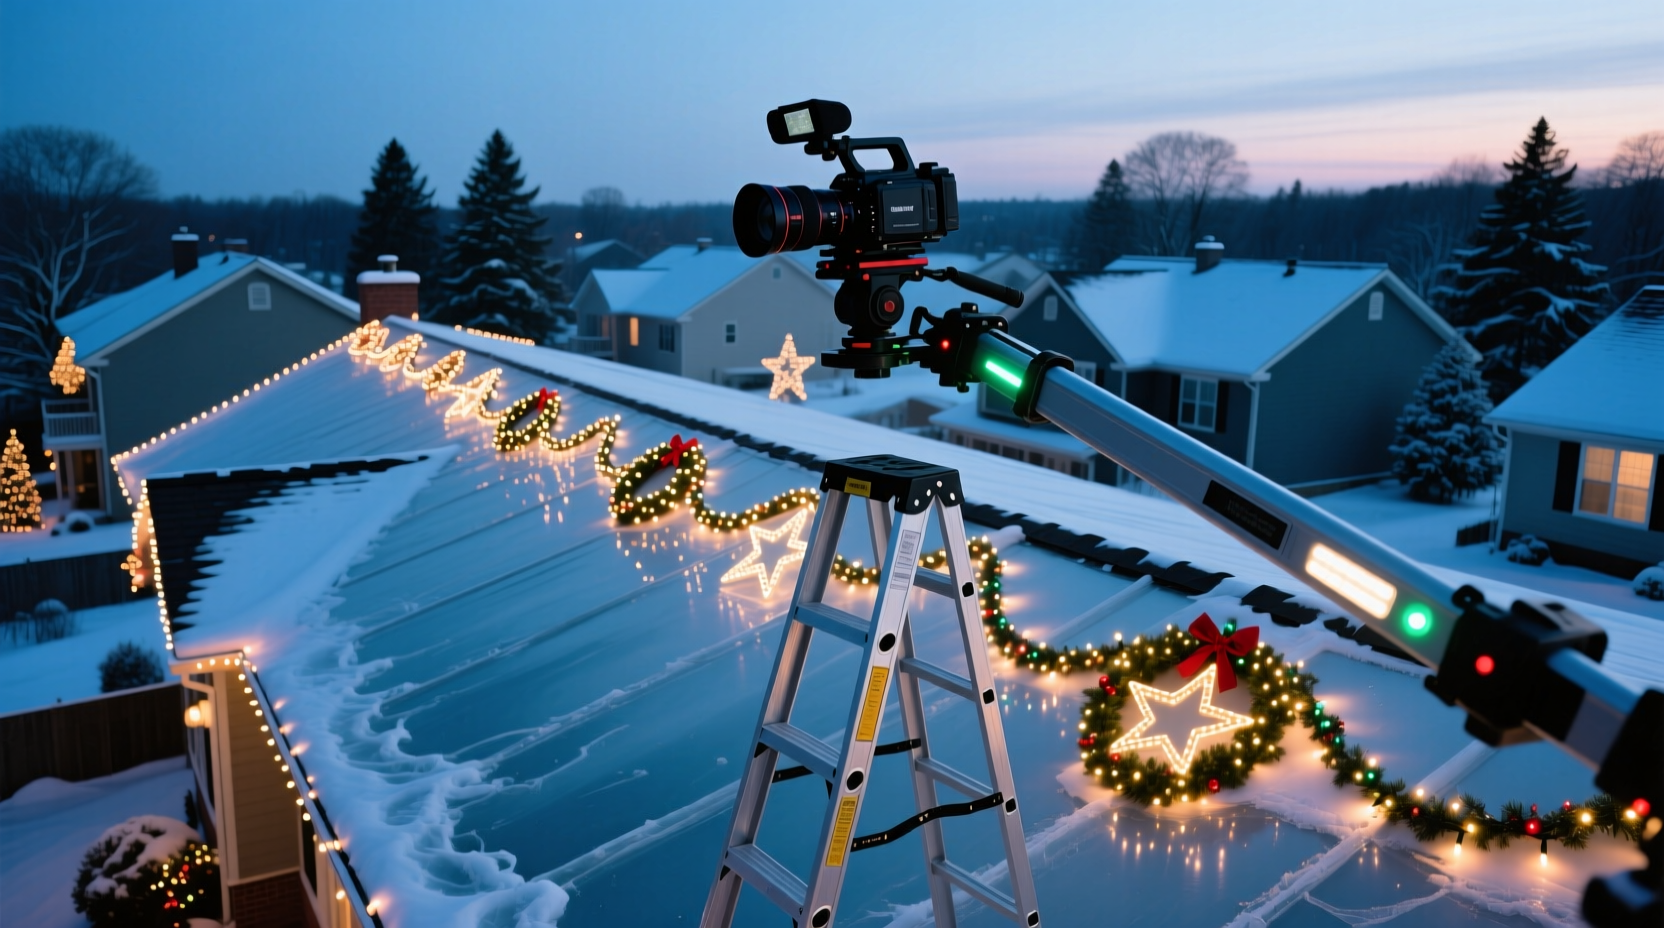
The concept is simple: position a camera on your ladder so it faces the section of your house where you're installing lights. Connect it to a monitor, tablet, or smartphone via Wi-Fi or a wired feed. As you adjust bulbs or reposition strands, you watch the live feed to assess spacing, symmetry, and overall appearance.
This method mirrors techniques used by professionals in construction, photography, and theater rigging, where visual feedback from a fixed vantage point ensures precision. For holiday decorating, it brings similar benefits—especially when dealing with multi-story homes or complex rooflines.
For example, if you’re placing C9 bulbs along an eave 20 feet above ground, your eye-level perspective from below may make them appear uneven even when they’re not. A camera mounted near the peak of the ladder gives you a closer approximation of how passersby will see the display, helping you avoid over-corrections based on distorted ground-level views.
Step-by-Step Guide: Setting Up Your Ladder Cam System
- Choose Your Camera: A smartphone is the most accessible option. Ensure it has a clear rear camera, sufficient battery life, and screen brightness for outdoor use. Alternatively, consider a GoPro or wireless security cam like Arlo or Ring.
- Select a Mounting Method: Use a universal phone clamp, tripod adapter, or adhesive mount designed for vehicles or bikes. If your ladder has rails, slide the mount onto them. Avoid loose tape or rubber bands—they can fail unexpectedly.
- Position the Camera: Place the camera high enough on the ladder to capture the full vertical span of your lighting zone. Angle it slightly downward to minimize glare from the sky.
- Connect to a Viewing Device: Open your camera app or streaming software. If using a smart camera, connect to its app via Wi-Fi. Keep the viewing screen within reach but safely on the ground. <5> Test Before Committing: Hang a few test bulbs and observe their appearance on-screen. Adjust the camera angle until the image reflects realistic spacing and alignment.
- Proceed with Installation: With the feed active, install lights while watching for gaps, twists, or misalignments. Pause frequently to review progress.
- Safely Remove Equipment: Once done, lower the ladder and disconnect the camera. Never attempt to adjust the device while standing on the ladder unless someone stabilizes it.
This system works best during daylight hours when visibility is high. However, if you're testing nighttime effects, conduct a final alignment check after dusk using the same camera—many smartphones perform well in low light, especially with night mode enabled.
Benefits and Limitations of Using a Ladder Cam
The primary advantage of a ladder cam is enhanced visual accuracy. What looks straight from five feet away might reveal crookedness when viewed remotely. By observing a continuous feed, you eliminate guesswork and reduce physical strain.
Another major benefit is safety. According to the U.S. Consumer Product Safety Commission, thousands of people visit emergency rooms each year due to ladder-related injuries during holiday decorating. Minimizing climbs reduces exposure to slips, falls, and overreaching hazards.
However, there are limitations. Signal interference can disrupt wireless feeds, particularly in areas with poor Wi-Fi coverage. Battery drain is another concern—outdoor temperatures and continuous video streaming can deplete power quickly. Additionally, some cameras struggle with dynamic range, washing out bright skies or losing detail in shaded areas.
Finally, while a ladder cam helps with alignment, it doesn’t replace final in-person inspection. Perspective distortion, lens curvature, and resolution limits mean small errors may still go unnoticed until viewed directly.
Do’s and Don’ts: Best Practices for Remote Light Alignment
| Do | Don’t |
|---|---|
| Use a tripod mount for steady footage | Leave the camera unattended in windy conditions |
| Check alignment both day and night | Rely solely on zoomed-in views for spacing decisions |
| Mark reference points on walls or gutters | Mount heavy devices without secure fastening |
| Pair the cam with a second person on the ground | Ignore manufacturer weight limits for ladder accessories |
| Record short clips for later review | Use outdated apps or unsupported hardware |
Following these guidelines increases reliability and prevents common pitfalls. For instance, marking every 12 inches along a gutter with painter’s tape gives you a baseline grid visible in the camera feed, making consistent spacing easier to maintain.
Real Example: A Homeowner’s Experience with Remote Alignment
Mark T., a homeowner in Portland, Oregon, decided to try a ladder cam after two consecutive years of frustration with his front porch light display. “I kept going up and down the ladder, thinking I had it right, only to step back and see one side was higher than the other,” he said. “Last December, I clipped my iPhone to the top rung using a bike phone holder and mirrored the screen to my iPad inside the living room.”
He positioned the iPad near the window facing the porch, allowing him to watch the feed while adjusting mini-lights along the railing. “It made such a difference. I could see exactly where gaps were forming and fix them immediately. I finished in half the time and didn’t climb more than three times total.”
His only regret? Not trying it sooner. “The hardest part was getting the mount to stay put in the wind. Next year, I’ll invest in a heavier-duty clamp.”
“We’ve used remote monitoring systems on commercial holiday installations for years. What used to take teams of people can now be managed solo with the right tech.” — Derek Langley, Lead Installer at Everlight Displays
Alternative Tools and Technologies
While a DIY ladder cam is cost-effective, other options exist for those seeking more advanced solutions:
- Drone Cameras: Flying a drone lets you inspect lights from multiple angles, including overhead views impossible to achieve from a ladder. However, drones require practice to operate safely near structures and may not be practical in cold or windy weather.
- Telescoping Pole Cameras: These extendable poles come with built-in HD cameras and monitors, commonly used for gutter inspections. They offer greater flexibility than ladder-mounted setups and eliminate height restrictions.
- Smart Lighting Apps: Some LED string lights integrate with apps that allow color and pattern control. While they don’t assist with physical alignment, they enhance coordination between different sections of a display.
- Augmented Reality (AR) Planning Tools: Emerging AR apps let you preview light placements virtually before installation. Though still limited in outdoor accuracy, they’re useful for planning layouts and estimating material needs.
Each tool has trade-offs in cost, learning curve, and effectiveness. For most homeowners, a smartphone-based ladder cam remains the most accessible and immediate solution.
Essential Checklist for Using a Ladder Cam Successfully
- ✅ Choose a weather-resistant camera or protect your device from moisture
- ✅ Confirm stable internet or Wi-Fi connection for live streaming
- ✅ Fully charge both camera and viewing device
- ✅ Securely mount the camera to prevent falls
- ✅ Test the video feed before starting installation
- ✅ Position the monitor within safe sightline (e.g., near door or window)
- ✅ Use reference markers on surfaces for consistent spacing
- ✅ Perform a final walk-around inspection once lights are hung
Completing this checklist minimizes technical issues and maximizes efficiency. Treating the setup like a mini-tech project—not just a decoration aid—leads to better outcomes.
Frequently Asked Questions
Can I use any smartphone as a ladder cam?
Yes, most modern smartphones work well as long as they have a functional rear camera, screen visibility in sunlight, and support for live video streaming. iPhones and Android devices with mirroring capabilities (like Google Chromecast or AirPlay) are ideal for sending feeds to larger screens.
Is it safe to leave a camera mounted on a ladder overnight?
No. Leaving electronic devices unattended on a ladder poses theft, damage, and tripping hazards. Always remove the camera and store it indoors after use. If you need ongoing monitoring, consider a temporary outdoor security camera instead.
Will a ladder cam work in the dark?
Some cameras perform adequately in low light, especially those with night vision or enhanced ISO settings. However, natural lighting provides the most accurate representation of alignment. Use the ladder cam during daylight for placement, then verify the final effect after dark with direct observation.
Conclusion: Embrace Smart Solutions for Safer, Smarter Decorating
Using a ladder cam to check Christmas light alignment from afar isn’t just possible—it’s a smart, practical strategy that enhances precision and safety. Whether you're dressing up a modest bungalow or orchestrating a neighborhood-favorite display, leveraging everyday technology can transform a tedious chore into a streamlined process.
The key lies in preparation: choosing reliable equipment, securing it properly, and understanding the camera’s limitations. When combined with simple reference tools and a disciplined approach, remote viewing becomes a powerful ally in achieving symmetrical, eye-catching results.
Holiday decorating should be joyful, not exhausting. By reducing unnecessary climbs and eliminating constant second-guessing, a ladder cam helps preserve energy, prevent injury, and deliver better-looking outcomes. This season, consider upgrading your toolkit with a simple mount and your smartphone—you might find that the perfect light line is just a screen tap away.


 浙公网安备
33010002000092号
浙公网安备
33010002000092号 浙B2-20120091-4
Comments
No comments yet. Why don't you start the discussion?