
Every holiday season, thousands of homeowners face the same frustrating challenge: untangling dozens of Christmas light strands, trying to remember which ones go where, and struggling to match colors across eaves, trees, and railings. The result? Hours wasted during cold December evenings, tangled wires, mismatched hues, and mounting frustration. But it doesn’t have to be this way.
A well-designed Christmas light strand labeling system can transform your decorating experience from chaotic to seamless. By clearly marking each strand with its intended location and color scheme, you eliminate guesswork, reduce setup time, and ensure visual consistency year after year. This guide provides a comprehensive approach to organizing your holiday lights—using durable labels, logical naming conventions, and smart storage practices that save time and protect your investment.
Create a Naming Convention That Works
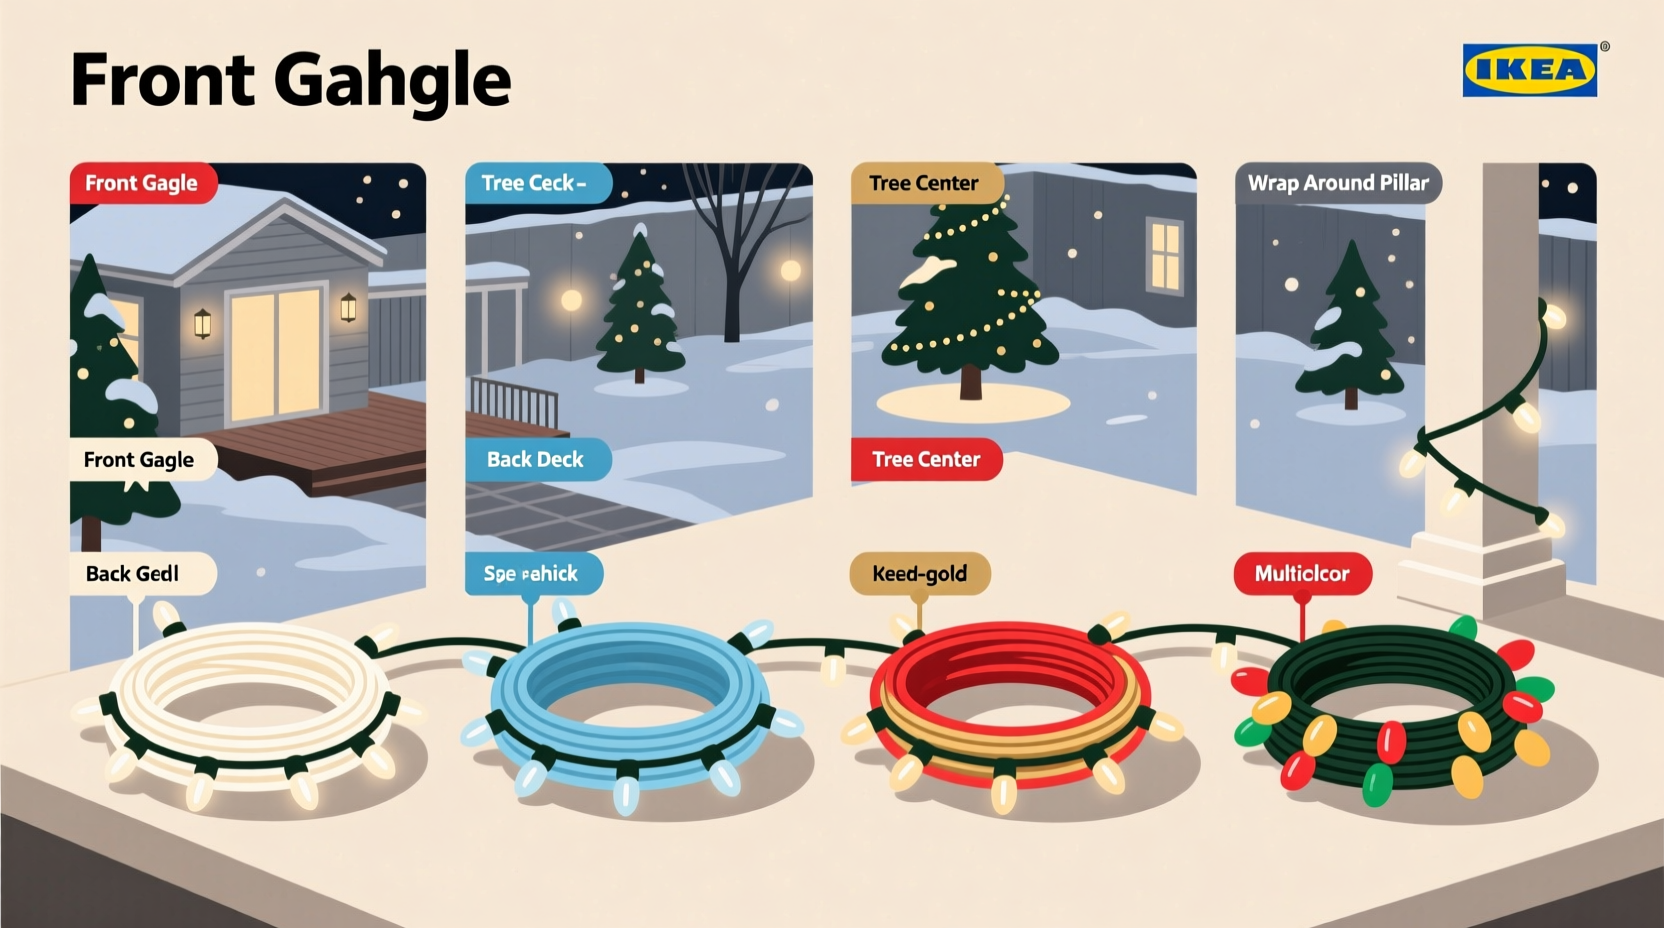
The foundation of any effective labeling system is a consistent naming convention. Without one, labels become meaningless over time, especially when multiple people are involved in setup or storage. A good naming structure should instantly communicate two things: where the strand goes and what color or effect it produces.
Start by mapping out your home’s exterior (or interior, if applicable) into distinct zones. Common zones include:
- Front eaves
- Garage outline
- Porch railing
- Tree wrapping (front yard, side yard)
- Window frames
- Deck posts
- Entryway columns
Next, assign a short, memorable code to each zone. For example:
| Zone | Code |
|---|---|
| Front Eaves | FE |
| Porch Railing | PR |
| Front Yard Tree | FYT |
| Garage Outline | GO |
| Entry Columns | EC |
Then, define your color schemes. If you use all-white lights, this step is simple. But many homes mix warm white, cool white, multicolor, or themed RGB strands. Assign abbreviations such as:
- WW – Warm White
- CW – Cool White
- MULTI – Multicolor
- RGB – Color-changing LED
- GOLD – Golden white (extra warm)
Combine the zone code and color code to create a full label. For example:
- FE-WW: Front Eaves – Warm White
- FYT-RGB: Front Yard Tree – Color-Changing
- PR-MULTI: Porch Railing – Multicolor
This system scales easily. If you add a second strand to the front eaves, label it FE-WW-2. Numbering prevents confusion when multiple identical strands serve the same area.
Choose the Right Labeling Method
Labels must survive storage, weather, and repeated handling. Many people make the mistake of using masking tape or sticky notes—both of which degrade quickly. Instead, opt for durable, weather-resistant solutions.
Here are four proven methods, ranked by longevity and ease of use:
- Plastic Cable Tags – These are small, rotatable tags that slide onto the wire near the plug end. Write on them with a permanent marker or use a label maker. They don’t fall off and resist moisture.
- Heat-Shrink Labels – Tubular plastic sleeves that shrink when heated, forming a tight, permanent bond around the wire. Ideal for long-term use but require a heat source.
- Label Makers with Laminated Tape – Print waterproof, smudge-proof labels and attach them with zip ties. Brother P-touch models are popular for this purpose.
- Engraved Zip Ties – Use a fine-tip engraving tool to etch codes directly onto heavy-duty nylon zip ties looped around the strand base.
Always place the label within six inches of the male plug. This ensures visibility during setup, when the plug end is typically handled first. Never label near the middle or far end—those sections may not be accessible until the entire strand is uncoiled.
Step-by-Step: Implement Your Labeling System
Follow this timeline to set up your labeling system efficiently—ideally during post-holiday takedown, when everything is still fresh in mind.
- Unplug and Unwind Each Strand
Work in a dry indoor space. Fully uncoil each strand to inspect for damage and prepare for labeling. - Identify Location and Color Scheme
Determine where the strand was used and its color type. Refer to your zone map if needed. - Assign a Full Code (e.g., FE-WW-1)
Use your naming convention to generate a unique identifier. - Apply the Physical Label
Attach your chosen label type near the plug. Double-check spelling and legibility. - Log It in a Master List
Create a digital or printed inventory sheet listing each code, description, length, bulb count, and storage bag number. Coil and Store with Care
Use the over-under coiling method to prevent kinks. Place each labeled strand in a dedicated compartment or bag.Tip: Use colored storage bags that match the dominant light color—red for warm white, blue for cool white—to provide a quick visual cue.- Update Annually
Each year, review your system. Retire broken strands, update codes for relocated lights, and reapply worn labels.
Real Example: How the Thompson Family Cut Setup Time by 70%
The Thompsons, a family in Denver, Colorado, spent nearly 14 hours setting up their holiday lights each December. With a two-story home, large porch, and three outdoor trees, coordination was a nightmare. Strands were mixed in bins, colors didn’t match, and half the time was spent testing bulbs and guessing placements.
In January 2023, they implemented a labeling system based on zone-color coding. They mapped eight exterior zones, assigned two-digit codes, and labeled 27 light strands using plastic cable tags and a label maker. They also created a master spreadsheet tracking each strand’s specs and location.
The next holiday season, setup took just under 4 hours. One person handed pre-labeled strands to the installer, who followed a printed placement guide. There were no mismatches, no trips back to the garage, and no frustration. “It felt like we hired a professional,” said Mark Thompson. “We even added two new strands without slowing down.”
Expert Insight: Why Organization Matters Beyond Convenience
Proper labeling isn’t just about saving time—it extends the life of your lights and improves safety. When strands are handled less roughly during setup and stored correctly, connections remain secure and wires stay intact.
“Most light failures happen at the plug or first socket due to strain during haphazard installation. A clear labeling system reduces fumbling and tension on vulnerable points.” — Daniel Ruiz, Electrical Safety Specialist, National Holiday Lighting Association
Ruiz also emphasizes that consistent color schemes contribute to curb appeal and neighborhood harmony. “Homes with coordinated lighting are perceived as more welcoming and thoughtfully decorated. The right system helps maintain that standard year after year.”
Checklist: Building Your Christmas Light Labeling System
Use this checklist to ensure you cover every step:
- ✅ Map out all outdoor (and indoor) lighting zones
- ✅ Assign short, memorable codes to each zone
- ✅ Define color/effect categories and abbreviations
- ✅ Choose a durable labeling method (plastic tags, laminated tape, etc.)
- ✅ Label each strand near the plug with a full code (e.g., GO-CW-1)
- ✅ Maintain a master list with details for each strand
- ✅ Store strands in labeled, color-coded bags or containers
- ✅ Review and update the system annually
Common Mistakes to Avoid
Even well-intentioned systems fail when basic errors creep in. Watch out for these pitfalls:
- Using non-permanent markers – Ballpoint pen or dry-erase ink will fade or rub off.
- Labeling too many strands with the same name – Without numbering, you can’t distinguish between identical strands in the same area.
- Placing labels mid-strand – They’re invisible during setup and easy to miss.
- Ignoring replacement parts – If you replace a bulb string, update the label and inventory immediately.
- Storing all lights together – Mixing labeled strands with unlabeled spares leads to contamination of the system.
“Organization breaks down fastest at the edges. One unlabeled strand introduced into a labeled system can unravel the whole effort.” — Lena Choi, Home Efficiency Consultant
FAQ: Frequently Asked Questions
Can I use colored tape instead of labels?
Colored tape can work as a secondary visual aid—green for trees, red for railings—but it shouldn’t replace text labels. Colors alone aren’t specific enough and can be misinterpreted, especially in low light or by different family members.
What if I change my light layout next year?
No problem. Update the physical label and your master list. Overwrite old tags with a new code or replace them entirely. The system is designed to evolve with your display.
Should I label extension cords too?
Absolutely. Label extension cords with their destination zone and maximum load. For example, “FE-WW-PWR” indicates it powers the front eaves warm white lights. This prevents overloaded circuits and simplifies troubleshooting.
Conclusion: Turn Chaos Into Celebration
A Christmas light strand labeling system is more than a productivity hack—it’s an investment in peace of mind, safety, and seasonal joy. What takes an afternoon to implement can save you days over the years. You’ll spend less time untangling and testing, and more time enjoying the glow of a beautifully lit home.
The holidays are meant for celebration, not frustration. By marking each strand by location and color scheme, you create a repeatable, reliable process that grows smarter every year. Whether you're decorating a modest porch or a sprawling estate, clarity and consistency make all the difference.


 浙公网安备
33010002000092号
浙公网安备
33010002000092号 浙B2-20120091-4
Comments
No comments yet. Why don't you start the discussion?