
Every household accumulates small items that seem to vanish into drawers or clutter countertops. From hair accessories to office supplies, these tiny essentials are indispensable but notoriously difficult to manage. Instead of purchasing new organizers, consider repurposing an item already in your recycling bin: the empty tissue box. Lightweight, readily available, and perfectly sized, used tissue boxes offer a surprisingly effective solution for organizing clutter. With minimal effort and no cost, they can be transformed into functional storage units across multiple rooms. This guide explores innovative, real-world applications for this humble container, helping you reduce waste while enhancing order.
Why Tissue Boxes Make Excellent Organizers
Tissue boxes are designed with accessibility in mind—the open top allows for quick retrieval, while their rectangular shape fits neatly on shelves, inside drawers, or under desks. Most are made from sturdy cardboard that holds its form even after the tissues are gone. Their standard dimensions (approximately 4.5 x 4.5 x 5 inches) make them ideal for storing small-to-medium-sized items without consuming excessive space. Unlike plastic bins, they’re lightweight, customizable, and fully recyclable when no longer needed.
Repurposing tissue boxes also aligns with sustainable living practices. According to the Environmental Protection Agency, paper products account for over 23% of landfill waste. By reusing instead of discarding, households can reduce their environmental footprint while solving everyday organizational challenges.
“Small changes in how we reuse everyday materials can lead to significant reductions in household waste.” — Dr. Lena Torres, Sustainable Living Researcher at Green Horizons Institute
5 Practical Applications by Room
The versatility of tissue boxes makes them suitable for nearly every area of the home. Below are five highly effective uses across different spaces.
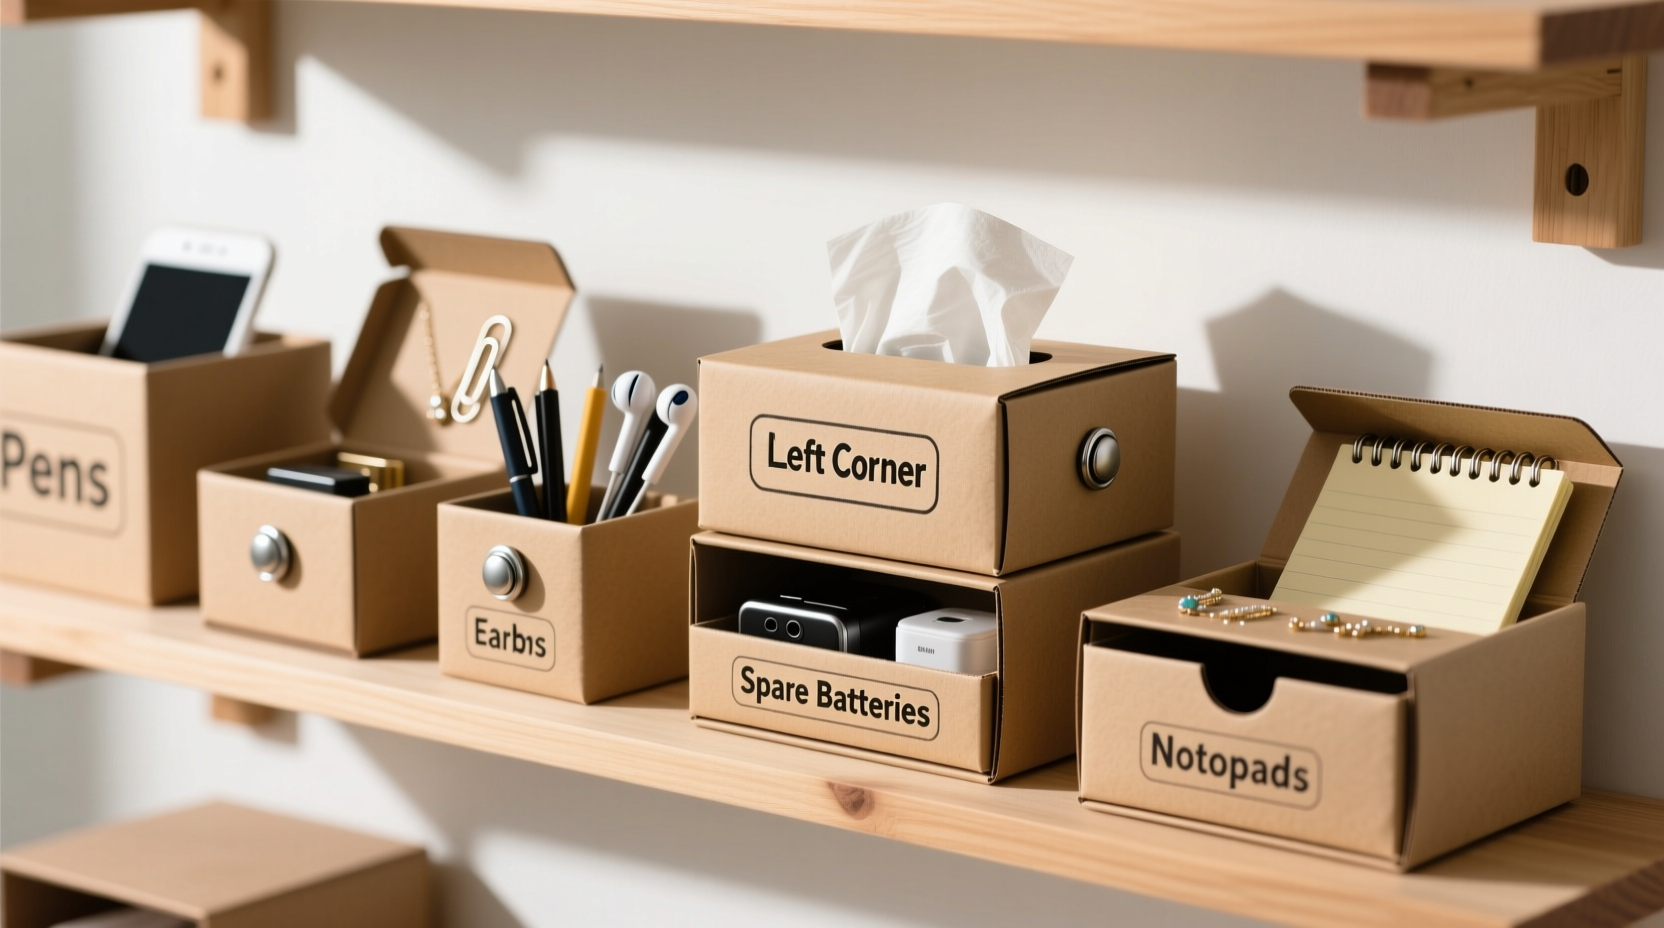
1. Bathroom: Hair & Grooming Tools Station
In shared bathrooms, hair ties, bobby pins, nail clippers, and travel-sized toiletries often end up scattered. An upright tissue box placed on the counter or inside a vanity drawer keeps these items visible and accessible. For added durability in humid environments, line the interior with contact paper or wrap the exterior with waterproof tape.
2. Home Office: Desk Supply Hub
Paper clips, rubber bands, USB drives, sticky notes, and pens frequently create desk chaos. A tissue box standing vertically acts as a multi-compartment organizer. Cut down the front edge slightly if lower access is preferred. For a polished look, cover the box with decorative paper or fabric using glue or double-sided tape.
3. Kids’ Room: Toy & Craft Material Sorter
Children’s craft supplies like crayons, stickers, pipe cleaners, and modeling clay pieces are easily lost. Assign one tissue box per category and let kids decorate their own organizers with drawings or stickers. This encourages responsibility and makes cleanup part of playtime.
4. Kitchen: Pantry Packet Keeper
Condiment packets, tea bags, instant soup mixes, and seasoning samples pile up quickly. Store opened and unopened packets in a tissue box inside a cabinet or pantry door. Label each side for different categories—e.g., “Coffee Add-ins,” “Sauces,” “Baking Mixes”—to streamline meal prep.
5. Entryway: Quick-Grab Essentials Bin
Keys, sunglasses, reusable shopping bags, and dog leashes need to be found fast before heading out. Place a tissue box near the door to hold these daily-use items. If needed, reinforce the base with extra cardboard to support heavier objects like flashlights or gloves.
Step-by-Step: Transforming a Tissue Box into a Custom Organizer
With just a few simple tools, any tissue box can become a durable, attractive storage solution. Follow this sequence for best results:
- Empty and clean: Remove any remaining tissues and wipe the interior with a dry cloth. Discard damp or moldy boxes.
- Reinforce (optional): For long-term use, apply masking tape along inner seams or glue a second layer of cardboard to the base.
- Cut for access: Trim the front edge to desired height—lower for flat items like cards, higher for taller ones like scissors.
- Decorate: Wrap with fabric, washi tape, wrapping paper, or paint. Use non-toxic adhesives, especially in children’s areas.
- Label: Attach printed labels, write directly on the front, or use adhesive label holders for easy updates.
- Fill and place: Load with designated items and position in the chosen location—shelf, drawer, or countertop.
Do’s and Don’ts of Using Tissue Boxes for Storage
| Do’s | Don’ts |
|---|---|
| Use in low-moisture areas unless sealed properly | Store heavy tools like hammers or wrenches |
| Label clearly for quick identification | Overfill beyond the rim—this weakens structural integrity |
| Customize size by cutting or combining boxes | Place near heat sources or direct sunlight for extended periods |
| Stack boxes vertically if space allows | Use damaged or waterlogged boxes |
| Replace annually or when showing wear | Forget to recycle when no longer usable |
Real-Life Example: Maria’s Morning Routine Upgrade
Maria, a working mother of two in Portland, struggled with morning chaos. Her kids’ backpacks were always missing permission slips, and her husband couldn’t find his work badge. After reading about repurposed tissue boxes online, she implemented a system in her hallway closet. She assigned one box for “School Forms,” another for “Work IDs & Badges,” and a third for “Pet Vaccination Records.” Each was decorated with colored tape and labeled in bold letters. Within a week, misplaced items dropped by 80%, and her family adapted quickly to returning documents to their designated slots. “It cost nothing,” she said, “but it saved us ten minutes every morning.”
Checklist: Getting Started with Tissue Box Organizing
- ✔ Collect 3–5 clean, dry tissue boxes from around the house
- ✔ Identify problem areas (e.g., junk drawer, bathroom counter)
- ✔ Choose items to categorize (office supplies, cosmetics, etc.)
- ✔ Reinforce boxes needing extra strength
- ✔ Decorate and label each according to its purpose
- ✔ Place organizers in high-traffic zones for maximum impact
- ✔ Review effectiveness after two weeks and adjust as needed
Frequently Asked Questions
Can I wash a tissue box if it gets dirty?
No—cardboard absorbs moisture and breaks down when wet. Instead, wipe gently with a dry or slightly damp cloth. If heavily soiled, replace and recycle the old box.
How long do repurposed tissue boxes last?
With moderate use and protection from humidity, they typically last 6 to 12 months. Reinforced or laminated versions may endure longer, especially in dry environments like closets or offices.
Are there fire safety concerns with cardboard organizers?
Cardboard is flammable, so avoid placing tissue box organizers near stoves, candles, or electrical outlets with exposed wiring. Keep them at least three feet away from potential ignition sources.
Final Thoughts and Call to Action
Organizing doesn’t require expensive containers or complex systems. Sometimes, the most effective solutions come from overlooked items already in your home. Empty tissue boxes prove that sustainability and functionality can go hand in hand. Whether you're streamlining your workspace, simplifying your bathroom routine, or helping kids stay tidy, this low-cost method delivers measurable results. The next time you finish a box of tissues, pause before tossing it. Ask yourself: what could this hold? Then turn it into a tool for clarity and calm.


 浙公网安备
33010002000092号
浙公网安备
33010002000092号 浙B2-20120091-4
Comments
No comments yet. Why don't you start the discussion?