
Braided headbands are more than just a fashion accessory—they’re a statement of personal style, comfort, and creativity. Whether you're dressing up for a casual day out or adding flair to a special occasion, a handmade braided headband offers a unique touch that store-bought accessories often lack. The best part? You don’t need years of crafting experience to make one. With basic materials and a little patience, anyone can create beautiful, durable headbands at home. This guide walks you through everything from selecting the right fabric to mastering simple braiding techniques—perfect for beginners ready to explore their creative side.
Why Make Your Own Braided Headbands?
Store-bought headbands may be convenient, but they rarely offer the customization, comfort, and satisfaction that comes with a handmade piece. Creating your own allows you to choose colors, textures, and widths that match your wardrobe or mood. Plus, making them yourself is cost-effective. A single spool of fabric cord can yield multiple headbands, and most supplies are reusable or recyclable.
Handmade accessories also make thoughtful gifts. A personalized braided headband in someone’s favorite color or pattern shows effort and care—something no mass-produced item can replicate.
“Crafting your own accessories builds confidence and encourages mindful consumption. It’s not just about style—it’s about connection.” — Lena Patel, Textile Artist & Sustainable Fashion Advocate
Materials You’ll Need
Gathering the right tools is the first step toward a successful project. Here’s what you should have on hand before beginning:
- Fabric strips or cords: Cotton, satin, or jersey knit work well. Pre-cut fabric strips (1 inch wide and 36–40 inches long) save time.
- Scissors: Sharp fabric scissors ensure clean cuts.
- Ruler or measuring tape: For consistent strip length and width.
- Elastic band or hair tie (optional): To secure the ends if not sewing.
- Needle and thread or fabric glue: For finishing seams neatly.
- Pins or clips: To hold fabric in place during assembly.
- Comb or brush: To smooth hair before wearing.
Step-by-Step Guide to Making a Basic Three-Strand Braided Headband
This beginner-friendly method uses the classic three-strand braid, similar to braiding hair. It’s reliable, symmetrical, and produces a polished look.
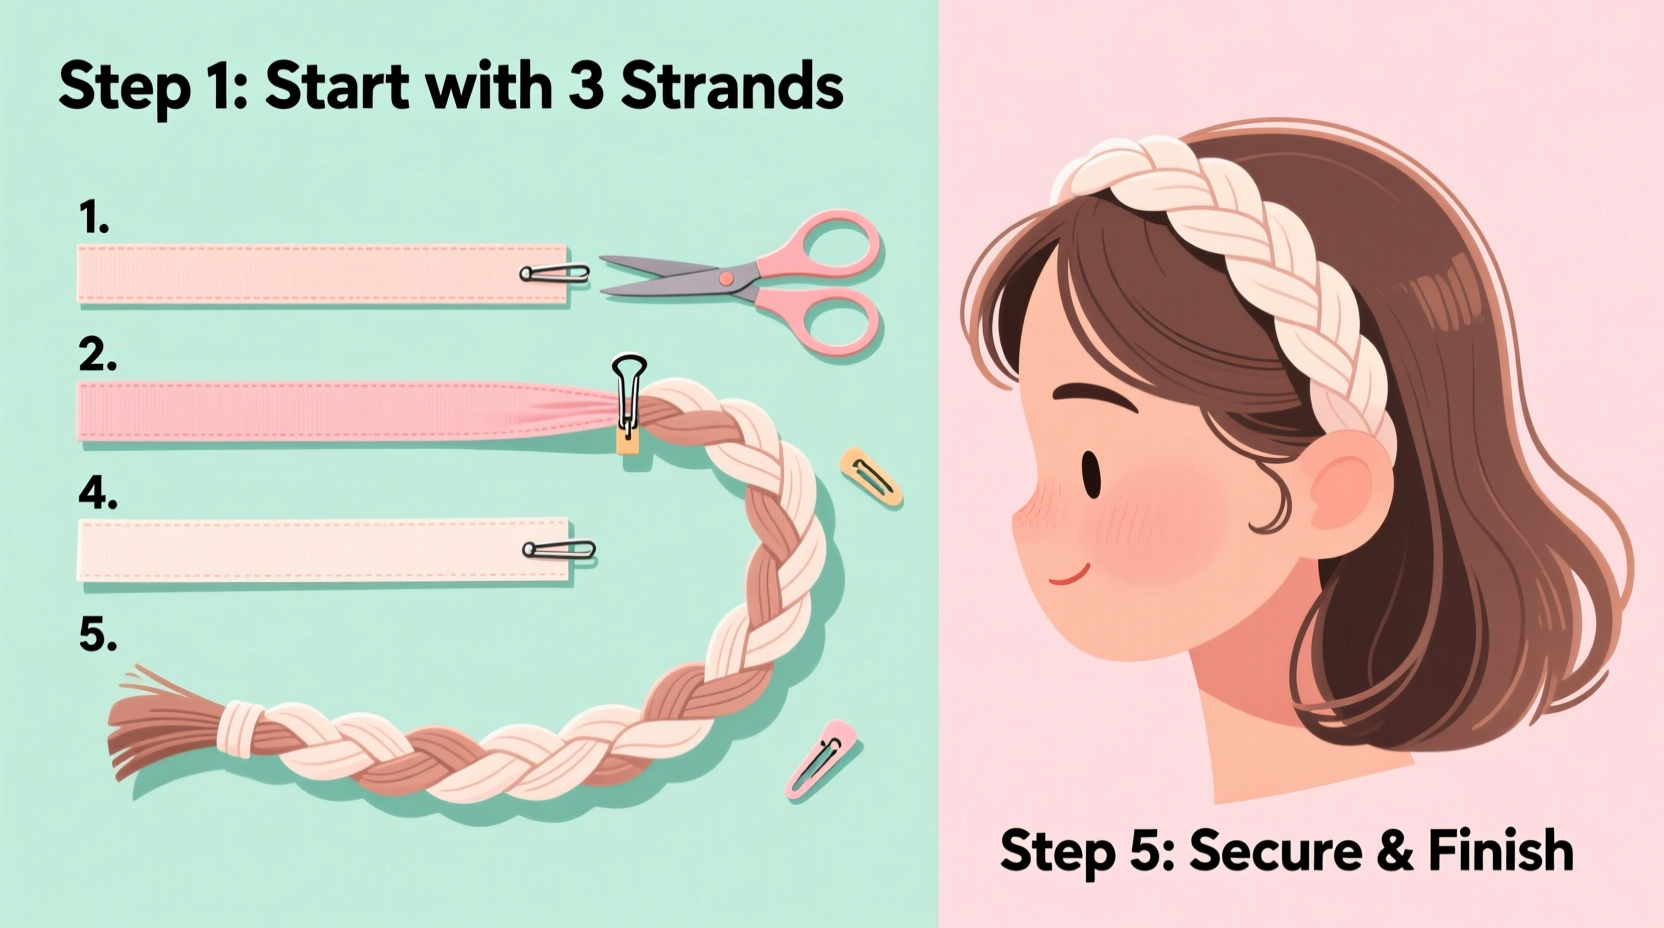
- Cut three fabric strips of equal length (about 38 inches) and width (1 inch). Choose coordinating colors or patterns for visual interest.
- Align the strips at one end and knot them together tightly. Leave about 2 inches of excess above the knot to use later for attachment.
- Secure the knotted end under a heavy book or clip it to the edge of a table. This keeps the strands taut while braiding.
- Begin the braid: Cross the right strand over the middle, then the left strand over the new middle. Repeat this sequence evenly.
- Maintain consistent tension as you go. Pull gently after each crossover to keep the braid snug but not twisted.
- Braid until you reach the desired length—typically 18 to 20 inches, depending on head size.
- Tie the end with another knot to secure the braid. Trim any excess fabric close to the knot.
- Attach elastic or sew ends together: Measure around your head, position the braid, and join the ends with stitching or strong adhesive.
For a seamless finish, fold the knotted ends inward and stitch closed. This hides raw edges and gives a professional appearance.
Variations to Try After Mastering the Basics
Once comfortable with the standard braid, experiment with these creative twists:
- Fishtail braid: Use two bundles of fabric and alternate small sections from each side. Creates a textured, woven effect.
- Four-strand braid: Adds complexity and thickness. Ideal for winter styles or bold statements.
- Incorporate ribbons or lace: Weave thin ribbons into the braid for elegance.
- Add beads or charms: Thread lightweight beads onto the ends before knotting for a playful accent.
- Use stretchy fabric: Makes the headband more adjustable and comfortable for all-day wear.
| Braid Type | Difficulty | Best Fabric | Estimated Time |
|---|---|---|---|
| Three-Strand | Beginner | Cotton, Jersey | 20–30 minutes |
| Fishtail | Intermediate | Satin, Ribbon | 35–50 minutes |
| Four-Strand | Intermediate | Knit, Fleece | 40–60 minutes |
| Twisted Rope Style | Beginner | Elastic Cord + Fabric Wrap | 25 minutes |
Mini Case Study: Sarah’s First Headband Success
Sarah, a college student with no prior crafting experience, wanted a budget-friendly way to refresh her spring wardrobe. She watched a short video tutorial, cut three strips from an old floral blouse, and followed the three-strand braid method. Her first attempt was uneven, but she unraveled it and tried again with better tension control. By her second try, she had a neat braid that matched her favorite sundress. She attached the ends with fabric glue and wore it to a picnic—receiving multiple compliments. Inspired, she made five more in different colors and gifted them to her roommates. What started as a simple project turned into a weekend ritual and a new creative outlet.
Common Mistakes and How to Avoid Them
Even simple projects come with learning curves. Watch out for these frequent issues:
- Uneven braiding: Caused by inconsistent tension. Practice slow, deliberate crossings and pause to adjust.
- Fraying fabric: Cut edges tend to unravel. Use pinking shears or apply a drop of fabric sealant.
- Slipping knots: Double-knot the ends and reinforce with glue or stitching.
- Wrong fit: Measure your head before finalizing the length. Standard adult head circumference ranges from 21 to 23 inches.
Checklist: Your DIY Braided Headband Project Plan
- ☐ Choose fabric type and color scheme
- ☐ Cut three (or more) strips to 38-inch length
- ☐ Knot one end securely and anchor it
- ☐ Begin braiding with even tension
- ☐ Complete braid and knot the end
- ☐ Measure around head and adjust length if needed
- ☐ Attach ends with needle/thread or fabric glue
- ☐ Trim excess and finish raw edges
- ☐ Style and wear proudly!
Frequently Asked Questions
Can I wash my DIY braided headband?
Yes, but gently. Hand wash with mild soap and lay flat to dry. Avoid wringing or machine washing, especially if glue or delicate fabrics are used.
What if my fabric slips while braiding?
Use clips or pins to temporarily secure loose strands. Working on a non-slip surface like a rubber mat can also help maintain control.
Are there no-sew options?
Absolutely. Use strong double-sided tape, fabric glue, or attach the braid to an existing elastic headband with hidden knots.
Final Thoughts and Inspiration
Making your own braided headbands isn’t just about creating something beautiful—it’s about slowing down, engaging your hands, and expressing individuality. Each braid carries the rhythm of your movements, the choice of your colors, and the pride of self-made craftsmanship. As you grow more confident, consider teaching a friend or hosting a small crafting session. These small acts of creation build community and keep handmade traditions alive.


 浙公网安备
33010002000092号
浙公网安备
33010002000092号 浙B2-20120091-4
Comments
No comments yet. Why don't you start the discussion?