
Handmade paper is more than just an eco-friendly alternative to store-bought sheets—it’s a canvas for creativity. While the basic process of pulping fibers and forming sheets remains consistent, the real magic happens when you begin experimenting. This guide dives into advanced yet accessible techniques that transform ordinary homemade paper into textured, colorful, and functional art pieces. Whether you're crafting stationery, gift tags, or artistic substrates, these methods will elevate your results beyond the basics.
Enhancing Texture and Dimension
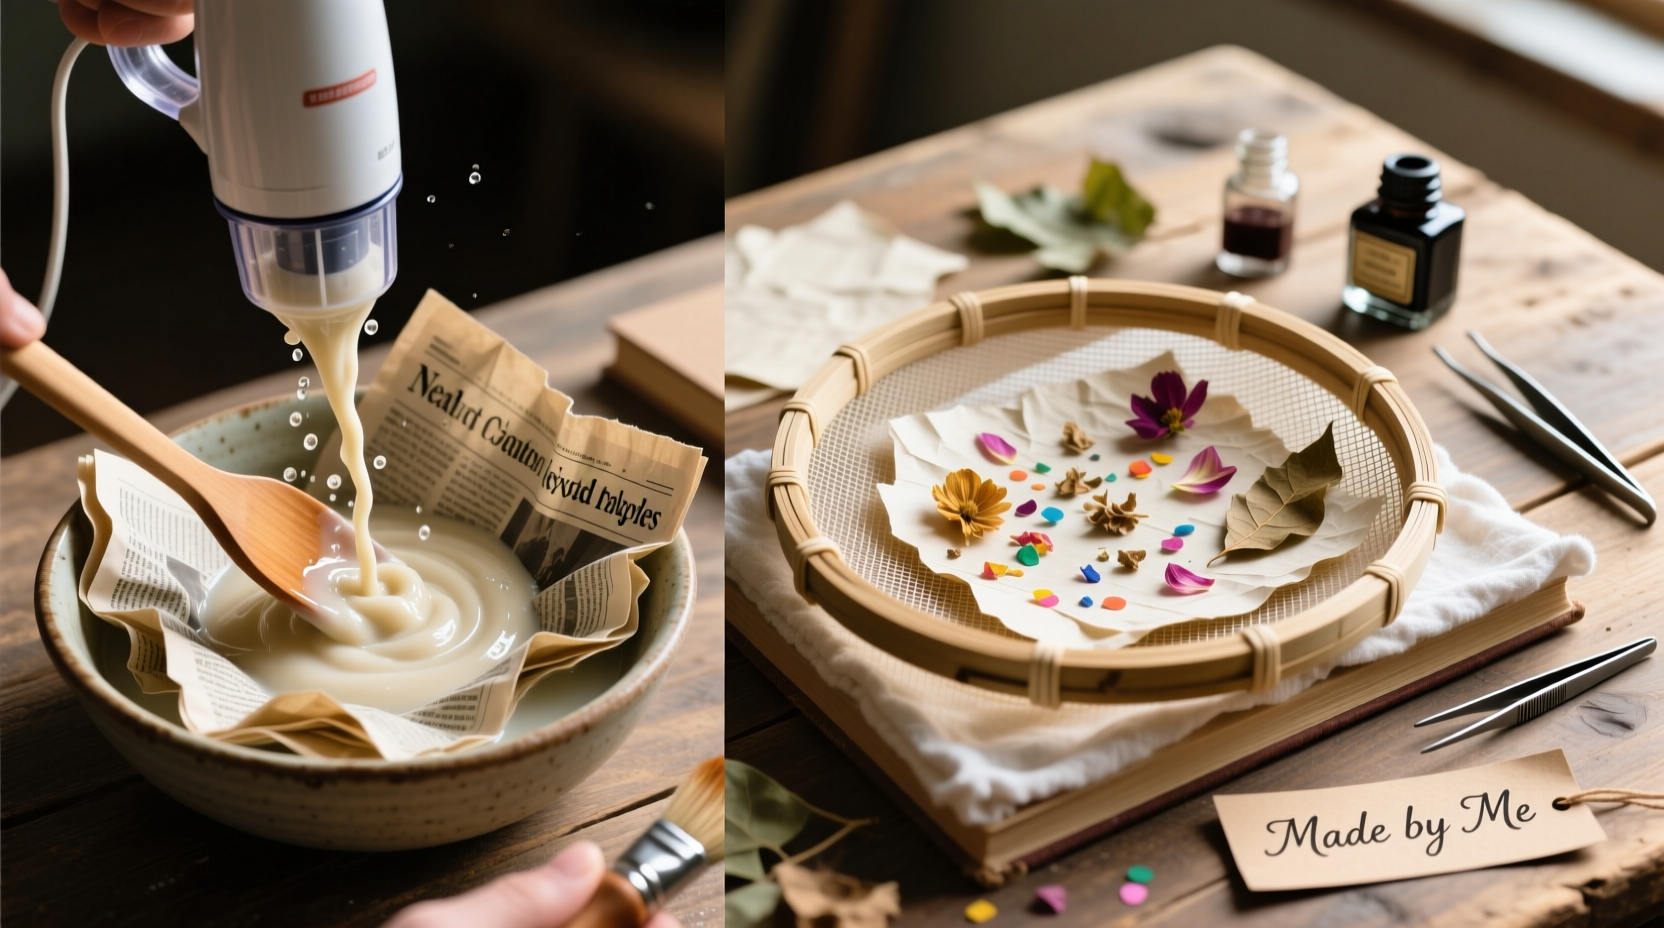
The surface quality of handmade paper defines its character. Smoothness has its place, but adding texture invites touch and visual interest. One way to achieve dimension is through controlled fiber distribution. Instead of blending pulp thoroughly, leave some longer strands intact during processing. These create subtle ridges and variations as the sheet dries.
Another method involves using textured molds. A standard deckle works well, but placing mesh fabric, lace, or even burlap beneath the pulp layer imprints intricate patterns. Press gently and allow extra drying time to preserve the raised details.
Incorporating Natural Inclusions
Embedding materials within the paper adds both beauty and storytelling potential. Petals, leaves, herbs, and finely chopped grasses can be layered into the pulp or sprinkled on top after pouring. Delicate items like rose petals should be added in moderation to avoid compromising structural integrity.
To ensure longevity, use dried botanicals rather than fresh ones, which may mold over time. Distribute them evenly across the mold before pressing. For bold statements, consider arranging inclusions into shapes—a heart of lavender buds or a sunburst of marigold petals.
“Paper that tells a story lives longer in memory than any mass-produced sheet.” — Lila Chen, Paper Artist & Sustainable Craft Advocate
Color Infusion Techniques
Natural dyes offer a sustainable way to tint paper without harsh chemicals. Onion skins, turmeric, beetroot, and black tea yield warm ambers, pinks, and browns. Simmer plant matter in water for 30–60 minutes, strain, then mix the liquid directly into the pulp.
For gradient effects, pour colored pulp in stages: start with a light base layer, let it partially settle, then add a darker hue on top. Swirling the mold gently creates marbled transitions. Alternatively, apply pigments only to the surface using a sponge or brush while the sheet is still damp.
| Dye Source | Color Result | Best For |
|---|---|---|
| Spinach (boiled) | Pale green | Eco-themed cards |
| Blueberries (mashed) | Artistic journals | |
| Avocado pits (simmered) | Blush pink | Wedding invitations |
| Strong coffee | Tan brown | Vintage-style labels |
Advanced Forming and Molding Methods
Traditional flat sheets are just the beginning. With slight modifications, you can shape paper into three-dimensional forms. To make molded containers or decorative bowls, drape the wet sheet over an oiled ceramic bowl or silicone mold. Allow it to dry completely before removal—this may take 24–48 hours depending on thickness.
Layering multiple sheets (called \"ply\") increases durability. Apply each new layer while the previous one is still damp so they bond naturally. For writing surfaces or bookmarks, embed thread, yarn, or thin ribbon along the edges during the final layer for reinforced borders.
Step-by-Step: Creating Embossed Handmade Paper
- Prepare cotton or mixed-fiber pulp as usual (soaked, blended, strained).
- Place a textured object—such as a leaf, coin, or engraved tile—on the bottom of a shallow tray.
- Pour pulp evenly over the object, ensuring full coverage (about 1/8 inch thick).
- Gently press down with a sponge to remove excess water and enhance contact.
- Lift the object carefully once the pulp begins to set (after 5–10 minutes).
- Transfer the embossed sheet to a felt or cloth for air-drying.
- Once dry, peel off and admire the impression left behind.
Finishing Touches That Make a Difference
After drying, your paper may feel rough or uneven. Light sanding with fine-grit paper smooths the surface for writing or printing. Be gentle—excessive pressure can tear delicate sheets.
Sizing is another professional finish. Mix a teaspoon of cornstarch with a cup of hot water, cool slightly, and brush a thin layer onto the surface. This reduces ink bleed and strengthens the sheet. Let it dry again before use.
For a glossy look, iron the finished paper on low heat with a pressing cloth. This also flattens any warping from drying. Store finished sheets between cardboard and in a sealed container to protect against moisture and dust.
Mini Case Study: The Botanical Stationery Series
Sophie, a hobbyist crafter in Portland, wanted to create personalized wedding thank-you cards using handmade paper. She collected dried lavender and chamomile from her garden, infused her pulp with pale yellow tea dye, and used a lace-lined mold for texture. Each sheet was sized with cornstarch and pressed under books for two days. The result? Elegant, aromatic cards that guests kept as keepsakes. Her secret: “I made test batches first. Not every flower holds up—chamomile does, but mint turned brown.”
Common Pitfalls and How to Avoid Them
- Overloading with additives: Too many inclusions weaken the paper. Stick to less than 10% by volume.
- Rushing the drying process: Heat guns or direct sunlight cause cracking. Air-dry slowly in a ventilated area.
- Using glossy or coated paper scraps: These don’t break down well. Stick to uncoated office paper, tissue, or newsprint.
- Skipping the soaking step: Fibers need at least 4 hours of soaking to form strong bonds.
Checklist: Perfect Handmade Paper in 7 Steps
- ✓ Soak clean paper scraps for 4+ hours
- ✓ Blend into smooth pulp with water
- ✓ Add natural colorants or inclusions if desired
- ✓ Pour onto mold, swirl for even spread
- ✓ Press gently to remove water
- ✓ Dry flat for 24–48 hours
- ✓ Finish with sanding, sizing, or pressing
Frequently Asked Questions
Can I use printer paper with toner for handmade sheets?
Yes, plain printer paper works well. However, avoid heavily printed pages, as excessive ink can bleed or interfere with fiber bonding. Recycled white paper is ideal for clean, neutral bases.
How do I prevent my paper from sticking to the drying surface?
Always use a non-stick barrier like parchment paper, nylon mesh, or 100% cotton fabric. Never use plastic wrap—it traps moisture and encourages mildew. If sticking occurs, lightly mist the back with water to loosen.
Is handmade paper durable enough for writing?
Absolutely. When properly formed and sized, handmade paper accepts fountain pen ink, pencil, and even light watercolor. Thicker sheets (double-layered) perform best for calligraphy and heavy media.
Making It Your Own
The true value of handmade paper lies not just in its sustainability, but in its capacity for personal expression. Every batch reflects your choices—the source of fibers, the colors you blend, the textures you imprint. These techniques open doors to endless variation, turning a simple craft into a meaningful practice. Whether you’re creating gifts, journal covers, or art installations, the process itself becomes meditative, grounding, and deeply satisfying.


 浙公网安备
33010002000092号
浙公网安备
33010002000092号 浙B2-20120091-4
Comments
No comments yet. Why don't you start the discussion?