
3D printing has transformed how we create toys, allowing hobbyists and designers alike to bring imaginative characters to life with precision and ease. Among the most popular creations are toy alien figures—endlessly customizable by design. While a standard print may come off the bed in neutral plastic, the real magic happens during personalization. With thoughtful detailing, color, texture, and narrative touches, your alien can evolve from a generic model into a one-of-a-kind character with personality, backstory, and visual impact.
Whether you're a seasoned maker or just starting out, exploring creative customization techniques unlocks deeper engagement with your craft. These methods go beyond basic painting, encouraging experimentation with materials, mixed media, and conceptual design. The goal isn’t just to decorate—it’s to transform.
Add Expressive Facial Features with Hand-Sculpting
Few things define a character more than its face. Most 3D printed alien models feature smooth or minimally detailed faces, leaving room for artistic interpretation. To give your alien distinct emotions or species traits, consider enhancing facial features using polymer clay or epoxy putty.
Knead a small amount of air-dry or bakeable clay and apply it over the printed surface to reshape eyes, add ridges, elongate jaws, or create asymmetrical deformities that suggest an otherworldly biology. Once cured, these additions can be sanded, primed, and painted seamlessly into the rest of the model.
This technique is especially effective when aiming for creatures with emotional depth—think sorrowful extraterrestrials, mischievous greys, or ancient cosmic beings. By modifying proportions and adding organic imperfections, you move beyond replication into true character design.
Use Layered Painting Techniques for Otherworldly Skin
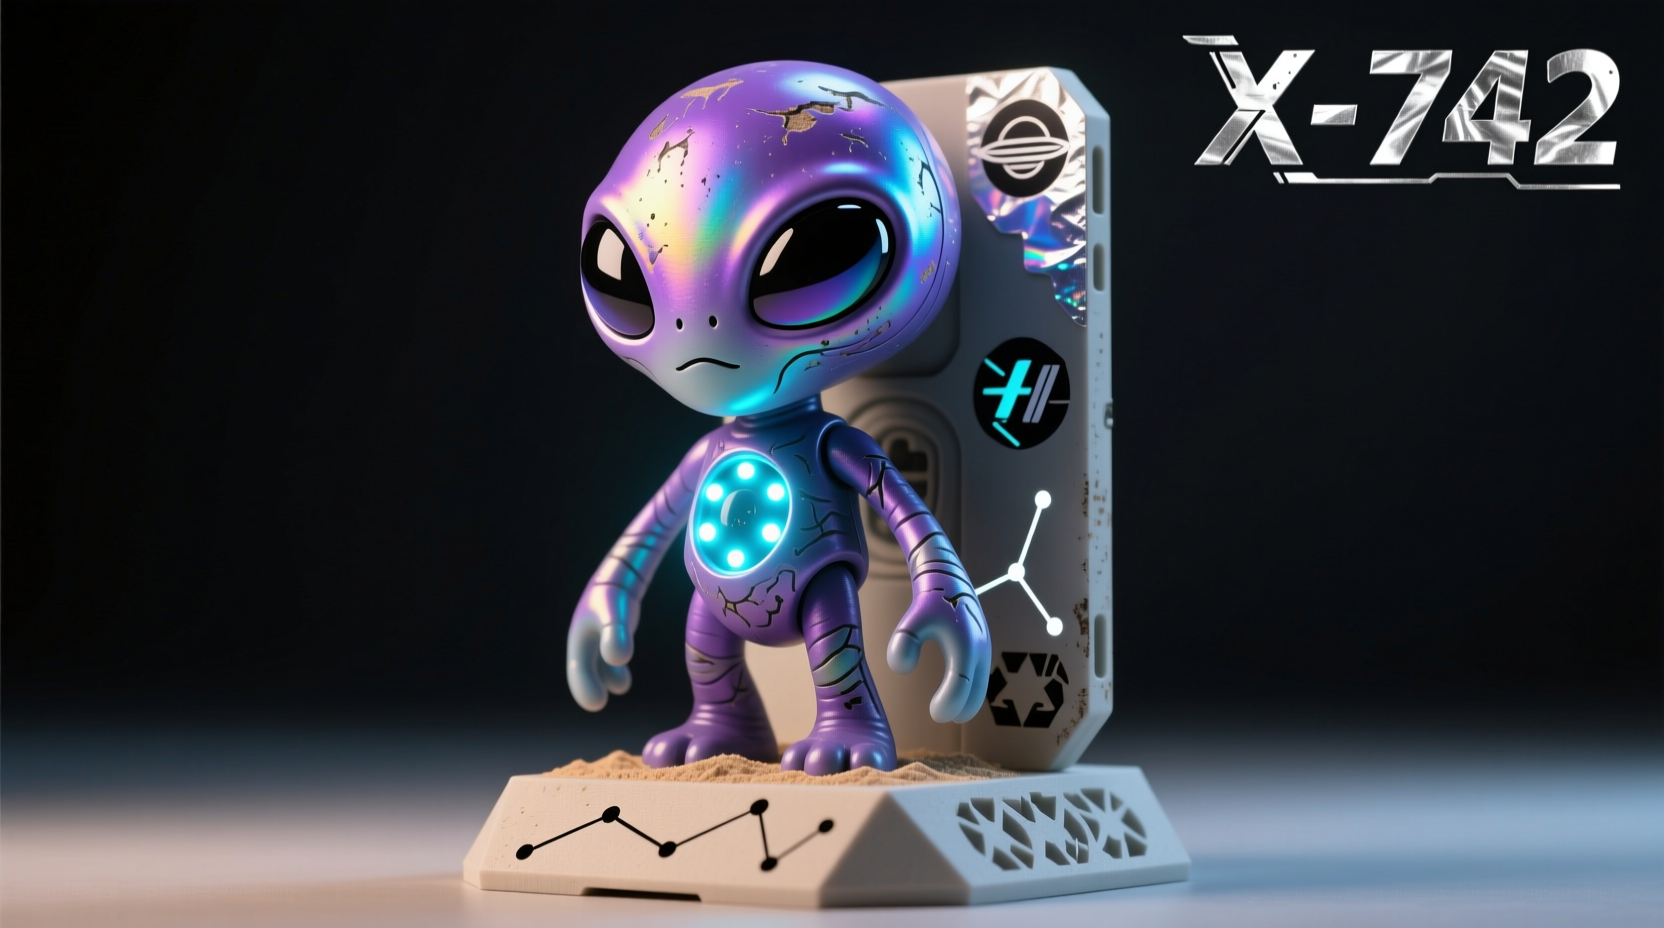
Painting is the cornerstone of toy customization, but standard solid coats often fail to capture the complexity of alien physiology. Instead, adopt layered painting methods such as glazing, dry brushing, and stippling to simulate translucent membranes, bioluminescent patches, or chitinous exoskeletons.
Start with a dark undercoat, then build up thin translucent layers (glazes) using acrylic inks or heavily diluted paints. For example, a green base with blue-purple glazes in recessed areas creates depth, mimicking subsurface scattering found in living tissue. Dry brush lighter tones on raised surfaces to highlight texture, while stippling with a sponge adds mottled skin variation.
| Technique | Best For | Recommended Tools |
|---|---|---|
| Glazing | Translucent skin, glowing organs | Acrylic ink, soft brush |
| Dry Brushing | Scaly plates, metallic armor | Stiff bristle brush |
| Stippling | Bumpy hide, fungal growths | Sponge or stipple brush |
| Washes | Shadow definition, grime effects | Black/brown wash, fine tip applicator |
Don’t limit yourself to earthly palettes. Combine neon pinks, deep violets, and electric teals to suggest alien biochemistry. Consider where light would naturally gather on the body and use subtle gradients to imply internal energy sources.
Incorporate Mixed Media Elements
To elevate your alien beyond plastic and paint, integrate non-traditional materials that enhance realism or whimsy. Small components like beads, wire, fabric scraps, or even recycled electronics can become integral parts of the design.
For instance, embed tiny LED lights behind transparent resin-filled eye sockets to achieve a pulsing glow. Attach thin copper wire as antennae that double as structural supports. Glue on sequins or iridescent film to simulate scale patterns that shift in the light.
- Use heat-shrink tubing for segmented limbs or mechanical joints
- Embed magnets in feet or hands for poseability or display options
- Wrap limbs in colored thread or embroidery floss to mimic bandages or ritual bindings
- Add faux fur or felt patches to suggest evolved adaptations to cold planets
“Customization isn’t about hiding the print lines—it’s about embracing them as part of a larger story. A scarred alien made from repurposed parts feels more real than a perfect clone.” — Lila Chen, Sci-Fi Toy Designer & MakerCon Speaker
Create a Backstory to Guide Design Choices
One of the most powerful yet overlooked personalization tools is narrative. When you define who your alien is—their planet of origin, social role, trauma, or abilities—it directly informs aesthetic decisions.
Is this a warrior from a volcanic moon? Then their armor should show heat warping and soot stains. Did they survive a lab experiment? Add stitched seams, mismatched limbs, or barcode tattoos. Are they a diplomat from a crystalline society? Incorporate geometric symmetry and reflective finishes.
Writing a short bio helps maintain consistency across modifications. It also makes your creation memorable and shareable. Collectors and fellow makers respond strongly to figures that feel alive with intention.
Mini Case Study: Zyx-7 “The Archive Runner”
A maker in Portland customized a standard bipedal alien model into Zyx-7, a data courier from a collapsed galactic network. Inspired by cyberpunk aesthetics and decayed technology, they glued microSD cards to the back as \"memory shards,\" painted circuit-like veins across the torso using silver pen, and added rust effects around joints to suggest long-term exposure to acidic rain. The eyes were replaced with salvaged watch dials showing erratic time—a symbol of fractured memory. This narrative-driven approach turned a simple print into a collectible centerpiece featured at a regional maker fair.
Step-by-Step Guide: From Print to Personality
- Post-Process the Print: Remove support structures, sand layer lines, and prime with gray spray primer for a uniform base.
- Plan Modifications: Sketch ideas or write a brief character profile to guide changes.
- Sculpt & Assemble: Apply putty or clay enhancements; attach mixed media elements securely with epoxy.
- Base Paint: Apply foundational colors using airbrush or brush, allowing for future layering.
- Detail & Texture: Use glazes, washes, and dry brushing to build depth and realism.
- Final Touches: Seal with matte or gloss varnish depending on desired finish (e.g., glossy for wet skin, matte for dusty hides).
- Display & Share: Mount on a themed base or include a small plaque with the alien’s name and origin.
FAQ
Can I paint directly on PLA plastic?
Yes, but for best results, always prime first. Unprimed PLA can absorb paint unevenly and may cause peeling over time. A light coat of spray primer creates a stable surface for acrylics.
How do I make my alien look weathered or battle-damaged?
Use a combination of techniques: chip away small bits of plastic with a knife, apply washes into crevices, dry brush metallic edges, and add streaks of red-brown paint for \"rust\" or \"blood.\" Avoid overdoing it—subtlety enhances believability.
Are there safe ways to add moving parts?
Absolutely. Ball-and-socket joints made from vinyl tubing or 3D printed hinges allow limited articulation. For rotating limbs, insert metal rods or threaded bolts. Ensure movement doesn’t compromise structural integrity.
Checklist: Personalizing Your Alien in 10 Steps
- ☐ Clean and prime the printed figure
- ☐ Define a character concept or backstory
- ☐ Sculpt facial or body enhancements if needed
- ☐ Gather paints and specialty tools (fine brushes, sponges)
- ☐ Apply base colors evenly
- ☐ Layer glazes, washes, and dry brushes for depth
- ☐ Integrate mixed media (wires, LEDs, fabric)
- ☐ Add weathering or damage effects
- ☐ Seal with protective topcoat
- ☐ Document and share your creation online
Conclusion
Personalizing a 3D printed toy alien figure is more than a technical exercise—it’s an act of storytelling through form, color, and material. Every decision, from a crooked smile sculpted in putty to the eerie glow of hidden LEDs, contributes to a being that feels authentic and alive. These techniques empower you to move beyond digital replication and into the realm of original creation.


 浙公网安备
33010002000092号
浙公网安备
33010002000092号 浙B2-20120091-4
Comments
No comments yet. Why don't you start the discussion?