
Moving, deep cleaning, or storing a dog cage often requires disassembling it. While this may seem straightforward, improper handling can lead to bent metal, stripped screws, or damaged plastic components. Whether you own a wire crate, collapsible metal kennel, or modular plastic carrier, knowing the correct breakdown process preserves both functionality and longevity. This guide walks through each phase with precision, offering practical advice to ensure your dog’s enclosure remains intact and ready for future use.
Why Proper Breakdown Matters
A dog cage isn’t just a container—it’s a structured environment designed for safety, ventilation, and comfort. Forcing parts apart or skipping steps during disassembly risks warping joints, damaging latches, or misplacing small hardware. Over time, repeated rough handling can compromise structural integrity, making reassembly difficult or unsafe for your pet.
Proper disassembly also protects your investment. High-quality crates, especially those made from powder-coated steel or reinforced plastic, are built to last—if maintained correctly. Taking the time to dismantle them properly ensures they remain functional across multiple uses, whether for travel, home organization, or seasonal storage.
Essential Tools and Preparation
Before touching any part of the cage, gather the necessary tools and prepare your workspace. A cluttered or cramped area increases the risk of dropping parts or losing hardware. Choose a clean, open floor space with good lighting.
Common tools you might need include:
- Adjustable wrench or socket set
- Phillips and flathead screwdrivers
- Small container for screws and bolts (a magnetic tray helps)
- Soft cloth or towel (to protect surfaces and parts)
- Ziplock bags or labeled containers for organizing components
If your cage uses quick-release pins or snap latches, no tools may be required—but inspect for rust or tightness anyway. Lubricate stiff mechanisms with silicone spray (never oil-based products, which attract dust).
Checklist: Pre-Breakdown Preparation
- Remove all bedding, toys, and food bowls from the cage.
- Clean the exterior and interior thoroughly.
- Inspect for manufacturer labels or assembly diagrams.
- Gather tools and organize storage containers for hardware.
- Clear a spacious, flat area for disassembly.
Step-by-Step Breakdown Process
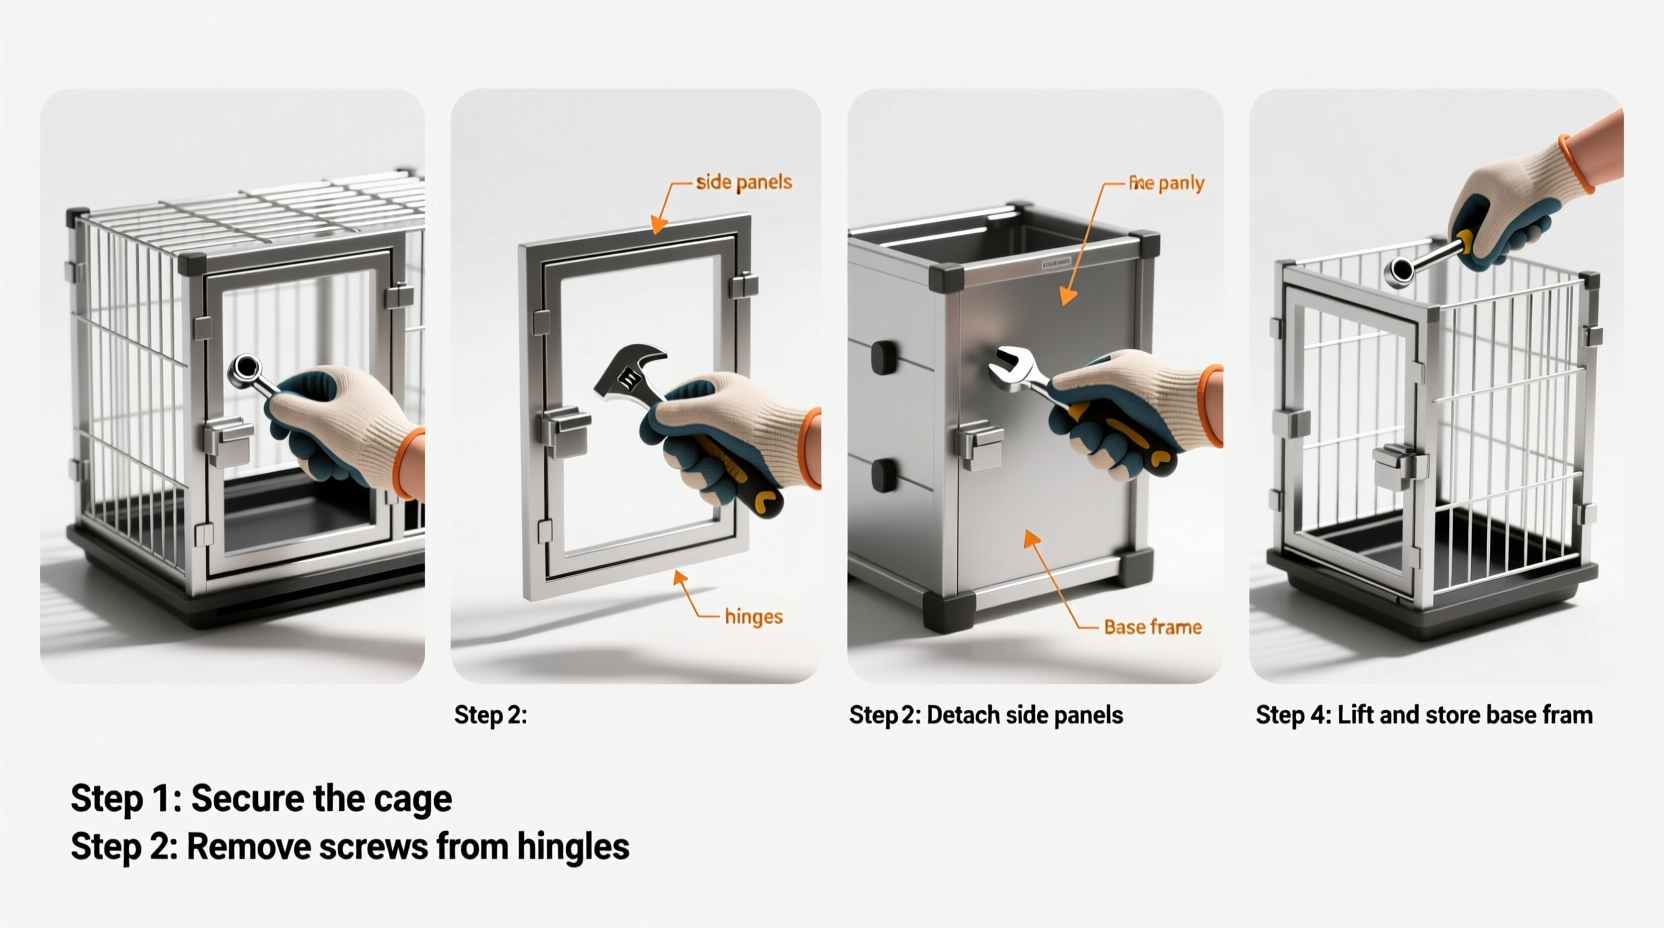
The exact method varies slightly depending on the cage type, but most follow a universal sequence. Follow these steps carefully to avoid damage.
Step 1: Remove Accessory Components
Begin by detaching anything not part of the main frame—this includes doors, trays, dividers, and feeding ports. Most cages feature removable floor pans or slide-out trays for easy cleaning. Gently pull these out straight to avoid bending tracks or rails.
Step 2: Unlock and Detach the Door Assembly
Doors are typically hinged or sliding. For hinged models, check for retaining pins or clips at the top and bottom. Use gentle pressure to lift the door upward once the pin is released—don’t force it sideways. Sliding doors often have end caps that must be unscrewed or snapped off before removal.
Step 3: Identify Fastening Mechanisms
Examine the corners and joints. Many modern crates use bolt-and-nut systems, cam locks, or push-pin connectors. Note which panels connect where—take a photo before separating pieces for reference during reassembly.
Step 4: Loosen and Remove Fasteners
Use the appropriate tool to loosen all bolts or screws. Turn counterclockwise slowly; if resistance occurs, apply penetrating lubricant and wait 5–10 minutes. Never use excessive force—stripped threads are irreversible. As each fastener comes out, place it immediately into a labeled bag (e.g., “Front Panel Bolts” or “Top Frame Nuts”).
Step 5: Separate Panels Carefully
Once fasteners are removed, gently separate each panel. Hold edges firmly but avoid pressing on mesh or grating, which can bend under pressure. Lay each section flat on a padded surface.
Step 6: Disassemble Collapsible Frames (If Applicable)
Folding crates often have hinge joints or scissor-style supports. These should fold inward smoothly. If stuck, check for debris in pivot points. Do not pry open or twist unnaturally.
“Taking five extra minutes to label parts saves hours later when rebuilding. I’ve seen owners spend days trying to remember which bolt went where.” — James Rutherford, Pet Product Technician at KennelTech Solutions
Do’s and Don’ts During Disassembly
| Do’s | Don’ts |
|---|---|
| Label every component and its corresponding hardware. | Leave screws loose on a table where they can roll away. |
| Clean each piece as you go to remove dirt buildup. | Use power tools unless specified by the manufacturer. |
| Inspect welds, hinges, and latches for wear. | Stand on or lean heavily on detached panels. |
| Store parts in a dry, rodent-free location. | Disassemble outdoors in wet or windy conditions. |
| Take photos at each stage for future reference. | Force connections that don’t release easily. |
Real-World Example: Moving a Large Wire Crate
Sarah, a dog trainer in Colorado, regularly relocates her training facility. She owns six heavy-duty wire crates used for boarding dogs. After one move, she noticed two cages wouldn’t lock properly. Upon inspection, she realized the corner brackets had been bent during rushed disassembly.
She now follows a strict protocol: each cage is cleaned, photographed mid-disassembly, and all bolts placed in color-coded bags. The frames are wrapped in moving blankets and stored upright. Since implementing this system, she hasn’t had a single damaged unit—even after three cross-state moves.
Her experience underscores a key truth: patience during breakdown prevents costly repairs and downtime.
Storage and Reassembly Tips
After successful disassembly, proper storage keeps components in optimal condition. Stack flat panels neatly, ideally with padding between layers. Avoid placing heavy items on top.
For long-term storage:
- Wrap metal parts in anti-corrosion paper or silica gel packs to prevent rust.
- Keep plastic trays out of direct sunlight to avoid UV degradation.
- Hang door assemblies vertically if possible to maintain alignment.
When reassembling, reverse the process. Refer to your photos and labels. Hand-tighten all fasteners first, then do a final pass with tools. Test door operation and latch security before introducing your dog.
Frequently Asked Questions
Can I break down a dog cage without tools?
Some models, especially folding or pop-up crates, are designed for tool-free disassembly using quick-release levers or clips. However, most durable wire or plastic kennels require basic tools for safe and complete breakdown. Always verify your model’s design before assuming it’s tool-free.
What should I do if a bolt is stuck or stripped?
Apply a penetrating lubricant like WD-40 or PB Blaster and let it sit for 10 minutes. Use a snug-fitting bit to avoid further slippage. If the head is completely stripped, consider using a screw extractor kit. As a preventive measure, periodically check and lubricate fasteners to avoid seizing.
How often should I fully disassemble a dog cage?
Complete disassembly isn’t needed frequently. Once or twice a year is sufficient—typically during deep cleaning or seasonal storage. Regular wiping and spot maintenance reduce the need for frequent teardowns.
Final Thoughts
Safely breaking down a dog cage is more than a chore—it’s an act of care. Just as you maintain your car or appliances, treating your pet’s enclosure with attention ensures reliability and safety over time. By following a methodical approach, using the right tools, and respecting the design of the structure, you preserve its function and extend its service life.


 浙公网安备
33010002000092号
浙公网安备
33010002000092号 浙B2-20120091-4
Comments
No comments yet. Why don't you start the discussion?