
Rust in a gas tank is more than just an eyesore—it can severely impact engine performance, clog fuel lines, and lead to costly repairs. When moisture accumulates inside a fuel tank, especially in vehicles that sit idle for long periods, oxidation begins almost immediately. Left unchecked, this leads to flaky rust particles that mix with fuel and damage sensitive components like carburetors and fuel injectors. The good news is that rust can be removed effectively without replacing the entire tank—provided you act before structural integrity is compromised. This guide outlines safe, practical, and proven techniques to restore your gas tank to optimal condition.
Understanding Rust Formation in Gas Tanks
Rust develops when iron or steel reacts with oxygen and water—a process accelerated by temperature fluctuations, humidity, and ethanol-blended fuels, which attract moisture. In older vehicles with metal tanks, condensation forms during cool nights, creating the perfect environment for corrosion. Even small amounts of rust can break loose and travel through the fuel system, leading to poor combustion, rough idling, or complete engine failure.
Before attempting any cleaning method, assess the severity of the rust. Light surface rust may respond well to chemical treatments, while heavy pitting or deep corrosion could mean the tank is beyond repair and needs replacement. A visual inspection using a flashlight and mirror can help determine the extent of damage.
Step-by-Step Guide to Cleaning Rust from a Gas Tank
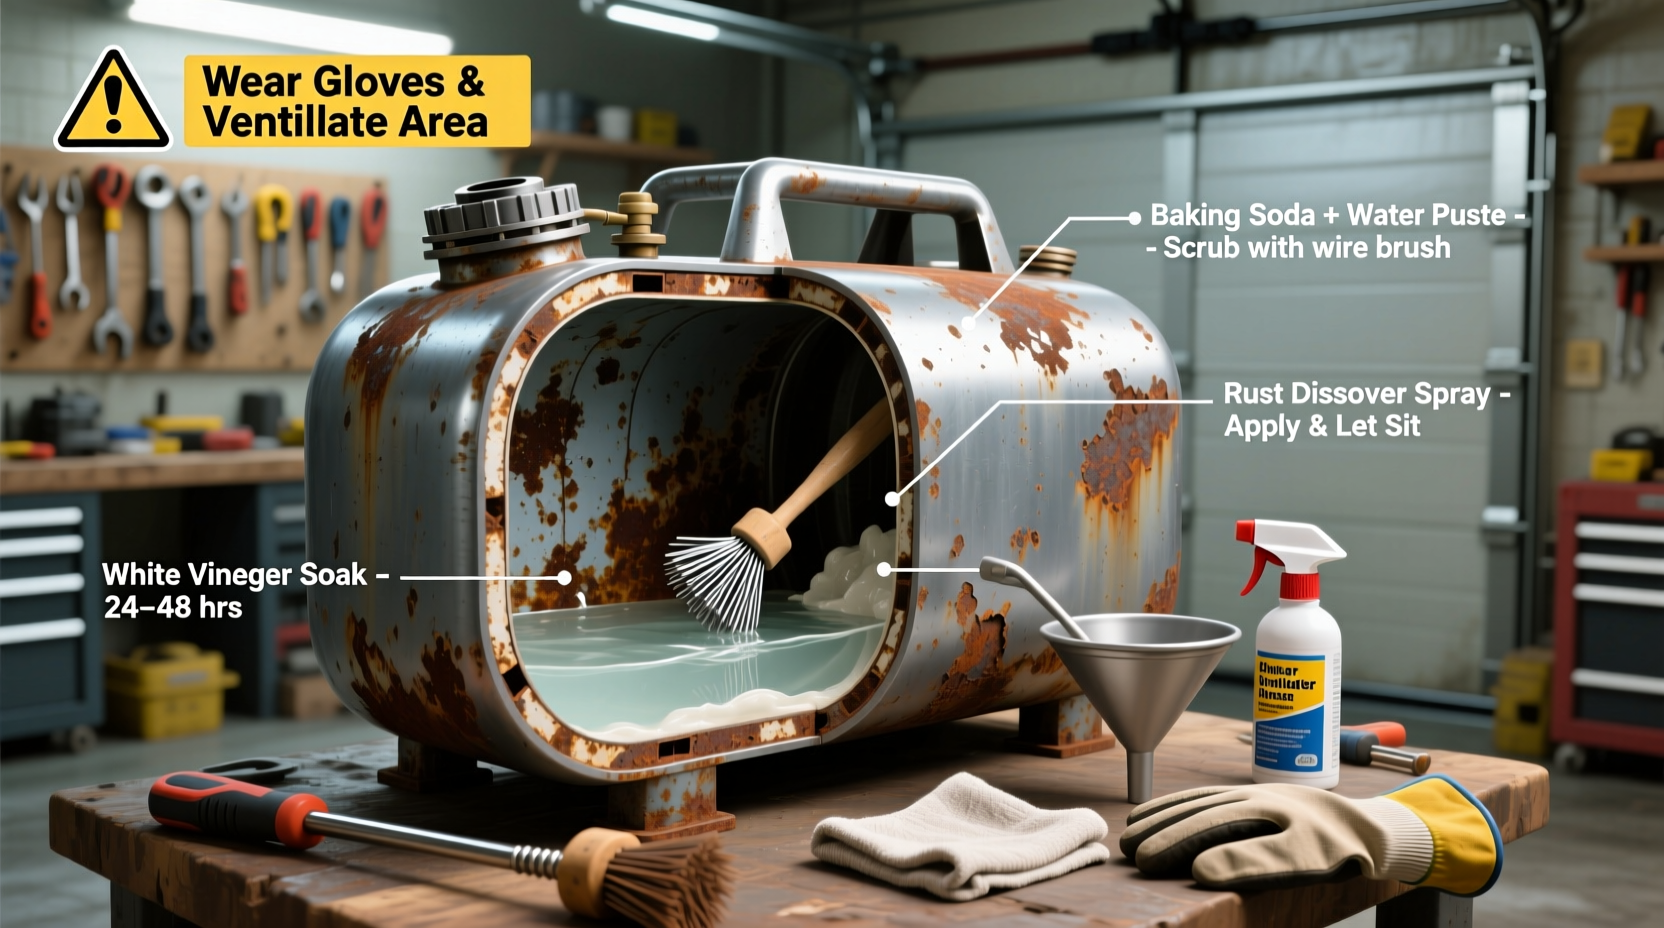
Safely removing rust requires preparation, patience, and attention to detail. Follow this comprehensive sequence to ensure effective results and avoid damaging your vehicle.
- Disconnect and Remove the Tank: Drain all fuel, disconnect fuel lines and electrical connections, then carefully remove the tank from the vehicle. Always work in a well-ventilated area away from open flames.
- Seal All Openings Except One: Use rubber plugs or tape to seal the fuel line outlet, vent hose port, and sending unit hole. Leave one opening for agitation and drainage.
- Choose a Cleaning Method: Select one of the reliable methods described below based on rust severity and available tools.
- Clean and Agitate: Pour in your chosen cleaning solution and shake or rotate the tank thoroughly for 15–30 minutes. Repeat if necessary.
- Rinse Thoroughly: Flush the tank multiple times with clean water until no residue remains.
- Dry Completely: Allow the tank to air-dry for at least 24 hours or use compressed air to speed up drying. Moisture left behind will restart the rusting process.
- Reinstall and Test: Reattach the tank, reconnect all lines, and run the engine to check for proper fuel flow and absence of leaks.
Proven Methods for Rust Removal
Different approaches offer varying levels of effectiveness depending on equipment access and rust depth. Below are three of the most trusted techniques used by mechanics and restorers alike.
Vinegar Soak (Acetic Acid Treatment)
White vinegar is a mild acid that dissolves rust over time. Submerging the tank in a vinegar bath allows acetic acid to penetrate crevices and loosen corrosion. Fill the tank completely with white vinegar and let it sit for 24 to 72 hours. Gently shake every few hours to enhance contact. After soaking, drain and rinse with water and baking soda to neutralize remaining acid.
Commercial Rust Removers
Products like Evapo-Rust, Ospho, or KBS Coatings offer specialized formulas designed specifically for fuel tanks. These solutions are non-toxic, biodegradable, and highly effective at converting iron oxide into a stable compound. Follow manufacturer instructions precisely, typically involving a 6–12 hour soak followed by thorough rinsing.
Ball Bearing or Bead Blasting (Mechanical Method)
For stubborn rust, mechanical agitation works wonders. Place a handful of clean ball bearings or ceramic media into the tank, seal all openings, and shake vigorously. The impact dislodges rust flakes without scratching the metal surface. For even better results, some professionals use rotary tumblers or send tanks to facilities for vapor blasting.
| Method | Effectiveness | Time Required | Safety Notes |
|---|---|---|---|
| Vinegar Soak | Moderate (best for light rust) | 24–72 hours | Non-toxic; requires neutralization after use |
| Commercial Rust Remover | High | 6–12 hours | Follow PPE guidelines; avoid skin contact |
| Ball Bearing Shaking | High (mechanical removal) | 30–60 minutes | Wear gloves and eye protection |
| Muriatic Acid | Very High | 1–3 hours | Extremely hazardous; not recommended for beginners |
Expert Insight: Preventing Future Rust Buildup
Once the tank is clean, preventing recurrence is essential. Many experienced mechanics emphasize proactive maintenance over reactive fixes.
“Keeping a full tank minimizes airspace, reducing condensation. I always advise clients to store vintage cars with ethanol-free fuel and a quality stabilizer.” — Mark Reynolds, Automotive Restoration Specialist
Fuel stabilizers slow oxidation and inhibit microbial growth that contributes to sludge and corrosion. Additionally, using ethanol-free gasoline (such as REC-90) in classic or infrequently driven vehicles significantly reduces moisture absorption.
Checklist: How to Safely Clean a Rusty Gas Tank
- ✅ Disconnect battery before starting
- ✅ Drain all fuel into approved container
- ✅ Remove tank from vehicle safely
- ✅ Inspect interior for pitting or holes
- ✅ Choose appropriate cleaning method
- ✅ Seal all but one opening
- ✅ Apply cleaning solution and agitate
- ✅ Rinse thoroughly with water
- ✅ Neutralize acid residues if used
- ✅ Dry completely before reinstallation
- ✅ Refill with fresh, stabilized fuel
Real Example: Restoring a Classic Motorcycle Tank
Tom, a motorcycle enthusiast in Oregon, noticed his 1978 Triumph started sputtering after sitting over winter. Upon inspection, he found dark sediment in the fuel bowl. He removed the tank and discovered moderate surface rust. Instead of replacing it—an expensive option for a vintage model—he opted for an Evapo-Rust soak. After two 8-hour cycles and vigorous shaking, the tank emerged nearly spotless. He flushed it with water, dried it with compressed air, and applied a fuel system sealer. The bike fired right up and ran smoothly for the next riding season. His total cost? Under $40 and one weekend of work.
Frequently Asked Questions
Can I clean a gas tank without removing it?
No method guarantees complete rust removal without removal. While additives claim to dissolve rust, they rarely reach all areas and cannot flush out debris effectively. Removing the tank ensures full access and proper cleaning.
Is muriatic acid safe for cleaning gas tanks?
Muriatic (hydrochloric) acid removes rust quickly but poses serious risks: fumes are toxic, it can etch metal if left too long, and residual traces can destroy fuel system components. It’s generally discouraged unless handled by professionals with proper safety gear.
How often should I inspect my gas tank for rust?
If you drive regularly and use quality fuel, annual inspection during routine maintenance is sufficient. Vehicles stored for months or running ethanol-blended fuels should be checked every six months.
Final Thoughts and Call to Action
Cleaning rust from a gas tank isn’t just about restoring function—it’s about preserving reliability, performance, and value. Whether you’re maintaining a daily driver or restoring a classic, addressing rust early saves money and prevents bigger issues down the road. With the right tools, materials, and precautions, this task is within reach of most DIYers.


 浙公网安备
33010002000092号
浙公网安备
33010002000092号 浙B2-20120091-4
Comments
No comments yet. Why don't you start the discussion?