
Waterproof camera and video glasses—such as those used in action cameras, diving equipment, or outdoor filming gear—are built to withstand moisture, dust, and impact. However, exposure to saltwater, sand, mud, and fingerprints can quickly degrade optical clarity and housing integrity if not properly maintained. While these devices are designed for tough conditions, improper cleaning can scratch lenses, compromise seals, or leave residues that affect image quality. Knowing how to clean them correctly is essential for preserving performance and extending their lifespan.
Understanding the Vulnerabilities of Waterproof Optics
Despite being labeled “waterproof,” many camera and video glasses are only resistant up to a certain depth and duration. The lens surface, housing seals, and anti-reflective coatings remain sensitive to abrasive materials and chemical exposure. For instance, salt crystals left after ocean use can etch glass over time. Similarly, wiping a sandy lens with a rough cloth causes micro-scratches that scatter light and reduce sharpness.
The outer lens is often coated with hydrophobic or anti-fog treatments. These thin layers can be stripped by alcohol-based cleaners, ammonia, or paper towels. Even seemingly harmless actions—like blowing air directly onto the lens with your mouth—can deposit moisture and organic residue.
“Many users assume waterproof means maintenance-free. In reality, post-use cleaning is critical to prevent long-term degradation.” — Dr. Lena Patel, Optical Equipment Engineer at AquaLens Technologies
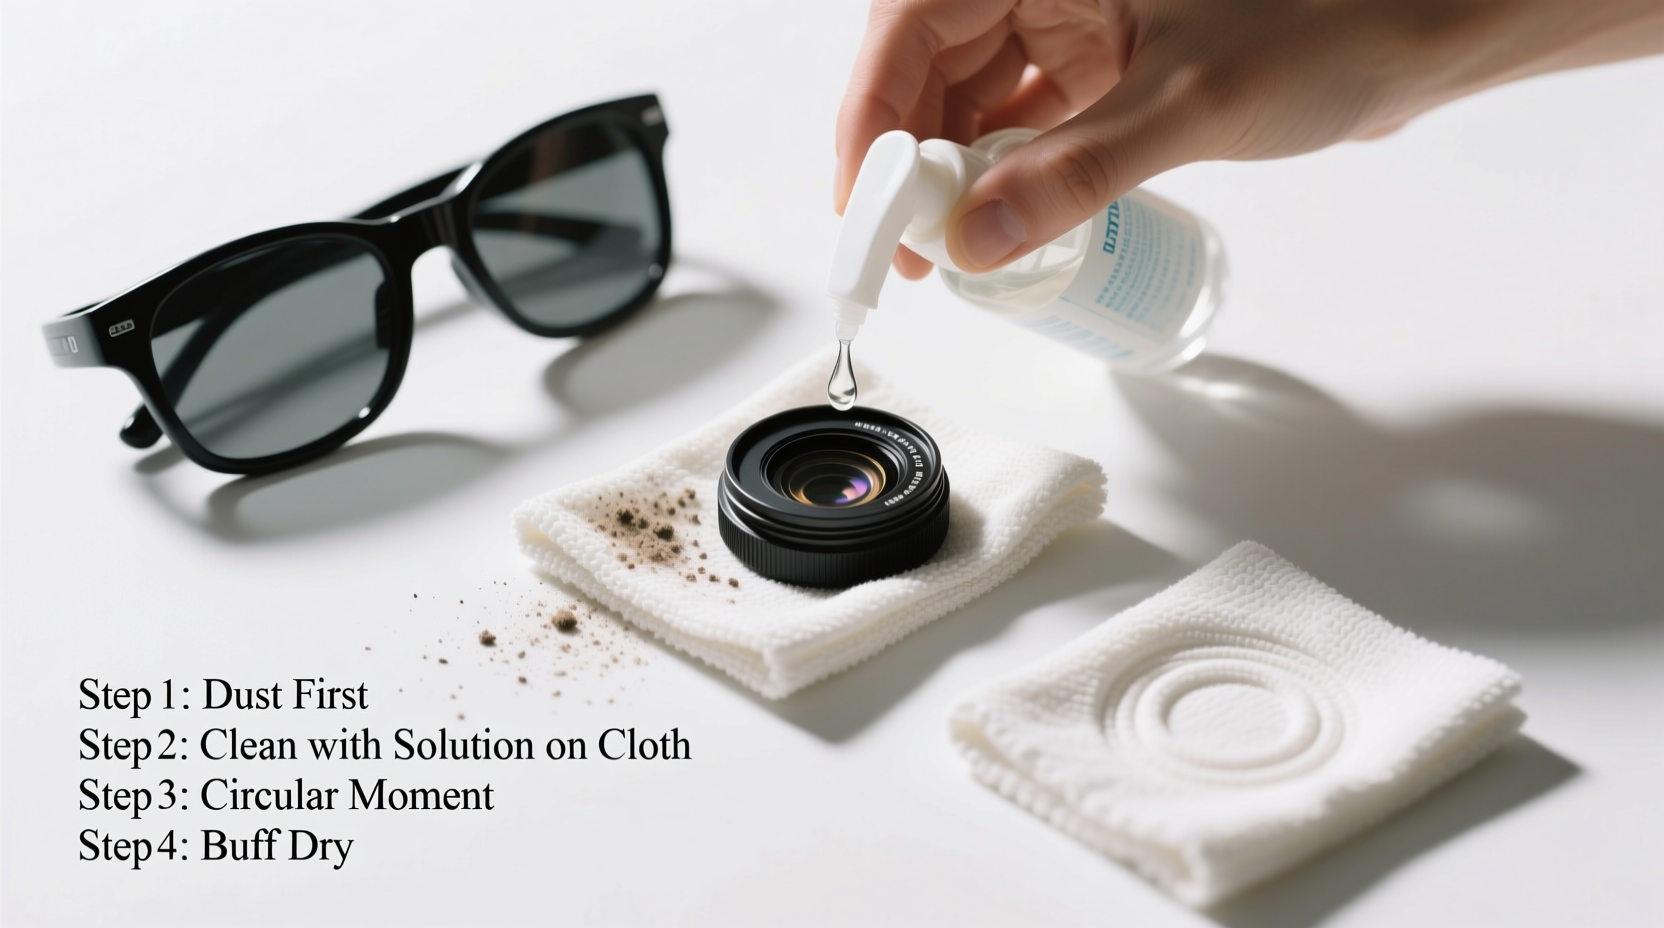
Step-by-Step Guide: Safe Cleaning Process
Cleaning waterproof camera and video glasses requires a methodical approach. Follow this sequence to avoid damage while ensuring thorough results.
- Rinse Immediately After Use: Especially after exposure to saltwater, chlorine, or sand. Use lukewarm fresh water to gently wash away debris. Hold the device with the lens facing down to prevent water from seeping into seams.
- Inspect for Debris: Check the lens surface and gasket areas under good lighting. Do not touch the lens if visible grit is present—wiping now could cause scratches.
- Loosen Particles with Air or Brush: Use a soft camel-hair brush or a bulb blower to remove loose dust. Never use compressed air cans, which may contain propellants harmful to coatings.
- Dampen a Microfiber Cloth: Moisten a high-quality microfiber cloth with distilled water or a lens-specific cleaning solution. Never spray liquid directly onto the lens.
- Wipe in Circular Motions: Starting from the center, gently move outward using light pressure. Replace the cloth if it becomes gritty during wiping.
- Dry Thoroughly: Allow the lens to air-dry in a dust-free environment or use a dry section of the microfiber cloth. Ensure no moisture remains around the housing seal.
- Check Seals and Housing: Inspect O-rings for cracks or trapped particles. Lubricate with silicone grease (O-ring specific) if recommended by the manufacturer.
Do’s and Don’ts: Best Practices Summary
| Do’s | Don’ts |
|---|---|
| Use distilled water or manufacturer-approved lens solutions | Use tap water regularly (minerals can leave spots) |
| Clean immediately after exposure to harsh environments | Delay cleaning for days, especially after saltwater use |
| Use lint-free microfiber cloths designed for optics | Wipe with clothing, paper towels, or tissues |
| Store in a cool, dry place with silica gel packs | Leave in hot cars or humid bathrooms |
| Follow the manufacturer’s maintenance guidelines | Assume all waterproof gear has the same care needs |
Real Example: A Diver’s Mistake and Recovery
Mark T., an underwater videographer based in Bali, returned from a week-long dive expedition only to notice blurred footage and a hazy lens coating. He had rinsed his camera in freshwater but wiped it with a beach towel, unaware it contained sand grains. Over several dives, micro-scratches accumulated, and salt residue degraded the anti-reflective layer.
After consulting a repair technician, Mark learned that while the scratches were permanent, future damage could be prevented. He adopted a new routine: immediate freshwater rinse, air-drying in shade, and cleaning only with a dedicated lens pen and microfiber cloth. Within weeks, his footage clarity improved significantly, and his gear longevity increased.
This case underscores that even experienced users can overlook simple risks. Prevention is far more effective than repair when it comes to optical surfaces.
Essential Tools for Safe Cleaning: Your Maintenance Kit
To maintain your waterproof camera and video glasses effectively, assemble a dedicated cleaning kit. This prevents improvisation with unsuitable materials.
- Lens-safe microfiber cloth: Preferably stored in a sealed pouch to avoid contamination.
- Bulb blower: Removes dust without touching the surface.
- Soft-bristle brush: Ideal for dislodging fine particles near seals.
- Distilled water or optical cleaning fluid: Free of minerals and additives that harm coatings.
- Lens pen: One side brushes, the other cleans with a carbon pad—useful for quick field touch-ups.
- Silica gel packs: Store with your device to absorb ambient moisture.
Frequently Asked Questions
Can I use alcohol wipes to disinfect my waterproof camera lens?
No. Most alcohol-based wipes contain solvents that strip anti-reflective, anti-fog, or hydrophobic coatings. If disinfection is necessary—such as in shared equipment settings—use a small amount of 70% isopropyl alcohol applied to a microfiber cloth, not directly on the lens. Even then, do so sparingly and only when absolutely needed.
How often should I clean my underwater camera lens?
After every use in challenging environments—especially saltwater, sand, or chlorinated pools. For regular freshwater or indoor use, clean when smudges or haze become visible. Routine inspection should be part of your post-use checklist.
What should I do if water gets inside the housing?
Power off the device immediately and do not attempt to charge or turn it on. Remove the battery if possible and place the unit in a sealed container with silica gel or uncooked rice for 48–72 hours. Even if it appears dry, have it inspected by a professional before reuse, as internal moisture can corrode electronics over time.
Final Recommendations for Long-Term Care
Preserving the clarity and functionality of waterproof camera and video glasses isn’t complicated, but it does require consistency and attention to detail. The most durable gear can fail prematurely if neglected after exposure. Treat cleaning as an integral part of your usage cycle, not an optional extra.
Invest in quality tools, follow a standardized process, and always inspect seals and coatings regularly. Remember that prevention—rinsing, covering, and storing properly—reduces the need for aggressive cleaning later. By treating your optics with care, you ensure sharper footage, reliable performance, and a longer service life across countless adventures.


 浙公网安备
33010002000092号
浙公网安备
33010002000092号 浙B2-20120091-4
Comments
No comments yet. Why don't you start the discussion?