
New high heels often come with a price: discomfort, stiffness, and painful blisters. While they may look stunning, wearing them straight out of the box can turn a special occasion into an endurance test. The good news is that breaking in high heels doesn’t have to mean suffering. With the right techniques, you can soften materials, stretch problem areas, and condition your feet—all while preserving the shoe’s structure and appearance. These strategies are used by stylists, podiatrists, and frequent heel-wearers who refuse to sacrifice style for comfort.
Understanding Why High Heels Need Breaking In
Freshly manufactured shoes are built on molds and designed for average foot shapes—not yours. Leather stiffens during production, soles lack flexibility, and seams press against sensitive areas until they conform. This mismatch causes friction, pressure points, and micro-tears in the skin, leading to blisters and soreness.
The breaking-in process allows the shoe to adapt to your unique foot shape. It softens rigid zones, loosens tight spots, and improves overall fit. Done correctly, it extends the life of the heel while making it more comfortable for extended wear. Rushing this phase—or skipping it entirely—leads to avoidable pain and potential long-term foot issues like calluses or tendon strain.
“Shoes should serve the foot, not punish it. A proper break-in routine aligns form with function.” — Dr. Lena Torres, Podiatric Specialist
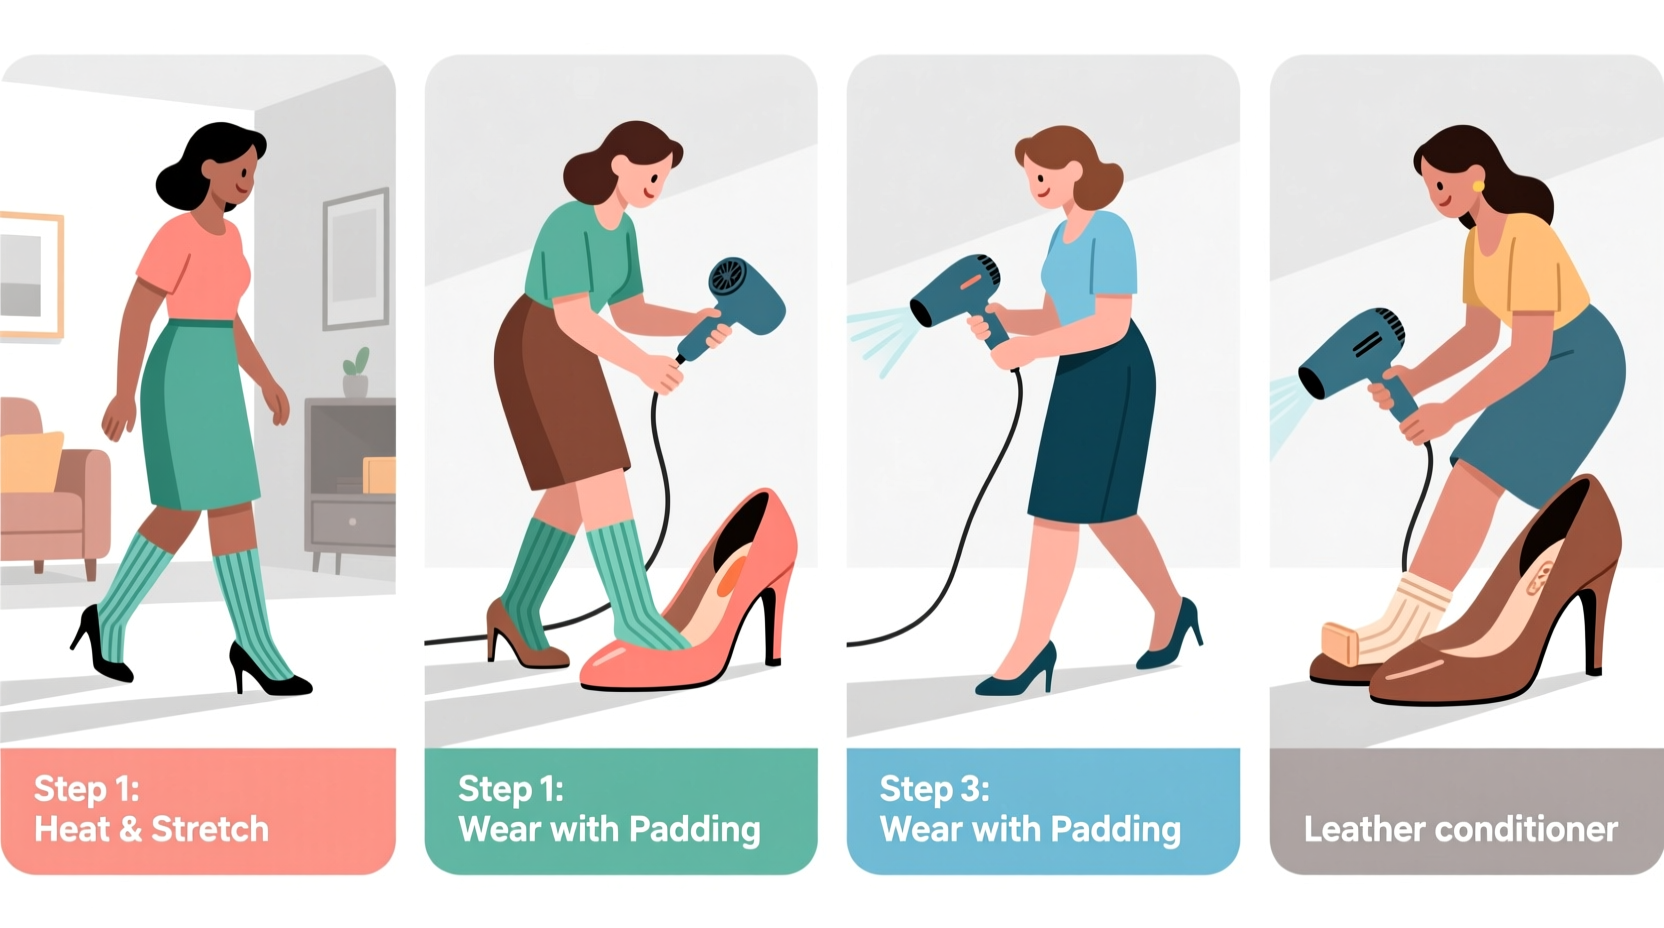
Step-by-Step Guide to Break In High Heels Comfortably
Breaking in heels isn't just about wearing them around the house. A strategic approach yields better results with less risk. Follow this timeline over 5–7 days before event day:
- Day 1–2: Indoor Wear (Short Sessions)
Wear the heels at home for 20–30 minutes daily with thick socks. Walk on carpeted surfaces to gently flex the sole and warm up leather. - Day 3: Target Stiff Areas
Use a hairdryer on low heat to warm tight zones (like the toe box) for 30 seconds, then immediately wear the shoes with padded socks for another 30 minutes. - Day 4: Stretch Problem Zones
Insert a stretched water-filled bag into the toe area, freeze overnight. Ice expands, gently stretching material without cracking. - Day 5: Simulate Real Conditions
Walk on hard floors, climb stairs, and stand for longer periods (up to 1 hour). Use gel inserts if needed. - Day 6–7: Test Run
Take a short outdoor walk—perhaps to run errands—to assess comfort and identify remaining pressure points.
Top 5 Techniques to Soften and Stretch High Heels
Different materials respond to different methods. Here’s how to apply targeted solutions based on your heel type:
- Leather Heels – Heat + Moisture Method
Warm the shoe with a hairdryer for 30 seconds, then immediately put it on with thick socks. Walk until cooled. Repeat twice. The heat opens leather fibers; moisture from socks helps them reform around your foot. - Suede or Fabric – Alcohol Spray Technique
Mix equal parts rubbing alcohol and water. Lightly mist interior areas causing friction. Wear with socks for 20 minutes. Alcohol relaxes fibers without staining. - Narrow Toe Box – Ice Expansion Trick
Fill a zip-top bag with water, place inside toe area, seal, and freeze. As water freezes, it expands, gently stretching the material. Leave for 4–6 hours. - Rigid Sole – Flex and Bend Routine
Holding the heel and forefoot, gently twist and bend the sole back and forth 20 times daily. This mimics walking motion and loosens stiffness. - Back Strap Chafing – Tape Protection
Apply moleskin or medical tape to the heel counter where it rubs. Wear with socks to reduce abrasion while the material softens.
Do’s and Don’ts When Breaking In High Heels
| Do’s | Don’ts |
|---|---|
| Wear thick or padded socks during indoor sessions | Wear barefoot to “toughen up” your skin |
| Use shoe stretch sprays on leather or synthetic materials | Soak shoes in water (can warp glue and shape) |
| Store shoes with shoe trees or rolled fabric to maintain shape | Leave heels in direct sunlight or hot cars (dries out materials) |
| Apply leather conditioner after breaking in to prevent cracking | Force stretch with excessive heat (can damage adhesives) |
| Use heel grips or cushioned insoles early on | Wear for long events before testing comfort |
Real-Life Example: Preparing for a Wedding Season
Sophia, a bridesmaid attending three weddings in six weeks, bought a pair of elegant satin stilettos. After one rehearsal dinner, she developed blisters on her heels and sides of her toes. Instead of abandoning the shoes, she followed a structured break-in plan.
She started by freezing water bags in the toe boxes twice, expanding the fit slightly. Each evening, she wore them indoors with silicone toe protectors and heel cushions for 30 minutes. On day four, she sprayed the inner straps with a fabric-safe stretch solution and walked around her apartment in them while doing chores. By the second wedding, she wore them confidently for five hours—with only minor fatigue. The third time, they felt like second skin.
Her secret? Patience and consistency. She didn’t rush the process and prioritized protection over pride.
Essential Checklist: Prepare Your Heels Before Wearing
- ☐ Inspect interior for rough seams or tags
- ☐ Apply moleskin or gel pads to known pressure points
- ☐ Perform 3–5 short indoor wear sessions (20–30 min each)
- ☐ Stretch tight areas using ice, heat, or spray
- ☐ Test walk on similar flooring as event venue
- ☐ Pack blister bandaids and spare insoles for first outing
Frequently Asked Questions
How long does it take to break in high heels?
Most heels require 5–7 days of gradual wear to become comfortable. Some softer materials may adapt in 2–3 days, while stiff leather or structured pumps might need up to two weeks. The key is incremental exposure, not marathon sessions.
Can I speed up the process without damaging the shoes?
Yes—using controlled heat, moisture, and stretching tools (like shoe stretchers or ice bags) accelerates softening safely. Avoid boiling water, oven baking, or aggressive hammering, which compromise structural integrity and adhesives.
Are there products that help break in heels faster?
Absolutely. Shoe stretch sprays, leather softeners, and wearable heel stretchers (like FootFitter or ProSoft) are effective. Gel insoles and silicone toe caps also reduce friction during the transition period, allowing the shoe to mold without injuring your feet.
Final Tips for Long-Term Heel Comfort
Once broken in, maintain comfort by storing heels properly—use dust bags and shoe forms to preserve shape. Rotate pairs instead of wearing the same heels multiple days in a row. Consider adding custom orthotic inserts if you stand for long durations.
Also, pay attention to heel height and pitch. Shoes with a 2–3 inch heel distribute weight more evenly than ultra-high stilettos. If possible, choose styles with cushioned insoles or ankle support—they’re easier to break in and gentler on joints.
“The most beautiful shoe is the one you can actually walk in.” — Marcus Lin, Celebrity Stylist & Footwear Consultant
Conclusion
Breaking in high heels doesn’t have to be a painful rite of passage. With thoughtful preparation, targeted techniques, and a little patience, you can transform stiff, unwearable shoes into confident companions for any occasion. Whether you're preparing for a wedding, work event, or night out, taking the time to condition both your shoes and your feet pays off in comfort, posture, and poise.


 浙公网安备
33010002000092号
浙公网安备
33010002000092号 浙B2-20120091-4
Comments
No comments yet. Why don't you start the discussion?