
Recessed can lights are a popular choice in modern homes for their clean appearance and effective illumination. Over time, however, they may need replacing due to outdated technology, bulb compatibility issues, or aesthetic upgrades. Whether you're switching from halogen to LED or simply refreshing an older fixture, the process requires careful attention to safety, electrical codes, and proper installation techniques. Done incorrectly, changing a can light can lead to fire hazards, electrical shocks, or insulation contact problems. This guide provides practical, actionable steps to help homeowners upgrade their can lights with confidence and safety.
Understanding Can Light Fixtures: Types and Compatibility
Before beginning any replacement or upgrade, it’s crucial to understand the type of can light currently installed. There are three main categories:
- New Construction: Installed before ceiling drywall is in place, secured directly to joists.
- Remodel (Old Work): Designed for existing ceilings, featuring adjustable clips that grip the drywall.
- IC vs. Non-IC Rated: IC (Insulation Contact) fixtures can safely touch insulation; non-IC must have at least 3 inches of clearance.
Mismatching a new fixture with your ceiling conditions—especially around insulation—can create a fire risk. Always check the label on the existing can or consult manufacturer specifications. When upgrading to LED, verify whether you’re using integrated LED trims or retrofit kits compatible with existing housings.
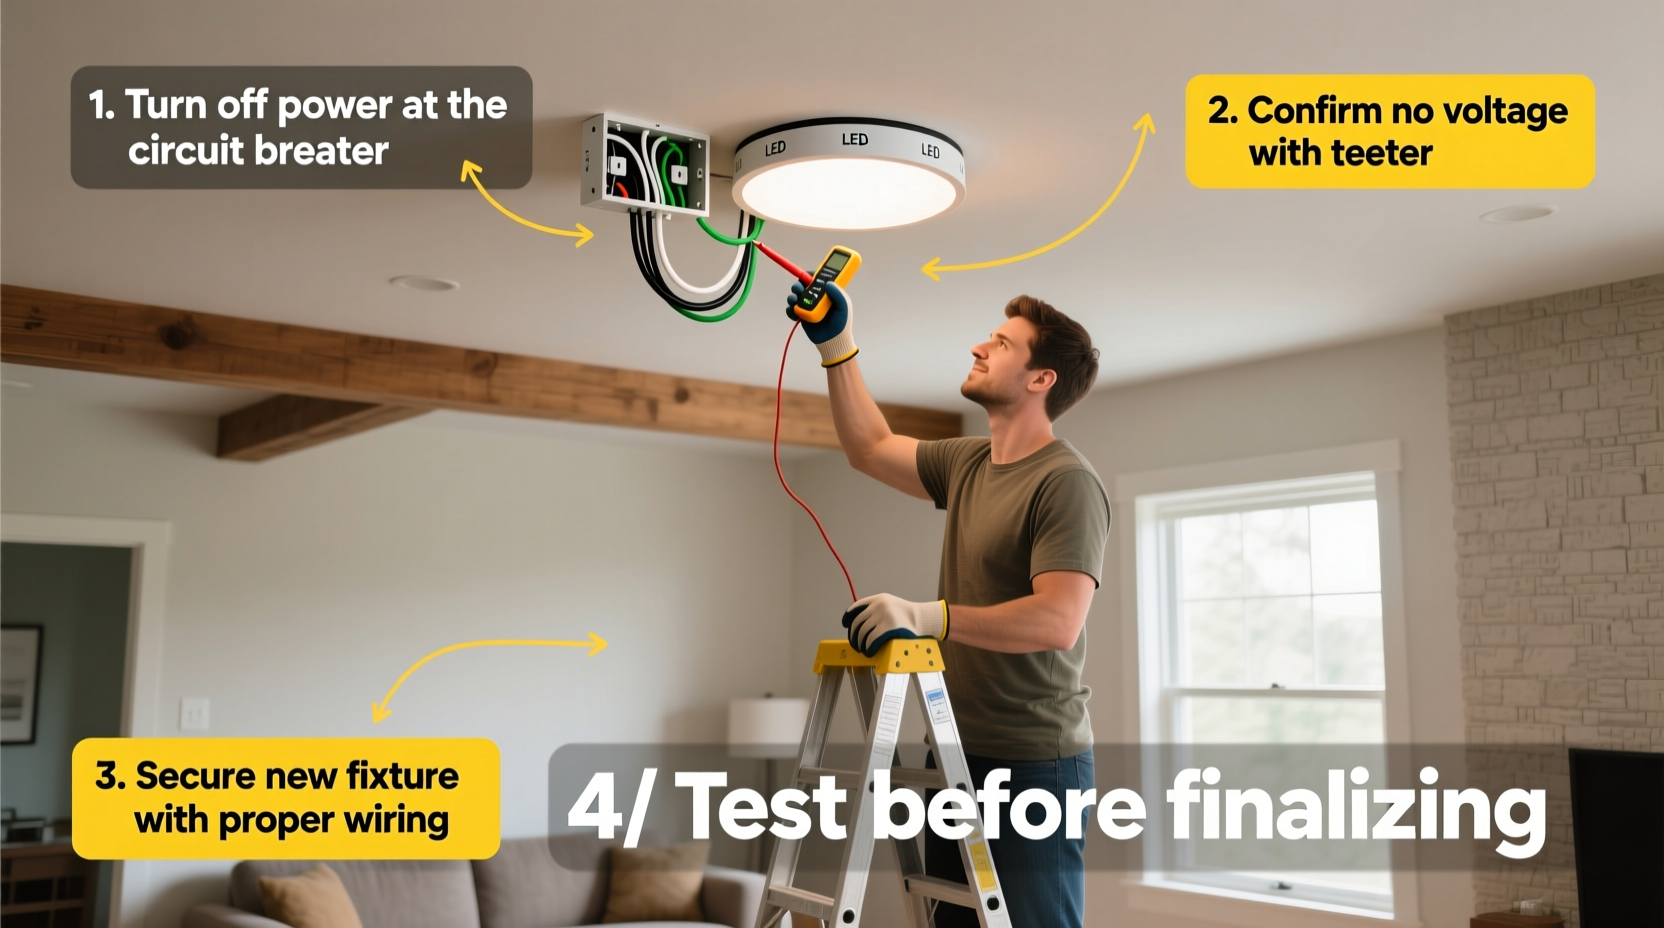
Step-by-Step Guide to Safely Replace a Can Light Fixture
Follow this sequence to replace a recessed can light safely and effectively:
- Turn Off Power at the Breaker: Locate the correct circuit breaker and switch it off. Use a non-contact voltage tester at the fixture to confirm no power is present.
- Remove the Trim and Bulb: Twist or unclip the trim ring gently and remove the bulb.
- Disconnect the Wiring: Unscrew the wire nuts connecting the fixture wires to the house wiring. Pull the wires apart carefully.
- Release the Fixture: For remodel cans, squeeze the support clips inward and lower the housing. For new construction, you may need attic access.
- Install the New Housing: Insert the new can, expand the clips (for remodel), and secure firmly against the ceiling.
- Connect Wires: Match black to black (hot), white to white (neutral), and ground to ground. Secure with wire nuts and tuck neatly into the housing.
- Attach Trim and Bulb: Install the appropriate trim kit and compatible bulb (e.g., BR30 LED).
- Restore Power and Test: Turn the breaker back on and test the light.
This process typically takes 20–45 minutes per fixture. If multiple lights are being upgraded, work on one at a time to avoid confusion with wiring.
Safety Checklist Before Starting
Never skip preparation. Use this checklist to ensure a safe working environment:
- ✅ Shut off power at the main electrical panel
- ✅ Verify power is off with a voltage tester
- ✅ Confirm ceiling accessibility (attic space or tight clearance)
- ✅ Check for insulation near the fixture
- ✅ Wear insulated gloves and safety glasses
- ✅ Use a sturdy ladder with someone nearby if possible
- ✅ Match new fixture ratings (IC, UL-listed, damp/wet location if needed)
“Always treat every wire as live until proven otherwise. A moment of caution prevents lifelong injury.” — James Reed, Master Electrician & NEC Consultant
Common Mistakes and How to Avoid Them
Even experienced DIYers make errors when upgrading lighting. The table below outlines frequent pitfalls and how to prevent them:
| Mistake | Risk | Prevention |
|---|---|---|
| Not turning off the correct breaker | Electrical shock | Label breakers clearly; test wires before touching |
| Using non-IC rated fixtures near insulation | Overheating and fire hazard | Use IC-rated housings in insulated ceilings |
| Over-tightening wire connections | Wire damage or short circuits | Hand-tighten wire nuts only; tug-test for security |
| Installing incompatible LED trims | Flickering, poor performance, or voided warranty | Check manufacturer compatibility lists |
| Ignoring air sealing needs | Energy loss and moisture buildup | Use airtight, insulated trims in conditioned spaces |
Real Example: Upgrading a Kitchen Can Light System
Homeowner Maria Lopez decided to upgrade six 15-year-old halogen can lights in her kitchen to energy-efficient LEDs. She initially planned to retrofit the existing housings with LED trims but discovered during inspection that the old fixtures were not IC-rated and were covered by loose-fill insulation in the attic. After consulting an electrician, she learned this posed a serious fire risk.
Maria opted to replace all housings with new IC-rated, airtight remodel cans designed for insulation contact. She selected integrated LED trims with 2700K color temperature for a warm, inviting glow. Though the project took longer and cost more than expected, her energy bills dropped by 18% in the first month, and the kitchen lighting became noticeably more even and flicker-free.
This case underscores the importance of evaluating both electrical and thermal safety—not just aesthetics—when upgrading can lights.
Upgrading to Smart or Tunable Lighting
Modern can lights offer advanced features like dimming, color tuning, and smart home integration. However, these require additional considerations:
- Dimmer Compatibility: Not all LED trims work with standard dimmers. Use MLV, ELV, or trailing-edge dimmers as specified.
- Smart Fixtures: Some integrated LED cans support Wi-Fi or Zigbee. Ensure your home network supports the protocol.
- Color Temperature Options: Tunable white trims allow adjustment from warm to cool light—ideal for multi-use rooms.
FAQ: Common Questions About Can Light Upgrades
Can I replace a can light without attic access?
Yes, especially with remodel (old work) housings. These feature spring-loaded clips that secure to the back of the drywall from below. Just ensure there's enough space above the ceiling for the new unit.
Are LED can lights worth the upgrade?
Absolutely. LEDs use up to 80% less energy than halogen bulbs, last 25,000–50,000 hours, generate less heat, and reduce cooling costs. The initial investment pays off in efficiency and longevity.
Do I need an electrician to change a can light?
If you're replacing like-for-like fixtures, turning off the power, and following code, most homeowners can do it safely. However, if rewiring is needed, the housing is damaged, or local codes require permits, hire a licensed electrician.
Final Thoughts and Next Steps
Upgrading can light fixtures enhances both the functionality and safety of your home lighting. By respecting electrical safety, selecting the right components, and avoiding common installation errors, you can achieve professional-quality results. Whether motivated by energy savings, better light quality, or modern aesthetics, each updated fixture brings you closer to a smarter, safer living environment.


 浙公网安备
33010002000092号
浙公网安备
33010002000092号 浙B2-20120091-4
Comments
No comments yet. Why don't you start the discussion?