
Whipped cream should be light, fluffy, and hold soft peaks with ease. But when your heavy whipping cream refuses to thicken—no matter how long you beat it—it’s more than just frustrating; it can ruin a dessert in seconds. The good news is that most issues preventing proper whipping are avoidable and often easy to fix. Understanding the science behind cream whipping, along with practical troubleshooting steps, ensures consistent results in the kitchen.
The Science Behind Whipping Cream
Heavy whipping cream contains 36–40% milk fat, which is essential for successful whipping. When air is incorporated through vigorous beating, fat globules in the cream begin to clump together, forming a network that traps air bubbles. This process transforms liquid cream into a stable foam. However, several factors—including temperature, fat content, equipment, and even timing—can interfere with this delicate emulsion.
If the fat doesn’t stabilize properly, the cream remains runny or may even separate into butter and buttermilk. Recognizing the root cause early saves time and ingredients.
Common Causes of Cream That Won’t Whip
Several preventable mistakes lead to failed whipping attempts. Identifying these early improves outcomes significantly.
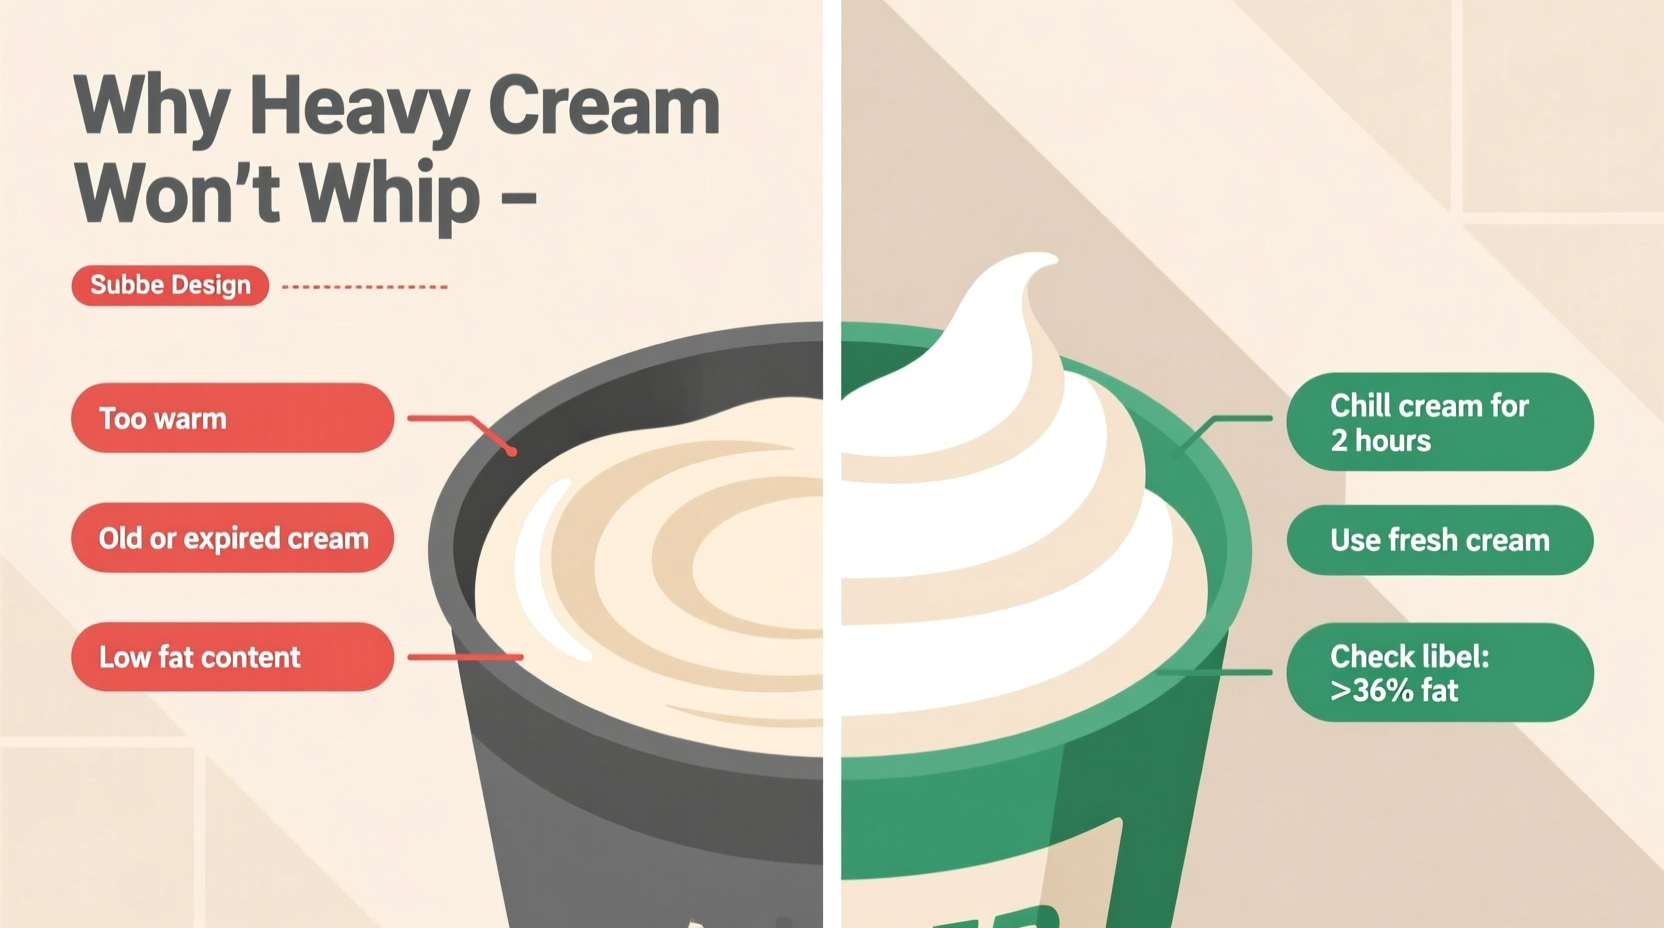
1. Cream Is Too Warm
Cream must be cold—ideally between 35°F and 40°F (2°C–4°C). Warm cream lacks the structural integrity needed for fat globules to stabilize. At higher temperatures, the fat is too soft to form a stable network, causing the cream to remain thin or collapse quickly.
2. Low Fat Content
Not all creams are created equal. If your product has less than 36% fat, it won’t whip well. Light cream, half-and-half, or even some “whipping creams” labeled below 30% fat will not achieve stiff peaks. Always check the label before purchasing.
3. Overbeating or Underbeating
Timing matters. Underbeating leaves the cream soupy; overbeating pushes it past whipped stage into grainy clumps and eventually butter. Once separation begins, it cannot be reversed.
4. Using Warm Equipment
Bowls, beaters, or whisks that aren’t chilled contribute heat to the cream during whipping. Stainless steel or glass bowls retain cold better than plastic and should be pre-chilled for at least 15 minutes.
5. Adding Sugar Too Early or in Excess
While sugar enhances flavor and stabilizes whipped cream slightly, adding it at the beginning can slow down the whipping process. Large amounts of granulated sugar may also delay aeration due to its weight and solubility rate.
6. Expired or Ultra-Pasteurized Cream
Cream past its expiration date loses freshness and whipping ability. Additionally, ultra-pasteurized (UHT) cream, while longer-lasting, often performs poorly when whipped because high heat alters protein structure and fat stability.
Solutions and Best Practices for Perfect Whipped Cream
Fixing uncooperative cream starts with prevention. Follow these evidence-based methods to ensure success every time.
Chill Everything
Place your mixing bowl, beaters, and even the cream in the refrigerator for at least 30 minutes before starting. For extra insurance, freeze the bowl for 10–15 minutes (but wipe condensation dry before use).
Choose High-Fat Cream
Select heavy cream labeled with at least 36% milk fat. Brands vary; organic or local dairy products often whip better due to minimal processing.
Add Stabilizers if Needed
In humid environments or when preparing desserts hours in advance, consider adding a stabilizer:
- 1 tsp cornstarch per cup of cream – adds body without altering taste.
- ½ tsp cream of tartar – helps maintain structure by lowering pH.
- Instant dissolved gelatin (½ tsp bloomed in 1 tbsp water) – ideal for pies or cakes needing firm hold.
Whip in Stages
Start on low speed to incorporate air gradually, then increase to medium-high. Stop frequently to check texture. Soft peaks form first (tips curl), followed by stiff peaks (tips stand straight). Do not walk away—this process takes 3–6 minutes typically.
“Temperature control is 80% of successful whipping. Cold cream + cold tools = reliable volume and stability.” — Chef Lila Nguyen, Pastry Instructor at Midwest Culinary Institute
Step-by-Step Guide to Whipping Cream Successfully
- Refrigerate the cream for at least 12 hours – never use room-temperature cartons.
- Chill your bowl and beaters – place metal or glass bowl in freezer for 10–15 minutes.
- Pour cold cream into the bowl – fill no more than halfway to allow room for expansion.
- Begin mixing on low speed – let the cream start thickening before increasing speed.
- Add sugar and vanilla after soft peaks begin to form – about halfway through whipping.
- Stop once stiff peaks hold their shape – overmixing leads to graininess.
- Use immediately or refrigerate – stabilized whipped cream lasts up to 24 hours covered.
Troubleshooting Table: What Went Wrong and How to Fix It
| Symptom | Possible Cause | Solution |
|---|---|---|
| Cream stays liquid after 5+ minutes | Too warm, low fat, expired | Discard; restart with chilled, high-fat cream |
| Cream thickens but collapses quickly | Lack of stabilization, over-handling | Add cornstarch or gelatin next time; serve immediately |
| Cream turns grainy or separates | Overbeaten | Scrape out and use as butter substitute in baking |
| Grainy texture despite no overbeating | Ultra-pasteurized cream | Switch to pasteurized-only brands |
| No volume gain | Warm tools or environment | Chill equipment thoroughly; work in cool kitchen |
Real Example: A Baker’s Mistake Turned Lesson
Jessica, a home baker preparing for a dinner party, found her cream wouldn’t whip despite 8 minutes of beating. She was using a brand-new container of “heavy whipping cream,” but it remained soup-like. After checking the label, she realized it was ultra-pasteurized—a cost-saving option from her usual store. The next day, she bought a locally produced, non-UHT cream, chilled her stainless steel bowl overnight, and added a pinch of cream of tartar. The result? Fluffy, cloud-like peaks in under 4 minutes. Her chocolate mousse received rave reviews—and she now keeps backup cream in the fridge specifically for last-minute desserts.
Frequently Asked Questions
Can I fix cream that won’t whip?
Once cream fails to whip due to warmth or low fat, there’s no way to salvage it mid-process. However, you can repurpose it in sauces, soups, or custards. Prevention is key: always use cold, high-fat cream.
Why does my whipped cream melt within an hour?
High ambient temperature, lack of stabilization, or insufficient whipping can cause rapid deflation. To extend hold time, add a stabilizer like cornstarch or gelatin, and keep desserts refrigerated until serving.
Is there a non-dairy alternative that whips well?
Yes—chilled coconut cream (from full-fat cans, refrigerated overnight) whips effectively. Some commercial non-dairy whipping toppings also perform well, though they contain additives. Avoid almond or oat milk creams unless specifically formulated for whipping.
Final Checklist Before You Whip
- ☑ Cream is cold (35–40°F / 2–4°C)
- ☑ Fat content is 36% or higher
- ☑ Bowl and beaters are pre-chilled
- ☑ Cream is fresh and not ultra-pasteurized
- ☑ Mixer speed starts low, increases gradually
- ☑ Sugar and flavorings added after soft peaks form
- ☑ No distractions—monitor closely near the end
Conclusion
Perfectly whipped cream isn’t magic—it’s method. By controlling temperature, selecting quality ingredients, and understanding the physical changes during whipping, anyone can achieve consistent, luxurious results. Whether topping a pie, folding into mousse, or piping onto cupcakes, taking a few extra precautions makes all the difference. Don’t let a single failed batch discourage you. Apply these insights, keep your tools cold, and enjoy the satisfying fluff of success.


 浙公网安备
33010002000092号
浙公网安备
33010002000092号 浙B2-20120091-4
Comments
No comments yet. Why don't you start the discussion?