
Losing personal items like keys, wallets, or bags is frustrating and common. Apple’s AirTag offers a seamless solution by turning everyday objects into trackable assets using the Find My network. With precision finding, end-to-end encryption, and a sleek design, AirTags are more than just Bluetooth trackers—they’re intelligent tools for peace of mind. Setting one up takes only a few minutes, but doing it correctly ensures maximum reliability and functionality.
What You Need Before Starting
Before activating your AirTag, ensure you have the necessary hardware and software in place. The setup process is designed for Apple devices only, so compatibility is essential.
- An iPhone or iPad running iOS 14.5 or later (or iPadOS 14.5+)
- Bluetooth enabled on your device
- Location Services turned on
- An Apple ID signed in to iCloud
- The AirTag itself (batteries are pre-installed and activated upon use)
Unlike third-party trackers that require apps from external developers, AirTags integrate directly into Apple’s ecosystem. This means no downloads, no account creation beyond your Apple ID, and immediate access to global tracking via the Find My app.
Step-by-Step Guide to Activating Your AirTag
Activation is intuitive and guided entirely through your iPhone or iPad. Follow these steps precisely to complete the process without issues.
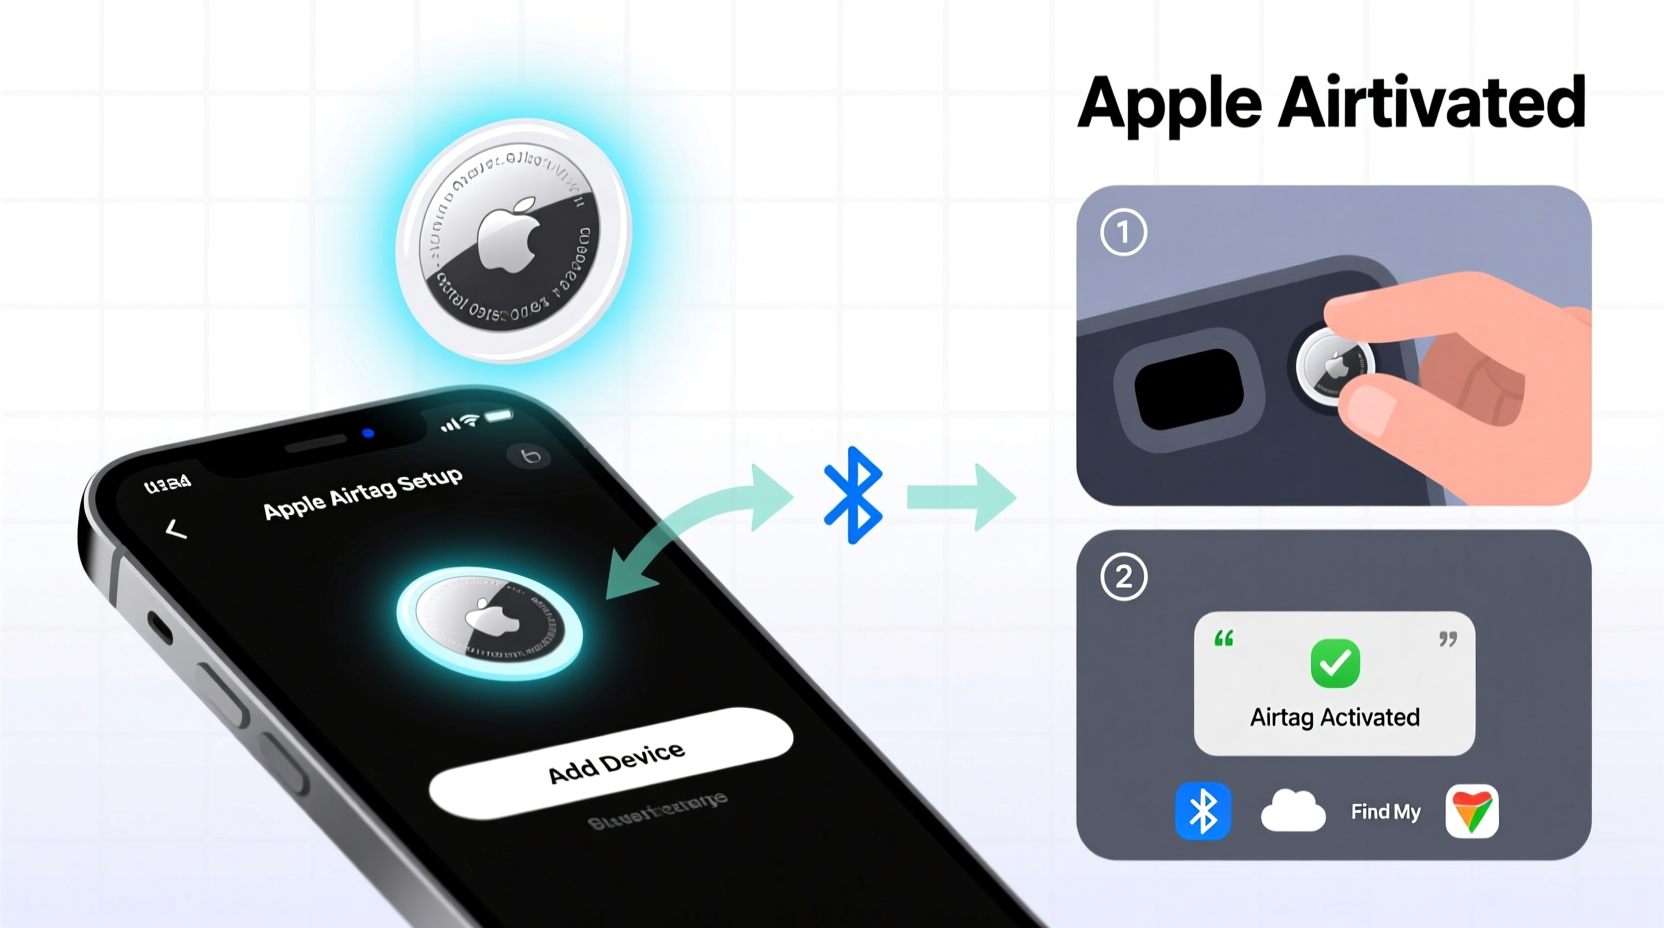
- Remove the AirTag from packaging – Peel off the plastic tab to activate the battery. You’ll hear a chime confirming power-on.
- Hold your iPhone near the AirTag – Bring the back of your iPhone close to the white side of the AirTag. A prompt should appear on your screen within seconds.
- Tap \"Connect\" – When the animation appears, tap to begin setup.
- Assign a name – Choose from suggested names (Keys, Wallet, Backpack) or enter a custom label.
- Select an emoji (optional) – Helps visually distinguish multiple AirTags in the app.
- Confirm ownership – Your Apple ID is securely linked to the AirTag for tracking and anti-stalking protections.
- Finish setup – Tap “Done” once confirmation appears.
The entire process usually takes under two minutes. After activation, your AirTag appears in the Items tab of the Find My app, ready for use.
Customizing and Securing Your AirTag
Once activated, take a moment to configure settings that enhance usability and privacy.
In the Find My app, select your AirTag and explore the following options:
- Lost Mode: Enable this if your item goes missing. If someone finds it and taps the AirTag with an NFC-capable phone, they’ll see your contact info (if provided).
- Play Sound: Useful for locating nearby items hidden under couch cushions or in cluttered bags.
- Notify When Left Behind: Alerts you if you walk away from your AirTag without it—ideal for wallets or purses.
- Separation Notifications: Customize when and how often you’re alerted.
“AirTags leverage Apple’s vast Find My network of over a billion devices, enabling anonymous location relays even when your lost item is out of Bluetooth range.” — Sarah Kim, Senior IoT Analyst at TechInsight Group
Privacy and Anti-Stalking Features
Apple prioritizes user safety. AirTags include built-in mechanisms to prevent misuse:
- If an unknown AirTag moves with you over time, your iPhone will alert you: “An AirTag has been detected traveling with you.”
- Unidentified AirTags emit a sound after being separated from their owner for a certain period.
- All location data is end-to-end encrypted; Apple cannot access where your AirTag has been.
These features make AirTags secure for both owners and the public, reinforcing trust in the system.
Best Practices for Using AirTags Effectively
To get the most out of your AirTag, follow proven usage strategies that maximize longevity and tracking accuracy.
| Do | Don’t |
|---|---|
| Attach AirTag to frequently misplaced items (keys, luggage, bike) | Use AirTags to track people or pets without consent |
| Enable Lost Mode immediately if item is missing | Place AirTag in water-exposed environments without protection |
| Check battery level monthly via Find My app | Ignore separation alerts repeatedly—they may indicate misplacement |
| Use precision finding on compatible iPhones (iPhone 11 and later) | Assume AirTag works offline—it relies on proximity to other Apple devices |
Real-World Example: Recovering a Lost Suitcase
Jessica was returning from an international trip when her checked luggage failed to appear at baggage claim. She had attached an AirTag to the handle before departure. Once outside the airport, she opened the Find My app and saw the suitcase was still inside the terminal. Using Precision Finding on her iPhone 12, she walked back toward baggage handling and followed the directional audio cues until she located it behind a service desk. Thanks to real-time location data and haptic feedback, she recovered her bag in under ten minutes.
This scenario highlights how AirTags go beyond basic tracking—they provide actionable, precise guidance when every minute counts.
Frequently Asked Questions
How long does an AirTag battery last?
The built-in CR2032 coin cell battery typically lasts about one year with regular use. You’ll receive a notification in the Find My app when the battery is low. Replacing it is simple: twist open the stainless steel back, insert a new battery, and reseal.
Can I use AirTags with Android phones?
No. AirTags require an Apple ID and the Find My app, which are exclusive to Apple devices. However, any NFC-capable smartphone (including Android) can read an AirTag if it’s in Lost Mode by tapping it to display the owner’s message.
Is there a monthly fee for using AirTags?
No. Unlike some GPS trackers, AirTags do not require subscriptions. All features—including global tracking through the Find My network—are free for life.
Final Checklist Before You Go
Ensure your AirTag is fully optimized with this quick verification list:
- ✅ AirTag successfully paired and visible in Find My app
- ✅ Named clearly (e.g., “Work Laptop Bag”)
- ✅ Lost Mode disabled unless currently needed
- ✅ Separation alerts enabled for high-value items
- ✅ Physical attachment secure (using key ring, loop, or case)
- ✅ Battery level confirmed healthy
Start Tracking with Confidence
Activating and setting up your AirTag is just the beginning. By integrating smart habits—like naming items clearly, monitoring separation alerts, and understanding privacy safeguards—you transform a small disc into a powerful ally against loss. Whether you're safeguarding daily essentials or valuable travel gear, the combination of Apple’s technology and informed usage makes misplacing important items a thing of the past.


 浙公网安备
33010002000092号
浙公网安备
33010002000092号 浙B2-20120091-4
Comments
No comments yet. Why don't you start the discussion?