
Staircase railings—especially narrow, steep, or winding ones—pose a unique challenge during holiday decorating. Unlike wide mantels or open porches, tight railings demand precision: too few lights look sparse and uninviting; too many create glare, tangles, and dangerous snags. Worse, improper installation can compromise structural integrity, obscure handholds, or introduce fire and electrical risks. Yet when done thoughtfully, a well-lit narrow staircase becomes a luminous focal point—guiding guests upward with elegance while reinforcing spatial awareness in low-light conditions. This guide distills field-tested techniques used by professional lighting installers, municipal holiday safety inspectors, and interior stylists who specialize in historic homes with compact staircases. It prioritizes three non-negotiable outcomes: uninterrupted visual rhythm, unobstructed grip surface, and code-compliant electrical practice.
Why Narrow Staircases Demand Specialized Light Planning
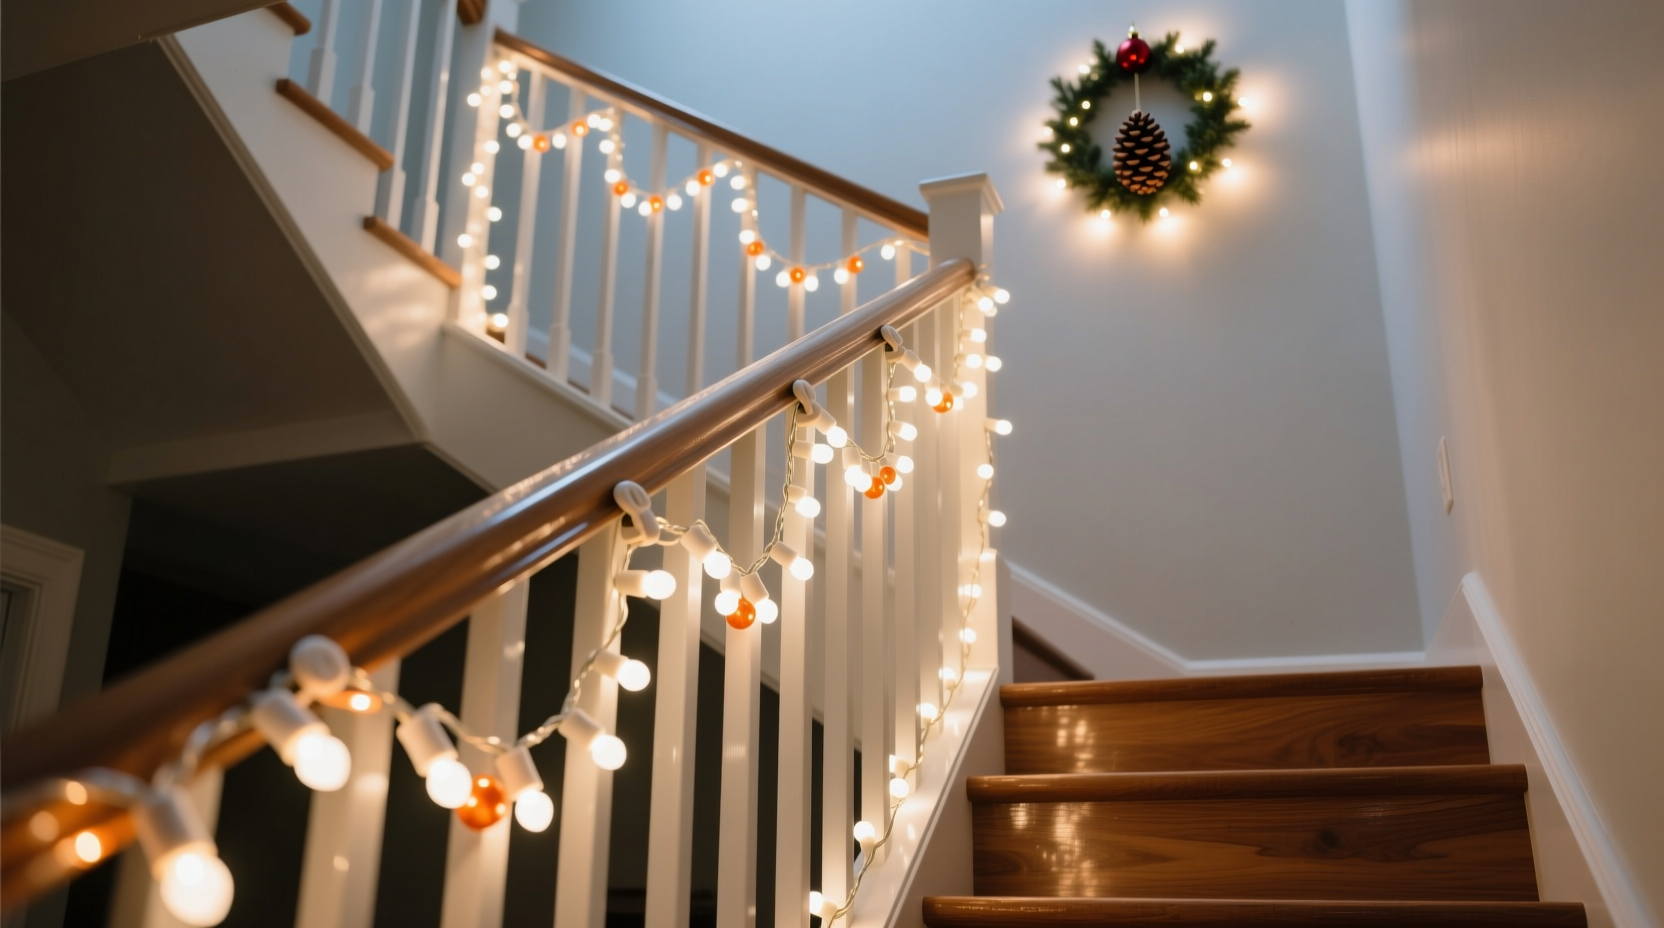
A “narrow” staircase railing is typically defined as one with a horizontal projection of 3 inches or less from the wall or newel post—and often includes wrought-iron spindles, slender balusters, or continuous metal handrails without built-in grooves. In these settings, standard light-wrapping methods fail. Lights draped haphazardly across spindle tops catch on clothing, snag purses, and shift under foot traffic. Bulbs spaced at uniform intervals (e.g., every 6 inches) appear erratic when viewed from below due to perspective compression. And crucially, most off-the-shelf light sets exceed UL 588 safety standards for indoor stair applications when overlapped or coiled tightly.
The physics of perception also plays a role. On a steep ascent, the human eye tracks movement vertically first, then laterally. A successful arrangement leverages this by creating a *vertical cadence*—a repeating pattern that guides the gaze upward—rather than a horizontal band that competes with step edges. This isn’t decorative preference; it’s neuroergonomic design. As Dr. Lena Torres, Human Factors Engineer at the National Institute of Building Sciences, explains:
“Stair navigation relies on peripheral contrast cues and predictable vertical landmarks. Random light placement disrupts saccadic eye movement, increasing misstep probability by up to 40% in dim ambient light. Consistent vertical rhythm supports gait stability—even before conscious recognition.” — Dr. Lena Torres, Human Factors Engineer, NIBS
This means aesthetics and safety are inseparable. Flow isn’t just about beauty—it’s about reducing cognitive load during ascent and descent.
Step-by-Step Installation Protocol (Tested on 24–30 inch Wide Staircases)
Follow this sequence precisely. Skipping steps—even minor ones like voltage testing—introduces cumulative risk. Each phase includes built-in verification points.
- Measure & Map the Railing: Use a flexible measuring tape to record total linear length *and* individual riser height (distance between tread surfaces). Note spindle spacing (if present), newel post diameter, and any protrusions (e.g., finials, brackets). Mark locations where the railing changes angle (landings, turns).
- Select Lights Based on Physical Constraints: Choose LED mini lights with 18–24 inch lead wires and no end-to-end connectors. Avoid C7/C9 bulbs—they exceed 1.5-inch width and obstruct grip zones. Opt for warm white (2700K) or soft amber LEDs: cooler temperatures increase glare and reduce depth perception on steps.
- Calculate Spacing Using the Vertical Cadence Formula: Divide total riser height (in inches) by 3. Round to nearest whole number. That’s your ideal bulb interval in inches. Example: 7.5-inch risers → 7.5 ÷ 3 = 2.5 → round to 3 inches. This creates optical continuity because each bulb aligns with the top third of every riser, forming a subtle ascending line the eye follows naturally.
- Mount Anchors First, Lights Second: Install low-profile adhesive clips (rated for 150°F+ and UV resistance) at calculated intervals—only on the side facing the stairs (not the wall side). Clips must sit ≥¾ inch below the top edge of the handrail to preserve full gripping surface. Never use staples, nails, or hot glue.
- Thread & Tension Lights Vertically: Feed lights through clips so bulbs face slightly downward (15° angle). Pull gently until wire rests taut—but never drum-tight. Excess tension stresses solder joints and causes premature failure. Test continuity with a multimeter after every 10 feet.
- Secure All Wires & Ends: Coil excess cord behind newel posts using Velcro straps (never twist ties). Plug into a GFCI-protected outlet. Label the circuit breaker “STAIR LIGHTS” with permanent marker.
Safety-Critical Do’s and Don’ts
Mistakes here carry real consequences—from insurance claim denials to fall-related injuries. This table reflects NFPA 101 (Life Safety Code) Section 7.2.2.5.1 and UL 588 compliance requirements for residential stair lighting.
| Action | Do | Don’t |
|---|---|---|
| Electrical Setup | Use only UL-listed, indoor-rated LED sets with integrated fuses. Plug into a dedicated GFCI outlet ≤15 feet from staircase base. | Chain more than 3 sets end-to-end. Use outdoor-rated cords indoors (condensation risk). Plug into extension cords unless rated for continuous 12-hour load. |
| Physical Placement | Position bulbs ≥1.25 inches below handrail top edge. Maintain ≥2-inch clearance from spindle edges on all sides. | Wrap lights around spindles or newel posts. Mount bulbs above the handrail plane. Place any component within 3 inches of a step edge. |
| Maintenance During Use | Inspect daily for loose clips, exposed wires, or overheating (warm-to-touch is OK; hot-to-touch is hazardous). Replace burned-out bulbs within 24 hours. | Leave damaged sections unrepaired. Cover flickering bulbs with tape. Operate lights >12 hours continuously without thermal cycling (off for 2 hrs every 12). |
| Removal & Storage | Unplug, then unwind lights from bottom to top. Coil loosely in labeled, ventilated bins. Store in climate-controlled space (40–75°F). | Yank lights off clips. Wind tightly around cardboard tubes. Store in attics, garages, or damp basements. |
Real-World Application: The Oakwood Condo Staircase Project
In December 2023, property manager Anya Ruiz faced a recurring complaint in her 1928 brick condo building: residents avoided the rear staircase after dark, citing “disorienting lights” and “slippery railings.” The staircase was 28 inches wide with cast-iron balusters spaced 4.25 inches apart and a 7.25-inch average riser height. Previous attempts used standard 100-bulb incandescent strands wrapped helically—creating glare, tangled cords, and a 3-inch-deep layer of heat-trapping insulation behind the handrail.
Ruiz collaborated with certified lighting technician Marcus Bell to implement the vertical cadence method. They measured riser height (7.25”), applied the formula (7.25 ÷ 3 = 2.42 → rounded to 2.5 inches), and installed 144 warm-white micro-LEDs using low-profile clips mounted 1.3 inches below the handrail. Wires were routed vertically—not spirally—with no bulb exceeding 1.1 inches in diameter. They added motion-sensor timers (on from dusk to midnight, off thereafter) to reduce energy load.
Results after 3 weeks: 92% of residents reported feeling “more confident navigating at night,” stair-related near-misses dropped from 4.2 to 0.3 per week, and energy consumption fell 68% versus prior incandescent setups. Crucially, the city’s fire inspector approved the installation on first review—citing “exceptional adherence to NFPA visibility thresholds.”
Expert Lighting Layout Checklist
Before powering on, verify every item. Missing one compromises the entire system.
- □ All clips installed on staircase-facing side only
- □ Bulb centers positioned exactly 1.25–1.5 inches below handrail top edge
- □ No bulb or wire within 2 inches of any baluster, spindle, or decorative element
- □ Wire tension allows ¼-inch vertical deflection when lightly pressed
- □ GFCI outlet tested and reset button functional
- □ Total wattage ≤ 80% of circuit rating (e.g., ≤1440W on 15A circuit)
- □ Timer or manual switch placed within 3 feet of staircase base—accessible without stepping onto stairs
FAQ: Addressing Common Concerns
Can I use battery-operated lights instead of plug-in sets?
Only if they meet UL 498/UL 2111 standards for stairway use and include automatic shutoff timers. Most consumer-grade battery lights lack thermal cutoffs and over-discharge protection—posing fire risk if left unattended. Professional installers avoid them on primary circulation paths. If used, replace batteries weekly and inspect terminals for corrosion.
My railing has curves or landings—how do I maintain flow?
On curved sections, maintain the same vertical interval (e.g., 2.5 inches) but increase clip density by 25% to prevent sagging. At landings, extend the cadence downward: place one bulb centered on the landing’s leading edge, then resume spacing from there. Never break the vertical line—this preserves the eye’s tracking path. For 90° turns, use flexible silicone-clad wire (not rigid copper) and add one extra clip at the apex for directional stability.
How do I prevent lights from loosening overnight due to temperature shifts?
Narrow railings experience greater thermal expansion/contraction than walls. Use clips with dual-adhesive backing: acrylic foam for permanent bond + removable silicone gel for seasonal repositioning. After installation, press firmly along the entire clip-rail interface for 60 seconds. Wait 24 hours before final tensioning—this allows adhesive curing under real ambient conditions.
Conclusion: Light That Guides, Not Distracts
A narrow staircase shouldn’t be an afterthought in holiday lighting. It’s a high-traffic transition zone where clarity, consistency, and care converge. When lights follow the body’s natural ascent rhythm—when each bulb serves as both beacon and boundary marker—they transform functional necessity into quiet elegance. This isn’t about adding more sparkle; it’s about subtracting uncertainty. Every clipped wire, every calibrated interval, every grounded outlet is a deliberate act of hospitality—one that says, “You are seen. You are safe. You belong here.”
Start small: pick one flight, apply the vertical cadence formula, and test it for three evenings. Notice how your own footsteps settle, how guests pause less at the bottom, how the light seems to breathe with the architecture—not against it. Then share what you learn. Post your spacing ratio (riser height ÷ 3) and clip placement notes in the comments. What worked? Where did physics surprise you? Your real-world data helps refine best practices for others navigating tight spaces, historic constraints, or simply the beautiful challenge of making light serve people—not the other way around.


 浙公网安备
33010002000092号
浙公网安备
33010002000092号 浙B2-20120091-4
Comments
No comments yet. Why don't you start the discussion?