
Deleting your Instagram account is a significant decision, whether you're stepping away for privacy, mental wellness, or digital detox. But before you press that final delete button, there's one critical step most people overlook: backing up everything. Your photos, videos, DMs, story archives, saved posts, and even comments are part of your digital footprint—some of which may be irreplaceable.
Unlike cloud storage platforms or email providers, Instagram doesn’t automatically preserve your data once you deactivate or delete your account. Once it’s gone, it’s gone. There’s no recovery option. That’s why a complete, organized backup is essential. This guide walks you through every method available to archive your entire Instagram presence—ensuring nothing gets lost in the process.
Why You Should Backup Before Deletion
Instagram has evolved from a simple photo-sharing app into a personal archive. For many, it holds years of memories, creative work, business portfolios, and private conversations. Consider:
- You might want to repurpose old content on another platform.
- Family photos or travel memories could be scattered only across your feed.
- Direct Messages often contain sensitive information, emotional exchanges, or collaboration details.
- Your followers and following lists reflect relationships you may want to preserve.
Even if you plan to return someday, reactivating an account doesn’t restore deleted content. The only way to keep your history intact is by creating a full backup first.
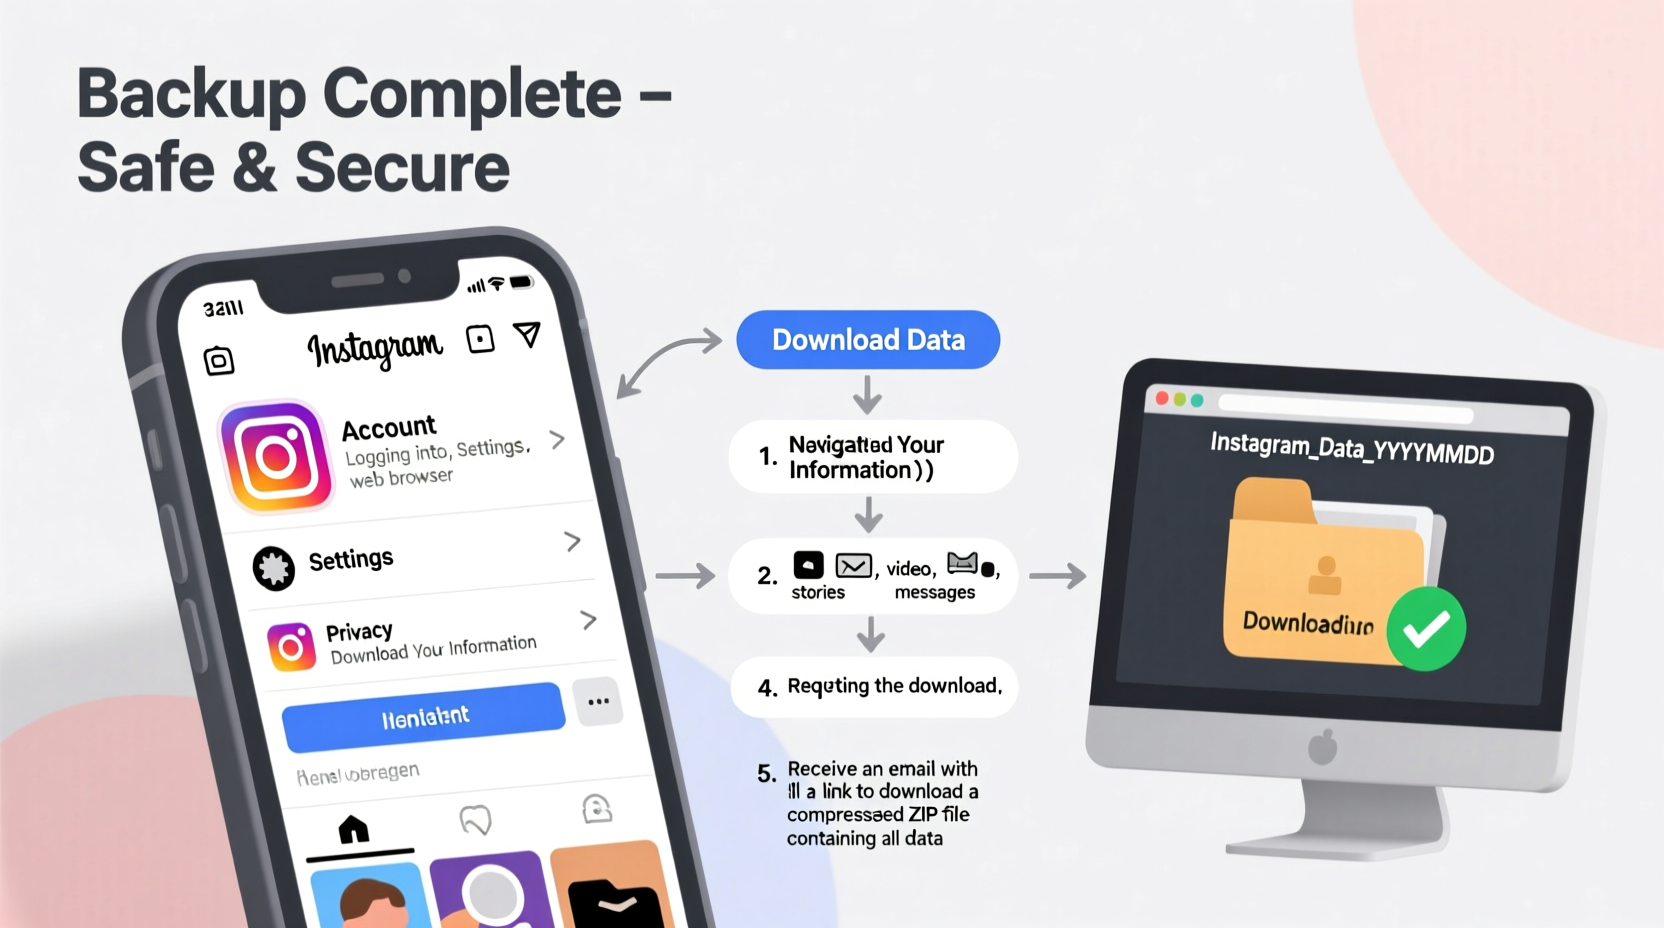
Step-by-Step: Requesting Your Instagram Data Archive
The most comprehensive way to back up your Instagram account is through Meta’s official “Download Your Information” tool. This exports nearly all your content in a downloadable format, including media, interactions, and profile details.
- Log in to Instagram via a web browser (preferably Chrome or Safari) at instagram.com.
- Go to your Profile, then click the menu icon (three horizontal lines).
- Select Settings and privacy.
- Scroll down and tap Accounts Center (or go directly to business.facebook.com/settings).
- Navigate to Privacy and security → Access your information.
- Click Download your information.
- Choose Instagram as the source.
- Select the Data you want included: Photos, Videos, Stories, Comments, Direct Messages, Followers, and more.
- Set the File type to HTML (for easy viewing) or JSON (for technical users).
- Choose Medium quality or High quality depending on available storage space.
- Enter your password and confirm.
- Click Create file.
Instagram will begin preparing your archive. This can take anywhere from 30 minutes to over 24 hours, depending on the volume of data. You’ll receive an email notification when it’s ready to download.
What’s Included in the Data Archive?
The downloaded ZIP file contains folders organized by content type. Here’s what you can expect:
| Content Type | Included? | Notes |
|---|---|---|
| Photos & Videos (Feed) | ✅ Yes | Includes captions, timestamps, and location tags. |
| Reels | ✅ Yes | Stored under \"Videos\" with metadata. |
| Stories Highlights | ✅ Yes | Saved permanently if archived. |
| Story Archives (Last 24 Hours) | ⚠️ Partial | Only recent stories; older ones must be manually saved. |
| Direct Messages | ✅ Yes | Text, images, videos, and timestamps included. |
| Saved Posts | ✅ Yes | Listed with post URLs and categories. |
| Followers & Following | ✅ Yes | Usernames only—no contact info. |
| Likes & Comments | ✅ Yes | Full history of interactions. |
| Account Login History | ✅ Yes | Device, location, and timestamp details. |
“Your social media history is part of your digital legacy. Treat it like any other important personal record.” — Dr. Lena Torres, Digital Archivist & Cybersecurity Researcher
Manual Backups: When Automation Isn’t Enough
While the official data export covers most content, it has limitations. Some elements aren’t included or require manual intervention to preserve properly.
Backing Up Unsaved Stories
If you haven’t enabled Story Archive, past 24-hour stories disappear forever after viewing. To save them:
- Open each expired story from your profile grid (if visible).
- Tap the three dots and select Save.
- Alternatively, use screen recording (on mobile) to capture video-based stories.
Saving Direct Message Media
Although messages appear in the data dump, individual photos and videos sent in DMs may not be easily accessible later. For critical files:
- Open each conversation.
- Long-press on images or videos and select Save to your device.
- Organize them into dated folders (e.g., “DMs – Alex – June 2023”).
Exporting Saved Posts
The data archive includes a list of saved posts, but not the actual images or videos. To keep visual copies:
- Go to your Saved collection.
- Tap each post and manually save the image/video to your phone or cloud storage.
- Use third-party tools like screenshot organizers or note-taking apps to catalog them with descriptions.
Real Example: A Creator’s Full Account Migration
Jamie, a freelance photographer with over five years of Instagram content, decided to leave the platform due to burnout. Her portfolio included 1,200+ posts, hundreds of client DMs, and dozens of saved inspiration boards.
She began by requesting her data archive two days before deactivation. While waiting, she manually saved key stories used in client pitches and exported her saved collections into Pinterest boards. When the ZIP file arrived, she extracted it and used a script to organize media by date. She uploaded highlights to her personal website and stored the full archive on an encrypted external drive.
Two months later, when approached for a retrospective exhibition, Jamie was able to pull high-res images and engagement stats directly from her backup—something impossible without preparation.
This case shows that proactive archiving isn’t just about memory preservation—it can have real professional value.
Third-Party Tools: Are They Safe?
Several third-party apps claim to offer faster or more user-friendly Instagram backups. Examples include:
- Downloader for Instagram (mobile app)
- GramSave (browser extension)
- Iconosquare (analytics + export)
However, proceed with caution. Many violate Instagram’s Terms of Service and may compromise your login credentials. In 2023, Meta cracked down on unauthorized data scraping, suspending accounts linked to such tools.
If you choose a third-party solution:
- Verify it uses OAuth (login redirection, not direct password entry).
- Check reviews and developer reputation.
- Avoid tools asking for SMS verification or two-factor codes.
The safest route remains using Instagram’s native export feature.
Checklist: Complete Instagram Backup Before Deletion
Use this checklist to ensure nothing is missed:
- ✅ Enable Story Archive in Settings → Privacy → Story Controls.
- ✅ Manually save any unsaved stories or highlights.
- ✅ Download your Instagram data via Accounts Center.
- ✅ Wait for confirmation email and download the ZIP file.
- ✅ Extract and verify contents (check photos, DMs, etc.).
- ✅ Save DM media individually if needed.
- ✅ Export saved posts to cloud albums or external drives.
- ✅ Store backup on multiple devices or services (local + cloud).
- ✅ Confirm file integrity (open random samples to test).
- ✅ Only after backup completion, proceed to delete or deactivate.
Frequently Asked Questions
Can I recover my Instagram data after deletion?
No. Once your account is permanently deleted, all data—including posts, messages, and profile—is erased from Instagram’s servers within 30 days. No recovery is possible.
How long does Instagram take to prepare my data archive?
Typically between 1 and 48 hours. Large accounts with thousands of photos or messages may take longer. Avoid closing the browser tab during generation.
Is my downloaded data secure?
The ZIP file is encrypted with a password sent separately via email. Store both the file and password securely. Delete them only when certain you won’t need access again.
Final Steps: Deletion After Backup
With your full backup secured, you can safely proceed to delete your account. Go to Instagram’s Deletion Page, log in, select a reason, and confirm. The process is irreversible after 30 days.
If you’re unsure, consider deactivating instead. This hides your profile temporarily while preserving all data for future reactivation.
Conclusion
Deleting your Instagram account doesn’t mean erasing your history. With careful planning, you can preserve years of creativity, connection, and personal growth. The few hours spent backing up today could save you regret tomorrow. Whether for privacy, peace of mind, or future projects, taking control of your digital content is an act of self-preservation in the online age.


 浙公网安备
33010002000092号
浙公网安备
33010002000092号 浙B2-20120091-4
Comments
No comments yet. Why don't you start the discussion?