
New boots can elevate your style, support your feet during long hikes, or toughen up your workday. But too often, that initial excitement is cut short by sore spots, rubbing heels, and full-blown blisters. The good news: breaking in boots doesn’t have to mean suffering through pain. With the right approach, you can mold stiff leather and rigid soles to your feet comfortably—without a single blister.
The key lies in understanding that boots aren't meant to be worn straight out of the box for 10-mile treks. Like any quality tool, they need gradual conditioning. Rushing the process leads to damaged skin, lost confidence in your footwear, and even long-term foot issues. Done correctly, however, boot-breaking becomes a ritual of preparation—one that rewards patience with unmatched comfort and durability.
Why Breaking In Boots Matters (And Why Pain Isn’t Required)
Boots are built to last, which means materials like full-grain leather, thick rubber soles, and reinforced stitching resist immediate flexibility. When you first wear them, these components haven’t yet conformed to the unique contours of your feet. This mismatch causes friction, pressure points, and heat buildup—all leading factors in blister formation.
However, many people assume discomfort is inevitable. It’s not. Blisters occur when moisture, movement, and pressure combine over time. Preventing them isn’t about enduring pain; it’s about managing fit, reducing shear forces on the skin, and allowing materials to adapt gradually.
“Painful breaking-in periods are outdated. Modern methods focus on controlled adaptation—both of the boot and the wearer.” — Dr. Lena Torres, Podiatrist & Footwear Consultant
A well-broken-in boot should feel supportive, not restrictive. It moves *with* your foot, not against it. Achieving this requires strategy—not willpower.
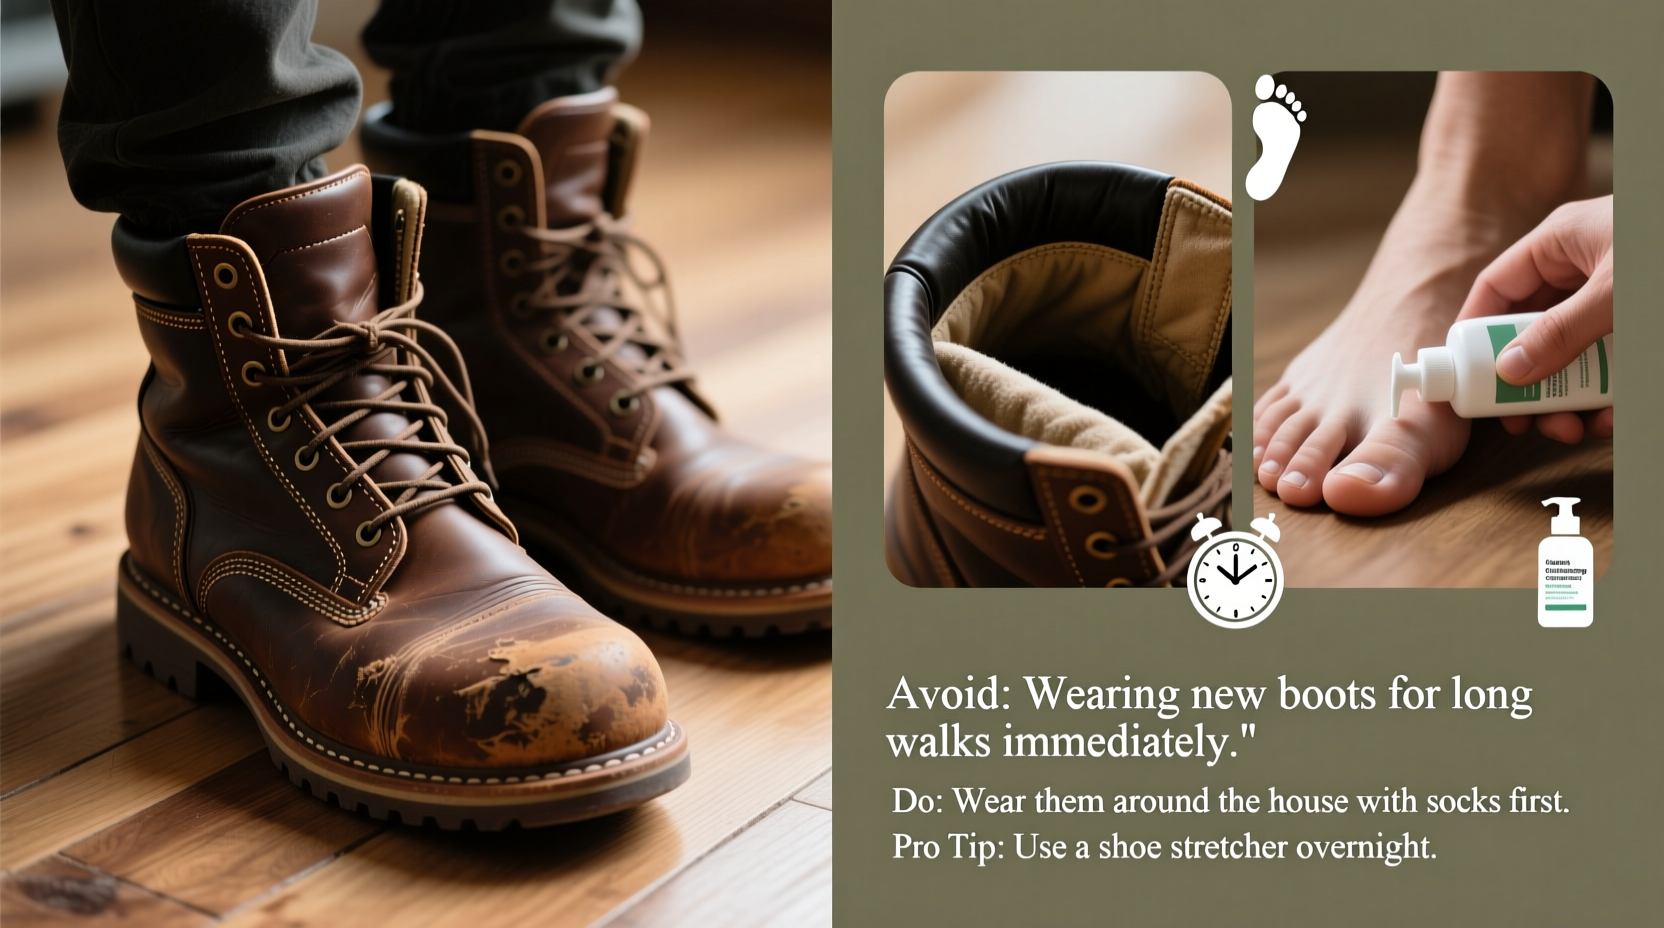
Step-by-Step Guide: How to Break In Boots Without Blisters
Follow this six-phase timeline over 2–3 weeks to safely condition your boots while protecting your feet.
- Phase 1: Indoor Wear (Days 1–3)
Wear your boots around the house for 1–2 hours daily. No socks at first if possible (on clean floors), so you can detect early pinch points. Pay attention to tight areas across the toes, instep, or heel collar. - Phase 2: Sock Testing (Days 4–6)
Repeat indoor wear, now with the socks you plan to use regularly—whether thin dress socks or thick wool hiking pairs. This simulates real conditions and helps identify fit changes due to sock thickness. - Phase 3: Short Outdoor Walks (Days 7–9)
Take 15–20 minute walks on flat pavement or sidewalk. Avoid hills or rough terrain. Focus on gait: notice if your heel lifts, toes jam, or sides rub. - Phase 4: Gradual Mileage Increase (Days 10–14)
Extend walks to 45 minutes, then an hour. Introduce mild inclines. If no hot spots develop, proceed. If you feel friction starting, stop immediately—don’t push through. - Phase 5: Targeted Conditioning (Ongoing)
Use a leather conditioner after each wear to soften high-stress zones. Apply only to dry areas (not damp leather). For stubborn stiffness, try a hairdryer on low heat while flexing the boot manually—but never exceed body temperature. - Phase 6: Real-World Test (Day 15+)
Attempt a half-day outing—a shopping trip, light trail hike, or extended commute. Bring moleskin and backup footwear just in case. Success here means you’re ready for regular use.
Painful Mistakes That Cause Blisters (And How to Avoid Them)
Even with good intentions, common missteps sabotage the break-in process. These errors lead directly to blisters and long-term dissatisfaction with otherwise excellent boots.
- Wearing new boots all day on day one: Whether for work or travel, this overwhelms unconditioned materials and soft tissue. Result: second-degree friction injuries.
- Using the wrong socks: Cotton retains moisture, increasing skin vulnerability. Opt for moisture-wicking blends like merino wool or synthetic performance fibers.
- Skipping waterproofing: Wet leather stiffens unpredictably and expands unevenly, creating new pressure zones. Treat boots before heavy use.
- Ignoring early warning signs: A “hot spot” is your body’s alarm system. Continuing to walk turns it into a blister. Stop, assess, pad, or switch shoes.
- Assuming one size fits all activities: Hiking downhill increases toe pressure; standing all day swells feet. Fit must accommodate activity-specific dynamics.
| Mistake | Consequence | Solution |
|---|---|---|
| Walking 5+ miles on first outdoor wear | Blisters, bruised heels, toenail damage | Limited exposure: max 30 minutes initially |
| Tightening laces to stop heel slip | Top-of-foot pain, nerve compression | Add heel lock lacing instead |
| Applying excessive heat | Cracked leather, warped structure | Use brief, indirect warmth only |
| Not using insoles during break-in | Inconsistent support, arch fatigue | Break in with final insole setup |
Expert Tools and Techniques for Smarter Break-In
Professionals and frequent hikers rely on more than time—they use targeted interventions to accelerate adaptation safely.
Use Shaping Methods to Pre-Condition Leather
Fill boots with rolled towels or shoe stretchers overnight to gently open tight areas. For toe boxes, insert a balloon filled with water and freeze it—the expanding ice applies uniform pressure.
Apply Friction-Reducing Products
Before wearing, apply anti-chafe balms like BodyGlide or Squirrel's Nut Butter to heels, ankles, and toes. These create a protective barrier without altering sock grip.
Double-Sock Trick for Stubborn Areas
If one side rubs persistently, wear two thin socks on that foot only during short walks. The extra layer reduces direct contact while allowing localized stretching.
Targeted Flexing Routine
Sit down and manually bend the sole at the ball of the foot 50 times per session. This mimics natural motion and loosens stiff outsoles faster than walking alone.
Real Example: From Painful First Steps to Trail Confidence
Mark, a park ranger in Colorado, bought a pair of premium leather hiking boots for backcountry patrols. Eager to start, he wore them on a 7-mile ridge trail on day two. By mile three, he had developed blisters on both heels and numbness in his left big toe. He finished the hike but limped for days.
After consulting a wilderness medic, Mark restarted the break-in process properly. He wore the boots indoors for ten days, used a leather conditioner weekly, and walked progressively longer loops near his home. On day 18, he completed a 6-mile forest trail with zero discomfort.
“I wasted a week recovering from avoidable pain,” he said. “Now I tell every new hire: your boots earn their stripes just like you do—don’t rush it.”
Checklist: Boot Break-In Success Plan
Print or save this checklist to track progress and avoid setbacks:
- ☐ Inspect interior for seams or protrusions that may rub
- ☐ Clean and condition leather before first wear
- ☐ Select appropriate socks for intended use
- ☐ Wear indoors for 1–2 hours/day (Days 1–3)
- ☐ Test with target socks (Days 4–6)
- ☐ Begin short outdoor walks (15–20 mins)
- ☐ Monitor for hot spots—stop if detected
- ☐ Gradually increase duration to 1 hour
- ☐ Apply heel-lock lacing if heel slips
- ☐ Use moleskin or blister patches preemptively on problem zones
- ☐ Perform manual flexing exercises daily
- ☐ Complete full-day test before committing to long use
Frequently Asked Questions
Can I speed up the break-in process with heat?
You can slightly accelerate softening using low heat—such as wearing boots with thick socks near a warm (not hot) air source for 20–30 minutes. Never place boots directly on radiators, heaters, or in ovens. Excessive heat degrades adhesives and dries out leather, causing cracks and premature failure.
How do I know if my boots are too small versus just stiff?
True sizing issues involve persistent pressure across the ball of the foot or pinched toes even after 5+ wears. Stiffness improves with movement and feels tighter at first but eases as the leather warms. If your toes touch the front when going downhill or your foot slides forward when braking, consider sizing up—even if length seems correct on paper.
Should I wear orthotics during the break-in?
Yes. If you normally use custom orthotics or supportive insoles, wear them from day one. Otherwise, you’ll break in the boot to your bare foot shape, making it uncomfortable once you add support later.
Final Thoughts: Comfort Is Earned, Not Expected
New boots carry promise—but fulfillment depends on preparation. There’s no shortcut around the break-in process, but there are smarter ways to navigate it. By respecting material limits, listening to your body, and avoiding preventable errors, you transform what could be a painful ordeal into a confident transition.
Your feet bear your weight every day. They deserve footwear that supports, not wounds. Whether you're stepping into work boots, hiking gear, or classic chukkas, take the time to build that foundation right. A blister-free future starts with the very first step—taken wisely.


 浙公网安备
33010002000092号
浙公网安备
33010002000092号 浙B2-20120091-4
Comments
No comments yet. Why don't you start the discussion?