
As the holiday season approaches, homes come alive with lights, garlands, and carefully curated displays. For those who cherish minimalist elegance or limited wall space, a floating Christmas shelf offers an ideal solution. It combines functionality with festive charm, allowing you to showcase miniature ornaments, vintage figurines, or heirloom keepsakes without cluttering surfaces. Unlike traditional mantels or tables, a floating shelf draws the eye upward, turning blank walls into storytelling spaces. Building one is simpler than it seems—requiring only basic tools, thoughtful planning, and attention to detail. This guide walks through every phase, from selecting materials to styling your final display.
Why Choose a Floating Shelf for Holiday Decor?
Floating shelves are more than decorative accents—they’re strategic storage solutions. In small apartments, shared living rooms, or homes with pets and children, floor-level decorations can be impractical or unsafe. A mounted shelf lifts fragile or sentimental items out of reach while keeping them visible. The illusion of weightlessness adds modern flair, especially when paired with warm lighting or reflective backdrops. Additionally, because these shelves don’t require legs or brackets, they maintain clean sightlines, enhancing the perception of space.
For Christmas specifically, the vertical orientation mimics a tree’s natural shape when styled thoughtfully. Layered mini wreaths, stacked gift boxes, or ascending candle arrangements can evoke seasonal height without occupying valuable floor area. Designers increasingly recommend floating installations as part of “micro-decorating”—a trend focused on meaningful, compact displays over mass ornamentation.
“Small-scale holiday decor invites closer inspection. When people lean in to appreciate a tiny village scene or hand-blown glass ball, that’s where real connection happens.” — Lydia Tran, Interior Stylist & Seasonal Design Consultant
Planning Your Build: Measurements, Placement, and Load Capacity
Before purchasing wood or drilling into walls, determine where the shelf will go and what it will hold. Most floating shelves rely on concealed brackets or cleats anchored directly into wall studs for support. Standard drywall alone cannot bear weight over time, so locating studs is non-negotiable.
Begin by using a stud finder to identify at least two vertical studs spaced according to your desired shelf length. Common widths range from 24 to 48 inches, suitable for most accent walls beside staircases, above sofas, or flanking windows. Height should allow easy viewing—typically between 5 and 6 feet from the floor—but consider ceiling height and surrounding furniture proportions.
Next, calculate load capacity. Tiny decorations are lightweight, but cumulative weight matters. Ceramic figures, glass baubles, and metal accents add up. As a rule, plan for at least 15 pounds of distributed weight even for delicate displays. This ensures safety and allows flexibility if you change themes in future years.
The depth of the shelf also affects stability. While deeper shelves (8–10 inches) accommodate larger arrangements, they increase leverage against the wall. For purely decorative use, 4 to 6 inches is sufficient and reduces stress on mounting hardware.
Material Selection Guide
| Wood Type | Pros | Cons | Best For |
|---|---|---|---|
| Pine | Affordable, easy to cut, takes paint well | Soft, dents easily, may warp | Painted rustic or farmhouse styles |
| Birch Plywood | Stable, resists warping, smooth finish | Edges require edging tape or veneer | Modern painted or stained finishes |
| Poplar | Harder than pine, accepts stain evenly | Slightly more expensive | Stained natural wood looks |
| Reclaimed Wood | Unique character, eco-friendly | Inconsistent thickness, may need sanding | Rustic, vintage, or industrial themes |
Step-by-Step Construction Process
With measurements confirmed and materials selected, begin building. This method uses a French cleat system—a reliable, invisible support that locks the shelf securely to the wall.
- Cut the cleat: From a 1x4 board, cut a 45-degree angle along its entire length using a table saw or circular saw. This creates two interlocking pieces—one that attaches to the wall, one to the shelf.
- Mount the wall cleat: Align the flat side of the cleat with the stud locations. Secure with 3-inch lag screws driven into each stud. Double-check levelness with a bubble level.
- Prepare the shelf board: Cut your chosen wood to final dimensions (e.g., 36” x 6”). Sand edges smooth, starting with 120-grit and finishing with 220-grit paper.
- Attach the shelf cleat: Fix the mating angled piece to the back underside of the shelf using wood glue and 1¼-inch brad nails. Clamp until set.
- Finish the wood: Apply primer if painting, then two topcoats. For staining, use pre-stain conditioner first, followed by wipe-on polyurethane for protection.
- Hang the shelf: Lift the shelf onto the wall cleat at a slight upward angle. Slide it forward until it clicks into place. Gently pull down to confirm secure fit.
Allow finishes to cure fully—typically 72 hours—before placing any objects. Rushing this step risks marring the surface or weakening adhesion.
Reinforcement Options for Extra Security
Though the French cleat is inherently strong, additional measures enhance peace of mind. For shelves longer than 36 inches, install a third stud and corresponding cleat segment. Alternatively, drill pilot holes through the shelf’s rear lip and insert discreet wall anchors after hanging—these won’t be visible from the front. Another option is museum putty, used sparingly under heavier items to prevent sliding.
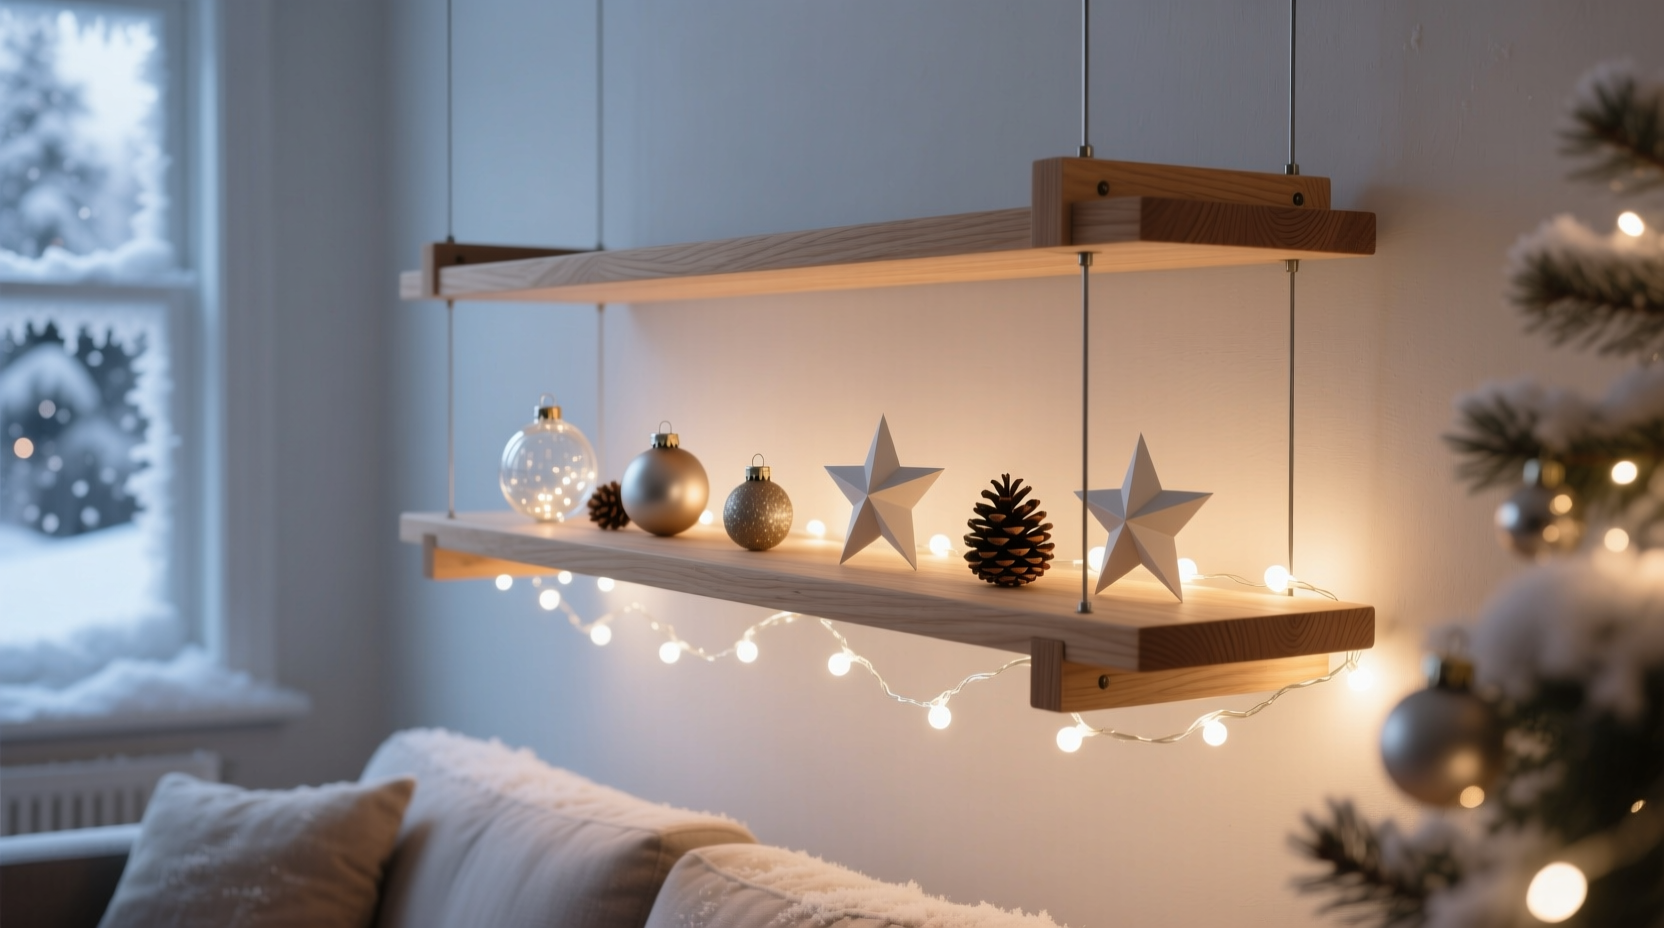
Styling Ideas for Maximum Festive Impact
A well-built shelf deserves an intentional arrangement. Avoid overcrowding; instead, group items in odd numbers (three candles, five mini trees) for visual rhythm. Consider creating a narrative: a snowy village scene, a progression of family ornaments through the decades, or a tribute to global holiday traditions.
- Use risers like small wooden crates or acrylic blocks to vary height and create depth.
- Incorporate soft lighting: battery-operated fairy lights woven through greenery or tucked behind translucent ornaments add warmth.
- Add texture with faux fur runners, burlap strips, or pinecones clustered at one end.
- Rotate elements annually to keep the display fresh—store off-season pieces in compartmentalized containers labeled by theme.
“I once designed a shelf display around a single heirloom nutcracker passed down three generations. We surrounded it with matching-era ornaments and old photographs in tiny frames. Guests said it felt like stepping into a memory.” — Rafael Mendez, Residential Stylist
Mini Case Study: The Urban Apartment Transformation
Jessica L., a graphic designer in Chicago, lived in a 650-square-foot loft with high ceilings and minimal wall decor. Each year, she struggled to make Christmas feel cozy without blocking natural light or tripping hazards. After reading about floating shelves, she built a 42-inch birch model above her sofa, anchoring it into two steel studs behind drywall.
She painted the shelf in matte evergreen and styled it with tiered displays: lower level held ceramic reindeer and mercury glass balls, middle featured a folded tartan scarf draped under a brass candle lantern, and the top row displayed framed vintage Christmas cards sent by relatives. She added a string of warm-white micro LEDs along the back edge, which reflected softly in the adjacent mirror.
The result transformed the room’s focal point. “It feels intentional,” she said. “Like we’re celebrating within our space, not overtaking it.”
Essential Checklist Before You Begin
- ✓ Studs located and marked
- ✓ Shelf dimensions measured twice
- ✓ Tools gathered (saw, drill, level, clamps)
- ✓ Wood sanded and finished
- ✓ Cleat securely mounted and leveled
- ✓ Fasteners rated for load (lag screws, not drywall anchors)
- ✓ Cured finish before loading
Frequently Asked Questions
Can I install a floating Christmas shelf on plaster walls?
Yes, but extra caution is needed. Plaster is brittle and may crack around screw points. Use a masonry bit to pre-drill, and ensure screws engage into studs. Avoid relying on wall anchors unless they are toggle bolts rated for heavy loads.
How do I safely remove the shelf after the holidays?
Lift the shelf slightly upward and backward to disengage the cleat. Patch any holes with spackling compound and touch up paint. Store the shelf in a dry, flat location wrapped in cloth to prevent scratches.
Is it safe to leave LED lights on the shelf unattended?
Battery-powered LEDs generate little heat and are generally safe. However, never leave plugged-in strands unattended for long periods. Opt for timers or smart outlets to control runtime automatically.
Final Thoughts: Create a Tradition That Rises Above
Building a floating Christmas shelf isn’t just a weekend project—it’s an investment in how you celebrate. Year after year, the same sturdy platform can host evolving memories: baby’s first ornament, a travel souvenir from a winter trip, a tribute to a loved one. Its permanence encourages curation, prompting you to ask not “What can I add?” but “What truly belongs here?”
More than decoration, it becomes ritual. The act of mounting, arranging, and illuminating the shelf marks the true beginning of the season. And when January arrives, removing it isn’t an end, but a pause—knowing it will return, ready to carry new stories.


 浙公网安备
33010002000092号
浙公网安备
33010002000092号 浙B2-20120091-4
Comments
No comments yet. Why don't you start the discussion?