
In compact homes, apartments, or studio living, the holiday season often brings a familiar challenge: where to place a Christmas tree without sacrificing precious floor space. The answer lies in reimagining tradition. A floating corner Christmas tree display offers an elegant, modern solution—transforming underused corners into festive focal points. Unlike conventional trees that occupy center-stage real estate, this vertical alternative uses wall-mounted shelves, tension rods, or geometric frames to suspend a narrow evergreen—or even a minimalist artificial silhouette—securely in the corner of a room. It’s not just about saving space; it’s about embracing creativity, maximizing aesthetics, and celebrating the season with ingenuity.
This guide walks through every phase of building your own floating corner tree, from planning and materials to decoration and safety. Whether you're working with 10 square feet or just a sliver between two walls, you can create a memorable holiday centerpiece that feels intentional, artistic, and uniquely yours.
Why Choose a Floating Corner Tree?
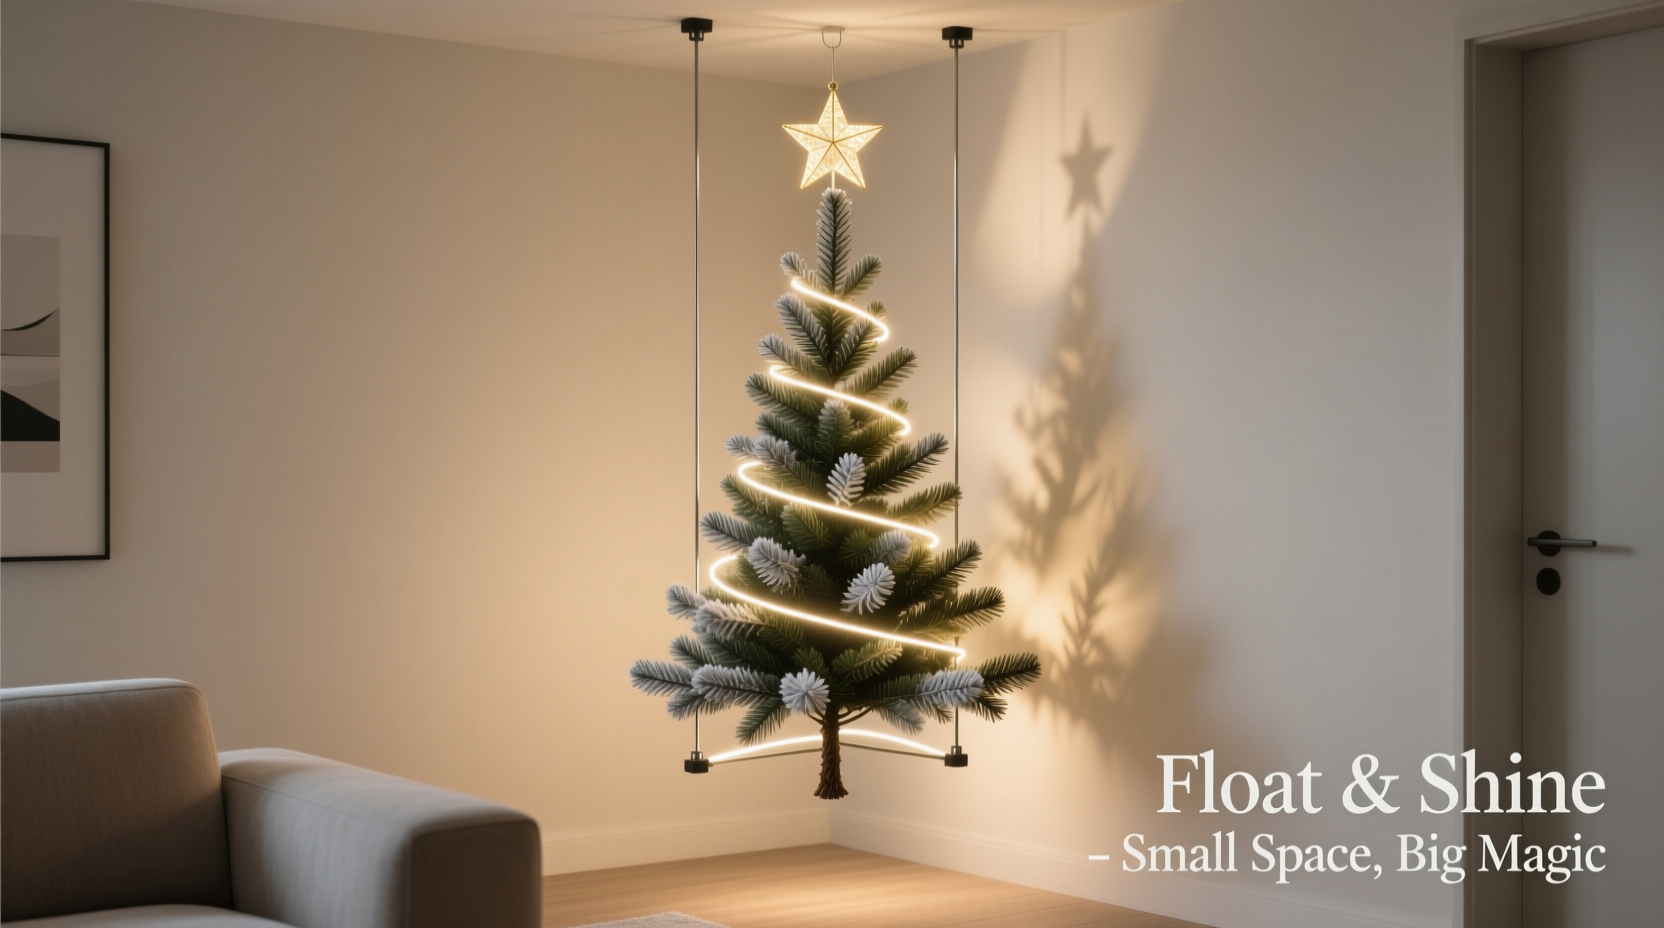
Urban living demands smart design. When square footage is limited, furniture must multitask, storage must be hidden, and decor should enhance rather than obstruct. A traditional floor-standing tree, while classic, can dominate small rooms, block pathways, or clash with existing layouts. A floating corner tree sidesteps these issues by using vertical space—often overlooked but highly functional.
Beyond practicality, the aesthetic appeal is undeniable. Suspended trees have a sculptural quality. They draw the eye upward, creating visual height and whimsy. Because they’re anchored in a corner, they integrate naturally into the architecture instead of competing with it. This makes them ideal for studio apartments, dorm rooms, hallways, or even office nooks where a full-sized tree would feel overwhelming.
Additionally, floating designs are customizable. You’re not limited to real evergreens—you can use artificial branches, wooden cutouts, string lights shaped like trees, or layered shelves arranged in a triangular formation to mimic foliage. The structure becomes both display and decoration.
“Small-space holiday design isn’t about compromise—it’s about curation. A floating tree lets you celebrate fully while honoring your home’s footprint.” — Lena Tran, Interior Designer & Author of *Compact Living, Full Seasons*
Planning Your Design: Key Considerations
Before cutting wood or drilling into walls, define your vision. Ask yourself three core questions:
- What size will work? Measure the height from floor to ceiling and the depth of the corner. Most floating trees range from 4 to 7 feet tall and 12 to 24 inches wide at the base.
- Will it hold real branches or be artificial? Real greenery adds fragrance and authenticity but requires maintenance and poses fire risks near lights. Artificial options offer longevity and control.
- How will it attach to the wall? Options include L-brackets, floating shelves, tension rods, or a custom frame. Weight distribution is critical—especially if using heavier materials.
Consider traffic flow. Even though the tree floats, ensure it doesn’t interfere with door swings or walking paths. Also, think about power access if you plan to use lights. Battery-operated LEDs eliminate cords, making placement more flexible.
Step-by-Step Guide to Building a Floating Corner Tree Display
The following method creates a stable, shelf-style floating tree using three-tiered triangular platforms to mimic tree layers. This version supports lightweight artificial branches, ornaments, and mini lights.
- Gather Materials
- Three pieces of ½-inch plywood or MDF (cut into right triangles: 12”x12”x17”, 18”x18”x25.5”, 24”x24”x34”)
- Sandpaper (120 and 220 grit)
- Wood stain or paint (optional)
- Four heavy-duty L-brackets (per shelf)
- Wall anchors and screws (appropriate for your wall type)
- Level, drill, stud finder
- Artificial pine sprigs, garland, or faux tree tips
- Mini LED string lights (battery-powered)
- Ornaments (lightweight)
- Prepare the Shelves
Cut the plywood into right triangles using a circular saw or have it pre-cut at a hardware store. Sand all edges until smooth. If staining or painting, apply finish and allow 24 hours to dry completely. - Locate Studs and Mark Positions
Use a stud finder to identify wall studs in the corner. Mark where each shelf will sit—typically spaced 12 to 18 inches apart vertically, with the largest at the bottom and smallest at the top. Use a level to ensure horizontal alignment across both walls. - Attach Brackets and Mount Shelves
Secure two L-brackets to the underside of each shelf—one on each leg of the triangle. Hold the shelf in position and drive screws through the brackets into the wall studs. For drywall-only mounting, use toggle bolts rated for at least 30 lbs per bracket. Repeat for all three shelves. - Style the Tree Layers
Begin at the bottom shelf. Arrange artificial evergreen sprigs around the edge, pointing inward to form a full base. Add volume with garland loops. Place the middle shelf similarly, using slightly fewer sprigs. Top it off with a single cluster on the highest tier. Weave in battery-powered fairy lights throughout for soft illumination. - Add Final Touches
Hang lightweight ornaments from the sprigs using thin wire or ribbon. Avoid overcrowding—minimalism enhances the floating effect. Optionally, place a small star or angel atop the top shelf to complete the treetop.
Alternative Designs for Different Needs
Not every floating tree needs shelves. Depending on your skill level, tools, and desired look, consider these variations:
| Design Type | Best For | Materials Needed | Assembly Time |
|---|---|---|---|
| Tension Rod Tree | Non-permanent setups (rentals) | Tension rod, foam cone, command hooks, lights | 30 minutes |
| Wire Frame Silhouette | Ultra-modern, minimalist spaces | Metal rod, welding tools (or pre-bent), LED strip | 2–3 hours |
| Hanging Branch Display | Natural, rustic vibe | Fallen evergreen branches, ceiling hook, twine | 1 hour |
| Floating Shelf Triangle | Durability + display versatility | Wood, brackets, fasteners, decor | 3–4 hours |
The tension rod method, for instance, involves installing a spring-loaded rod diagonally in the corner and slipping a slim foam or fabric tree onto it. It’s removable and renter-friendly. Meanwhile, a welded wire frame shaped like a tree can be mounted directly to the wall and wrapped with lights—ideal for industrial lofts or contemporary interiors.
Real Example: A Studio Apartment Transformation
When Maria Lopez moved into her 450-square-foot Brooklyn studio, she assumed Christmas traditions would have to shrink. “I love decorating, but my last tree blocked half the living area,” she recalls. After researching space-saving ideas, she built a floating corner tree using three painted birch shelves mounted with reinforced brackets.
She used preserved eucalyptus and faux pine sprigs for texture, weaving in warm white LEDs. Mini red glass balls hung sparingly. “It took one weekend, cost under $80, and became the heart of my holiday setup,” she says. “People thought it was a designer installation.”
Her only adjustment? She added a small mirrored panel behind the lowest shelf to reflect light and create depth—a trick she found online and adapted intuitively.
Safety and Maintenance Tips
Even decorative installations require attention to safety. Follow these guidelines:
- Avoid overloading shelves. Stick to lightweight decor. Total weight per shelf should not exceed 15 lbs unless using commercial-grade hardware.
- Keep heat sources away. Do not place near radiators, space heaters, or candles. Even artificial trees can melt or ignite under extreme heat.
- Check stability monthly. Gently test each shelf for wobble. Tighten screws as needed, especially in older buildings with shifting walls.
- Unplug lights when leaving home or sleeping. If using plug-in LEDs, install a timer to limit daily operation.
- Store components properly. After the holidays, disassemble carefully. Keep sprigs in airtight containers to prevent dust buildup and pest infestation.
Frequently Asked Questions
Can I build a floating tree without drilling into the wall?
Yes. Use high-tension corner rods or freestanding A-frame structures placed in the corner. Adhesive-backed hooks (like Command™ strips) may support very lightweight decor, but avoid using them for anything over 2 lbs. Freestanding versions rely on floor-to-ceiling pressure and are ideal for rentals.
What kind of tree works best—real or artificial?
Artificial is strongly recommended for floating displays. Real trees shed needles, require water trays (a leak risk), and pose greater fire hazards when wired with lights. Preserved or faux greenery lasts longer, is lighter, and allows for creative customization.
How do I make it child- or pet-safe?
Mount shelves high enough to stay out of reach if needed. Use unbreakable ornaments or skip them entirely. Secure all wires tightly with clips to prevent tugging. Alternatively, place the tree in a low-traffic corner inaccessible during unsupervised times.
Final Checklist Before You Begin
- ☐ Measure your corner’s height and available depth
- Ensure proportions suit the space without crowding.
- ☐ Choose a design type (shelf, rod, frame, etc.)
- Match it to your tools, budget, and permanence needs.
- ☐ Buy materials and check wall type
- Drywall, plaster, or concrete affects anchor choices.
- ☐ Confirm power source for lights
- Battery-powered options offer maximum flexibility.
- ☐ Assemble and style in stages
- Mount structure first, then add greenery and decor gradually.
- ☐ Perform a stability test
- Apply gentle pressure to ensure no wobbling or detachment.
Conclusion: Celebrate Smarter, Not Larger
The spirit of Christmas isn’t measured in square feet. With thoughtful design, even the smallest corner can become a beacon of warmth and celebration. A floating corner tree isn’t a substitute for tradition—it’s an evolution of it. It honors the joy of decoration while respecting the realities of modern living. By building your own, you’re not just saving space; you’re crafting a personal statement of creativity, resilience, and seasonal delight.
Start simple. Use what you have. Adapt as you go. And remember—some of the most memorable holidays are born not from grand gestures, but from clever solutions made with care.


 浙公网安备
33010002000092号
浙公网安备
33010002000092号 浙B2-20120091-4
Comments
No comments yet. Why don't you start the discussion?