
For urban dwellers in studio apartments, micro-lofts, or shared rentals, the traditional Christmas tree presents a logistical paradox: it’s festive, but it consumes precious square footage, risks tipping over on hardwood floors, and often violates lease agreements prohibiting floor-standing trees or wall modifications. Yet abandoning the ritual feels like surrendering seasonal joy. The solution isn’t compromise—it’s reimagining. A floating shelf Christmas tree transforms vertical wall space into a sculptural, stable, and deeply personal holiday centerpiece. It requires no floor footprint, minimal hardware (often lease-compliant), and invites creative expression—from minimalist Scandinavian pine sprigs to maximalist LED-lit conifer cascades. This isn’t a stopgap. It’s a design-forward, renter-respectful evolution of tradition—one that prioritizes safety, aesthetics, and spatial intelligence without sacrificing warmth or wonder.
Why Floating Shelf Trees Work Where Floor Trees Fail
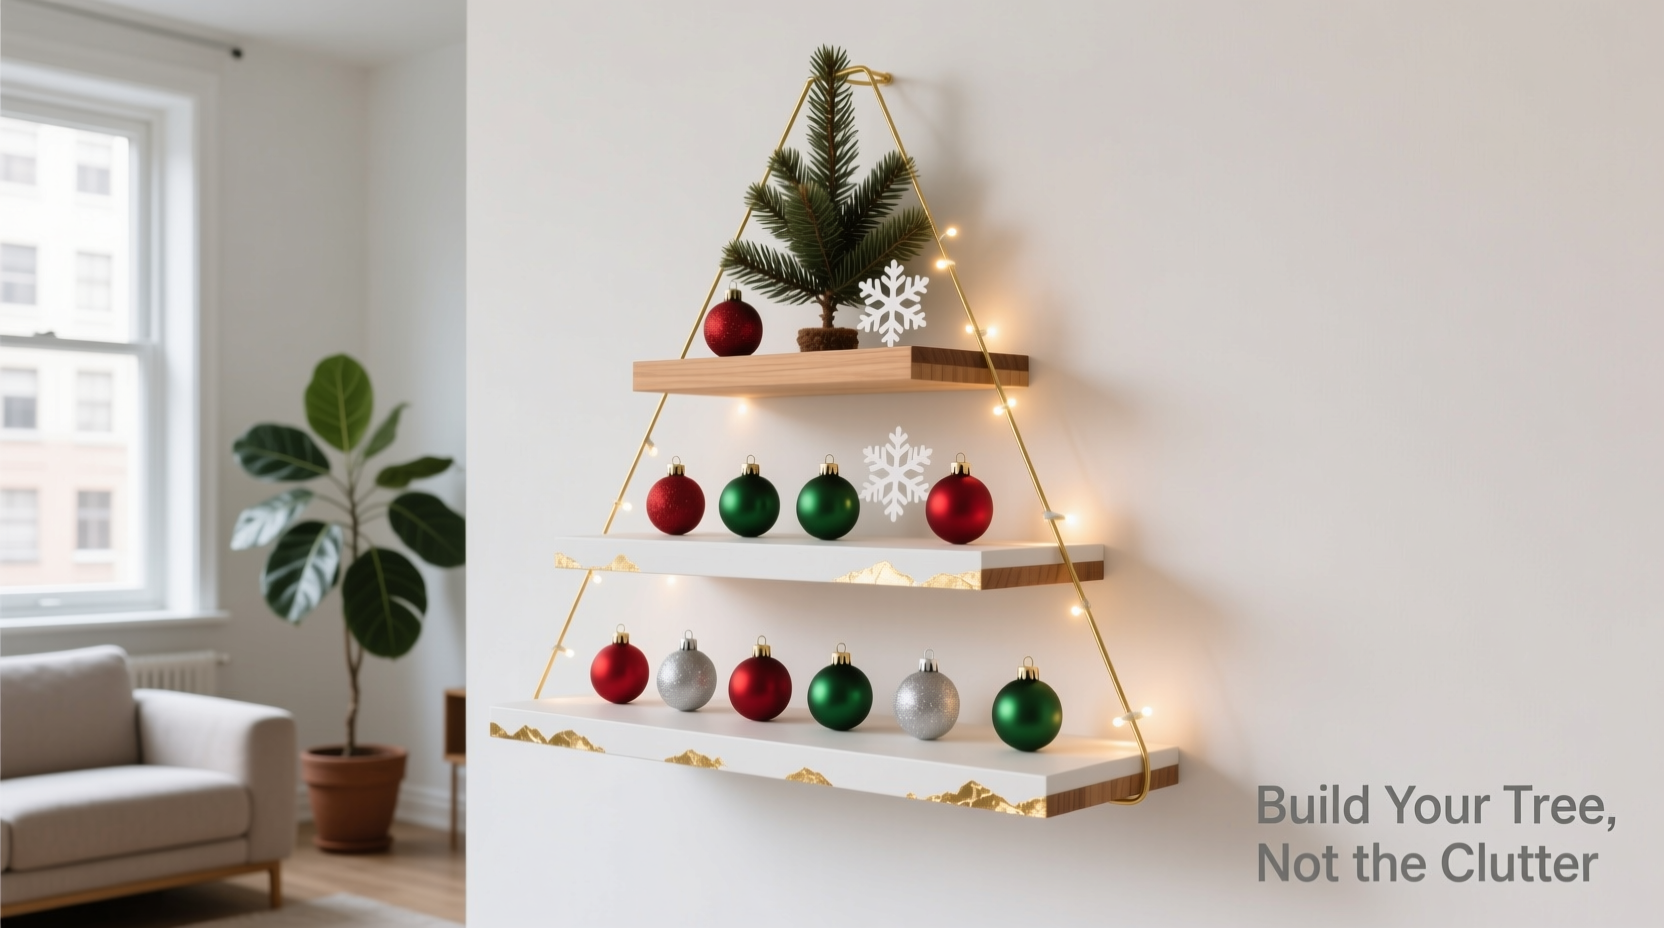
In compact living environments, every inch matters—not just for movement, but for psychological comfort. A standard 4-foot floor tree occupies roughly 3.5 square feet at its base, competes with furniture placement, and introduces tripping hazards near doorways or narrow hallways. More critically, many apartment leases explicitly prohibit floor-standing trees due to fire code concerns or flooring liability. Floating shelf trees sidestep these constraints entirely. By anchoring securely to wall studs (or using high-load-rated toggle anchors for non-stud locations), they distribute weight vertically and eliminate floor obstruction. They also reduce fire risk: elevated placement keeps foliage away from baseboard heaters, radiators, and foot traffic—two leading causes of holiday-related residential fires, according to the National Fire Protection Association.
Structurally, a well-engineered floating shelf system supports far more than decorative weight. Premium engineered wood or solid hardwood shelves rated for 50+ lbs can hold dense greenery, ornaments, lights, and even small gift boxes—all while maintaining clean sightlines and preserving open floor plans. Unlike freestanding alternatives like corner stands or tension rods (which lack rigidity and often damage trim), floating shelves integrate seamlessly into existing architecture. They become part of the room’s rhythm—not an afterthought wedged into unused corners.
Materials & Tools: Renter-Safe, Apartment-Approved Essentials
Success hinges not on complexity, but on precision selection. Below is a curated list prioritizing lease compliance, ease of removal, and structural integrity. All items are widely available at major home improvement retailers or online—and most leave zero residue upon removal.
| Item | Why It Matters | Renter-Safe Alternative |
|---|---|---|
| Floating shelf brackets (heavy-duty steel, 16\"–24\" depth) | Must support ≥50 lbs per shelf; steel prevents sagging under wet greenery | Toggle bolt kits rated for drywall (e.g., TOGGLER SNAPTOGGLE) — tested up to 300 lbs in ½\" drywall |
| Shelf material: 1\" thick birch plywood or solid poplar | Resists warping from moisture; smooth surface accepts paint/stain without bleeding | Prefinished MDF shelves with melamine coating — lightweight yet rigid |
| Low-profile LED string lights (battery-operated or USB-rechargeable) | No outlet hunting; eliminates cord clutter and tripping hazards | Solar-powered fairy lights with built-in dusk/dawn sensor — ideal for north-facing walls |
| Non-damaging mounting tape (3M Command Strips Heavy Duty) | For securing lightweight ornaments or garlands without holes | None — avoid for anything >2 lbs; use only as secondary reinforcement |
| Greenery: preserved eucalyptus, cedar clippings, or faux pine boughs | Natural options add fragrance and texture; faux avoids needle drop and water trays | Faux branches with PVC-free, flame-retardant PE tips — certified ASTM F963 |
Note: Avoid particleboard shelves—they swell when exposed to humidity or accidental spills. Skip adhesive hooks marketed for “no-drill” setups unless rated for *static* loads over 15 lbs; dynamic sway from bumped shelves makes them unreliable.
Step-by-Step Assembly: From Wall Marking to First Light
This sequence assumes a standard 8-foot ceiling and three-tiered tree (base, mid, apex). Adjust shelf spacing based on your wall height and desired silhouette—wider gaps create airiness; tighter stacking yields density.
- Measure and Plan Layout: Sketch your wall space. For visual balance, position the lowest shelf 24–30 inches above baseboard. Space subsequent shelves 12–16 inches apart vertically. Mark all stud centers with pencil (use a level to ensure horizontal alignment).
- Drill Pilot Holes: Drill ⅛\" pilot holes into each stud center at marked points. If no stud aligns, switch to toggle bolts—drill ¼\" holes, insert toggles, and tighten until wings snap closed behind drywall.
- Mount Brackets Securely: Attach heavy-duty brackets using 2.5\" corrosion-resistant screws. Tighten fully—but do not overtighten, which can strip drywall or warp brackets.
- Install Shelves: Place shelves onto brackets. Check level across front and side edges. Secure with two 1\" screws per bracket (driven upward through bracket into shelf underside) to prevent lateral shift.
- Layer Greenery Strategically: Start at the base shelf. Anchor thicker stems (cedar, pine) upright with floral wire wrapped around shelf edge. Fan out lighter elements (eucalyptus, olive branches) outward and upward. Repeat for mid and top shelves, decreasing volume by 30% per tier to mimic natural taper.
- Add Lights Last: Weave battery-powered LEDs *under* greenery first, then drape gently over top. Hide battery packs behind back of shelf or inside hollow ornaments. Test brightness before final arrangement.
- Final Anchoring (Critical): Use museum putty or removable adhesive pads beneath ornament bases to prevent sliding. For hanging ornaments, drill tiny 1/16\" holes in shelf underside and thread clear fishing line—no visible hardware.
Real Example: Maya’s 320-Sq-Ft Studio in Chicago
Maya, a graphic designer renting a converted 1920s walk-up, faced a hard deadline: her landlord required all holiday decor removed by January 2nd, with zero wall damage permitted. Her studio had one 7-foot wall with plaster-and-lath construction—unreliable for standard anchors. She opted for a three-shelf pine-and-silver scheme using TOGGLER SNAPTOGGLE bolts (rated for 220 lbs in her wall type). She sourced sustainably harvested cedar boughs from a local florist, wired them to birch shelves with rustproof galvanized wire, and strung warm-white micro-LEDs powered by rechargeable batteries. To comply with her lease, she documented every step: photos of stud-finder readings, receipts for hardware, and a signed note from her landlord approving the toggle-bolt method. On December 1st, she installed the tree in 90 minutes. By New Year’s Eve, she’d disassembled it, patched two ¼\" holes with spackle, and sanded them flush—leaving no trace beyond faint pencil marks. “It wasn’t just practical,” she said. “It felt intentional—like my apartment finally held space for celebration, not just survival.”
Design Principles for Visual Impact & Safety
A floating tree must transcend novelty to become a cohesive design element. These principles ensure harmony with your space while maintaining structural soundness:
- Scale with Intention: Shelf depth should be proportional to wall width. A 24\" shelf looks balanced on a 10' wall; on a 6' wall, limit to 16\". Avoid extending shelves beyond 24\"—longer spans increase deflection risk, especially with moisture-heavy greenery.
- Color Story Consistency: Match shelf finish to existing trim or furniture. White oak shelves echo light wood floors; matte black complements industrial fixtures. Avoid clashing tones—e.g., walnut shelves with bright turquoise ornaments disrupt visual flow.
- Weight Distribution Logic: Place heaviest elements (wooden ornaments, ceramic stars, weighted garlands) directly over brackets—not at shelf ends. This minimizes torque on wall anchors.
- Fire Safety Integration: Keep all greenery ≥36\" from heat sources (radiators, vents, lamps). Use only UL-listed LED lights—incandescent bulbs generate excessive heat and pose ignition risk near dried botanicals.
- Dynamic Balance: Angle upper shelves slightly forward (2–3°) using adjustable brackets or shims. This creates perceived depth and prevents the “stacked box” effect—making the tree feel organic, not architectural.
“The floating shelf tree represents a quiet revolution in urban holiday culture. It’s not about downsizing tradition—it’s about elevating it. When you invest in thoughtful, secure installation, you’re honoring both your home and the season.” — Lena Torres, Interior Architect & Founder of Compact Living Collective
FAQ
Can I install this on plaster walls or brick?
Yes—with proper hardware. Plaster walls require masonry anchors or specialized plaster anchors (e.g., E-Z Ancor Twist-N-Lock). Brick demands carbide-tipped masonry bits and sleeve anchors. Always consult a professional if unsure—plaster failure can cause extensive repair costs.
How do I keep greenery fresh without water access?
Preserve natural branches by soaking cut ends in water for 24 hours before wiring. Then mist lightly every 2–3 days using a fine spray bottle. Avoid saturating shelves. For longer wear, choose preserved greenery (glycerin-treated)—it retains color and flexibility for 6–12 months without watering.
Will this damage my walls when I remove it?
Not if installed correctly. Toggle bolts leave only ¼\" holes, easily filled with spackle and sanded. Stud-mounted brackets require patching screw holes—also minor. Never use adhesive-only solutions for shelves over 5 lbs; residue removal often damages paint and drywall paper.
Conclusion
A floating shelf Christmas tree is more than a space-saving hack—it’s a declaration of intentionality in how we inhabit our homes. It reflects a mature understanding that festivity need not be chaotic, that beauty thrives within boundaries, and that care for our environment extends to respecting the structures that shelter us. You don’t need vaulted ceilings or dedicated entryways to host the spirit of the season. You need clarity of purpose, respect for materials, and the willingness to build something meaningful—literally, from the wall up. Your apartment isn’t a temporary holding zone. It’s where memories gather, where light catches dust motes in December air, where tradition finds new roots. So measure your wall, choose your greenery, and mount your first shelf—not as a concession, but as a commitment. The tree you build will stand as proof: constraint, when met with creativity, doesn’t shrink joy—it focuses it.


 浙公网安备
33010002000092号
浙公网安备
33010002000092号 浙B2-20120091-4
Comments
No comments yet. Why don't you start the discussion?