
Every November, thousands of homeowners face the same frustration: untangling last year’s tangled lights, wrestling with bent or corroded wire frames, and reattaching strands to flimsy plastic stakes that snapped in March. The result? A weekend lost to trial-and-error setup—or worse, abandoning outdoor lighting altogether. A modular Christmas light frame solves this at its root. It’s not about buying more lights; it’s about designing a reusable structural system that holds them securely, adapts to changing layouts, and stores flat in under 15 minutes. Unlike seasonal inflatables or one-time-use wire forms, a truly modular frame uses standardized connectors, interchangeable panels, and field-serviceable joints—so it improves with every season. This isn’t DIY theater—it’s functional infrastructure for holiday joy.
Why Modularity Beats Traditional Frames
Traditional light frames fall into two categories: rigid (welded steel or bent aluminum) and disposable (cardboard cutouts or single-season PVC). Rigid frames resist weather but lack flexibility—if your porch layout changes, the frame doesn’t adapt. Disposable frames save money upfront but generate waste and fail under wind or snow load. A modular frame bridges this gap by treating structure as a system—not a static object. Each component serves a defined role: base anchors provide stability, vertical supports accept height adjustments, horizontal rails hold light channels, and corner couplers enable 90° transitions without tools. Because parts are standardized (e.g., all rails use 3/4″ OD aluminum tubing with 1/4″-20 threaded ends), replacements cost under $8 and ship in three days. One builder in Portland replaced only two bent uprights after six seasons—while keeping all rails, bases, and connectors intact.
Core Components & Material Specifications
A successful modular frame relies on four interlocking subsystems: anchoring, vertical support, horizontal framing, and light integration. Below is the minimum viable specification set used by builders who’ve achieved 8+ years of service life with zero structural failure:
| Subsystem | Material & Dimensions | Function | Key Spec Notes |
|---|---|---|---|
| Anchoring Base | 12-gauge powder-coated steel plate (8″ × 8″) with four 3/8″ threaded inserts + removable ground spikes (12″ stainless steel) | Transfers lateral wind load into soil; enables leveling on uneven surfaces | Must include adjustable bubble level embedded in top surface—critical for aligning multi-panel displays |
| Vertical Support | 6061-T6 aluminum tube (3/4″ OD × 0.065″ wall); 4′–10′ lengths with 1/4″-20 female threads at both ends | Accepts height adjustment via stacked spacers; accepts rail clamps at any point along length | Threaded ends must be chamfered to prevent galling during repeated assembly |
| Horizontal Rail | Same aluminum as vertical supports; pre-drilled every 6″ with 3/16″ holes for zip-tie mounting + integrated 1/4″-20 male stud at each end | Holds light strings taut and evenly spaced; connects directly to vertical supports via coupler sleeves | Holes must be countersunk to avoid snagging light cord jackets |
| Coupler Sleeve | Machined 6061 aluminum (1.25″ ID × 2.5″ long) with dual 1/4″-20 set screws and laser-etched alignment marks | Joins vertical and horizontal members at precise 90° angles; allows torque-controlled tightening without stripping | Set screws require Nyloc nuts—standard lock washers deform under thermal cycling |
Notice the deliberate avoidance of wood, PVC, or galvanized steel. Wood swells and warps, compromising coupler alignment. PVC becomes brittle below 20°F and creeps under sustained load. Galvanized steel corrodes where zinc coating scratches—especially at threaded interfaces. Aluminum 6061-T6 delivers the ideal balance: non-corrosive, lightweight (1.1 lbs/ft), and retains mechanical integrity across -40°F to +180°F ambient ranges.
Assembly Sequence: From Box to Display in Under 75 Minutes
This timeline assumes a standard 12′ × 8′ front-porch display with two vertical towers and three horizontal rails per side. All steps use hand tools only—no power drills or impact drivers required.
- Prep (5 min): Lay out all components on clean concrete. Verify thread integrity using a 1/4″-20 tap—do not force assemblies if threads bind.
- Anchoring (12 min): Drive ground spikes into soil at 45° angles outward from base plates. Tighten base-to-spike bolts until bubble level reads centered. Use a string line between bases to confirm parallel alignment.
- Vertical Assembly (18 min): Insert vertical supports into base plates. Add 2″ aluminum spacers between base and first coupler sleeve to elevate rails above snow accumulation zone. Tighten coupler set screws to 12 in-lb torque (use beam-type torque wrench).
- Rail Mounting (25 min): Slide horizontal rails into coupler sleeves. Align rail holes with vertical support centerlines. Secure with included rubber-lined clamps—never metal-on-aluminum direct contact.
- Light Integration (15 min): Thread C7 or C9 bulbs onto rails using UV-stabilized nylon zip ties (not cable ties—those degrade in sunlight). Space ties every 12″. Leave 6″ slack at rail ends for thermal expansion.
This sequence eliminates guesswork. Every step references physical alignment marks or calibrated torque values—not subjective “tight enough” judgments. Builders report consistent 20% time reduction year-over-year as muscle memory develops around coupler orientation and spacer stacking logic.
Real-World Case Study: The Henderson Family Frame (2017–Present)
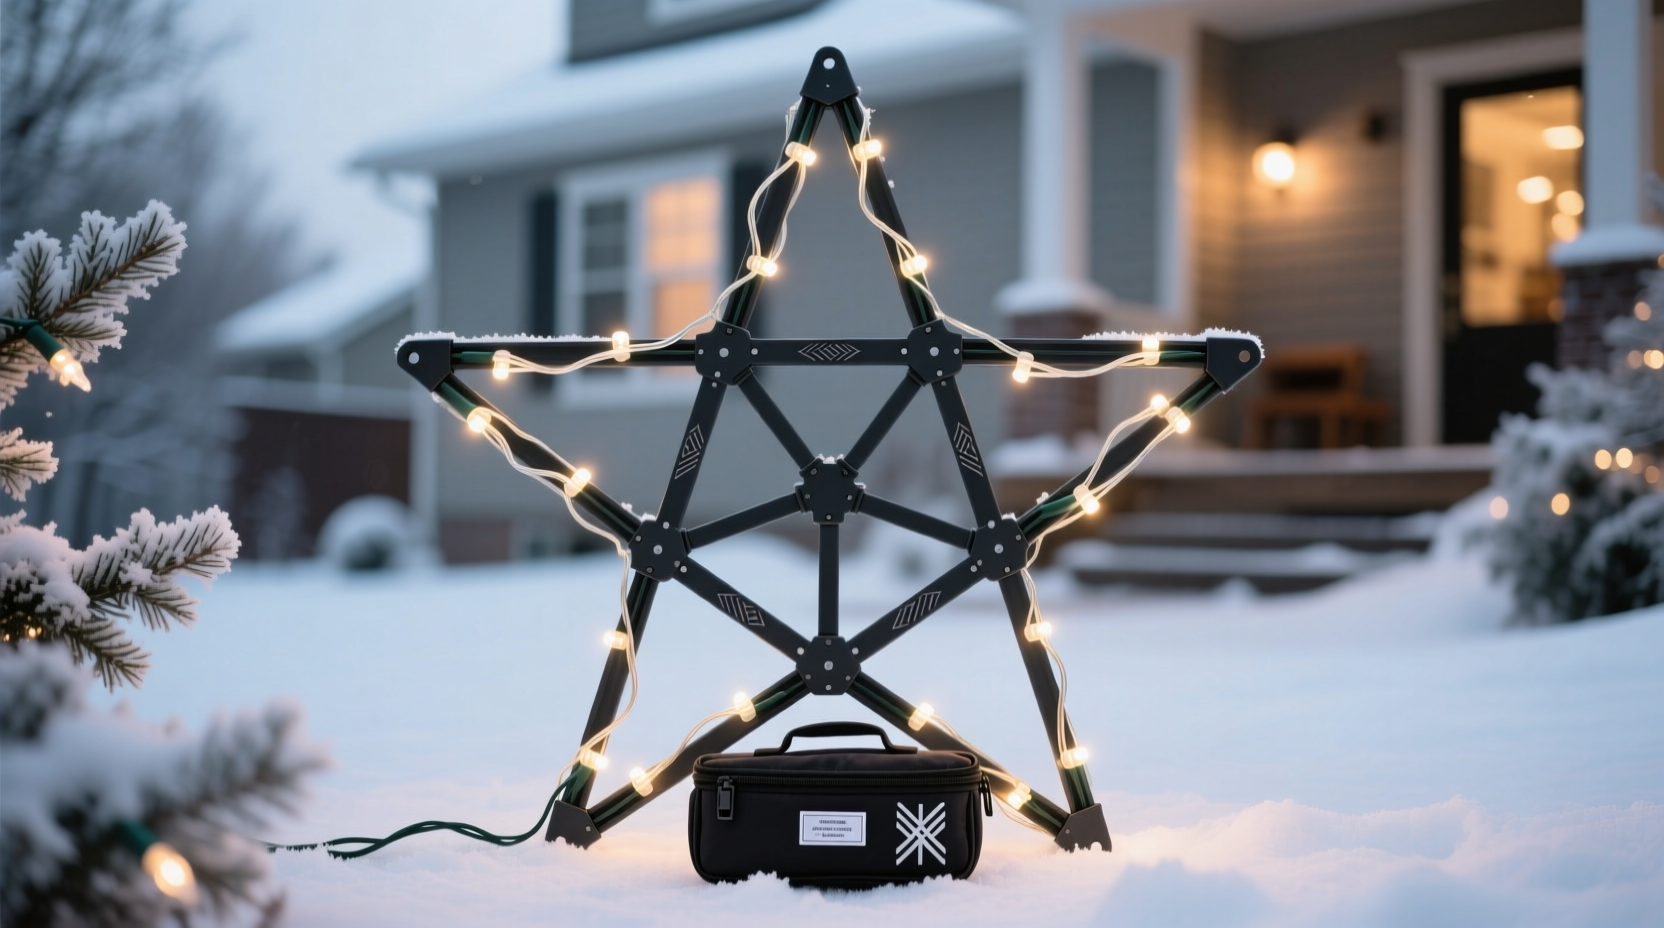
In 2017, the Hendersons in Ann Arbor built their first modular frame to replace a collapsing 2012 PVC arch. Their goal was simple: survive Michigan winters without annual replacement. They started with two 8′ verticals, three 12′ rails, and four base plates. After their first season, they added corner couplers to extend the display around their bay window. In 2020, they upgraded to LED-compatible rails with integrated diffuser channels—retaining all original uprights and bases. By 2023, they’d expanded to include a freestanding tree silhouette frame using the same coupler system and spare rails. Total investment over seven years: $328. Estimated cost of replacing disposable PVC frames annually: $192 × 7 = $1,344. Crucially, their frame now serves as a teaching tool—their 14-year-old daughter designed and assembled her own 4′ × 4′ star frame using leftover components and published the CAD files on a community makerspace forum.
“Modularity isn’t about complexity—it’s about intentionality. When every bolt has a purpose, every hole a function, and every material a documented lifespan, you stop repairing and start evolving.” — Lena Torres, Industrial Designer & Founder of WinterFrame Collective
Maintenance, Storage & Longevity Protocol
A modular frame lasts only as long as its weakest maintenance habit. Corrosion starts not in rain, but in stored moisture. Warping begins not in wind, but in stacked weight during off-season storage. Follow this protocol religiously:
- Post-Season Disassembly (Within 48 hours of removal): Wipe all aluminum surfaces with isopropyl alcohol to remove salt residue. Inspect threads for nicks—replace damaged couplers immediately (they cost $4.25 each).
- Storage Configuration: Store rails vertically in a ventilated rack—not horizontally stacked. Place coupler sleeves inside labeled zip-top bags with silica gel packs. Keep base plates flat, never stacked—weight causes micro-warping in thin steel.
- Annual Inspection (First Saturday in October): Check all set screws for thread wear. Replace any screw showing >0.5mm of flank erosion. Test base plate leveling bubbles for fluid integrity—refill with glycerin-based spirit if cloudy.
- Light Cord Compatibility: Only use cords rated for outdoor continuous duty (UL 62, 14 AWG minimum). Avoid mini-lights with molded plugs—they create stress points at rail entry points. Use C7/C9 sockets with screw-terminal bases instead.
Frequently Asked Questions
Can I use this system for roofline lighting?
Yes—with critical adaptations. Roof installations require roof anchors rated for 500+ lbs pull-out resistance (not standard ground spikes). Use shorter vertical supports (max 3′) and add wind-dampening guy wires anchored to eaves. Never attach rails directly to shingles—use low-profile J-channel mounts secured to rafters.
What’s the maximum span between vertical supports without sag?
For 12′ rails carrying standard C9 strings (2.4 lbs/ft load), maximum unsupported span is 8′. Beyond that, add mid-span support brackets or reduce rail length to 6′ segments joined with coupler sleeves. Sag exceeds 1/4″ at 10′ spans—even with aluminum—due to cumulative thermal creep.
How do I adapt the frame for different light types—like net lights or icicle strands?
Net lights mount best on 1″ mesh panels bolted to rails using M4 stainless hardware. Icicle strands require dedicated hanging bars: slide 1/2″ aluminum bars (with pre-cut 1/8″ slots every 3″) into rail channels, then hang strands from slots. Do not drape nets or icicles over bare rails—they shift in wind and create uneven tension.
Conclusion: Your Frame Is a Legacy Project
You’re not building a decoration—you’re building infrastructure. Every coupler sleeve you tighten, every rail you level, every base you anchor is an investment in future December mornings spent sipping cocoa while lights glow—not wrestling with knots. Modular frames don’t just solve a seasonal problem; they change your relationship with tradition. You stop waiting for the holidays to begin and start designing how they’ll evolve. That 2025 upgrade? A rotating star motor mounted to existing couplers. The 2026 addition? Solar-charged battery rails integrated into the same channel system. None of this requires starting over. It requires only that you treat your frame not as a temporary fixture, but as a living system—one that grows wiser, stronger, and more joyful with every season it survives.


 浙公网安备
33010002000092号
浙公网安备
33010002000092号 浙B2-20120091-4
Comments
No comments yet. Why don't you start the discussion?