
For photographers, graphic designers, and digital artists, seeing true-to-life colors on screen is not a luxury—it’s essential. A poorly calibrated monitor can mislead your editing decisions, leading to prints that don’t match what you saw on screen or images that look off when viewed on other devices. Accurate color representation starts with proper monitor calibration. This guide walks through the entire process, from understanding why calibration matters to implementing a repeatable routine that ensures consistency across all your work.
Why Monitor Calibration Matters in Photo Editing
Color accuracy directly affects the integrity of your final image. Without calibration, your monitor may display colors too warm, too dark, or oversaturated, causing you to overcorrect shadows, adjust white balance inaccurately, or apply excessive contrast. These edits compound when the image is viewed elsewhere, often resulting in disappointment.
Different monitors—especially consumer-grade models—vary significantly in factory default settings. One might emphasize reds, another could crush shadow detail, and many are set to overly bright levels to stand out in retail environments. These defaults are designed for marketing appeal, not precision.
Professional workflows demand consistency. Whether you're preparing images for print, web publishing, or client review, calibrated monitors ensure that what you see is a faithful representation of the actual pixel data. This reduces guesswork, minimizes rework, and builds trust in your output.
“Calibration isn’t about making your monitor look better—it’s about making it tell the truth.” — David Busch, Professional Photographer and Author
The Step-by-Step Process to Calibrate Your Monitor
Monitor calibration involves adjusting brightness, contrast, color temperature, gamma, and white point so they align with industry standards such as sRGB, Adobe RGB, or DCI-P3. While software tools help, optimal results require both hardware and methodical setup.
Step 1: Prepare Your Environment
Begin in a controlled lighting environment. Avoid direct sunlight or strong overhead lights that reflect on the screen. Ambient light should be consistent and neutral in tone (around 5000K). Allow your monitor to warm up for at least 30 minutes before calibration—this stabilizes backlight performance and color output.
Step 2: Reset Monitor Settings to Factory Defaults
Before beginning, reset your monitor’s settings to their original state. This clears any custom presets that may skew results. Access the on-screen menu and select “Reset” or “Factory Default.” After resetting, manually set the following:
- Color Mode: Native or Custom (not sRGB unless specifically required)
- Brightness: Start around 50–70%, depending on ambient light
- Contrast: Set to maximum or 80–100%
- Color Temperature: Set to 6500K (D65), the standard for photography
- Gamma: Choose 2.2, which matches most viewing conditions and operating systems
- Uniformity & Eco Modes: Disable all power-saving and adaptive brightness functions
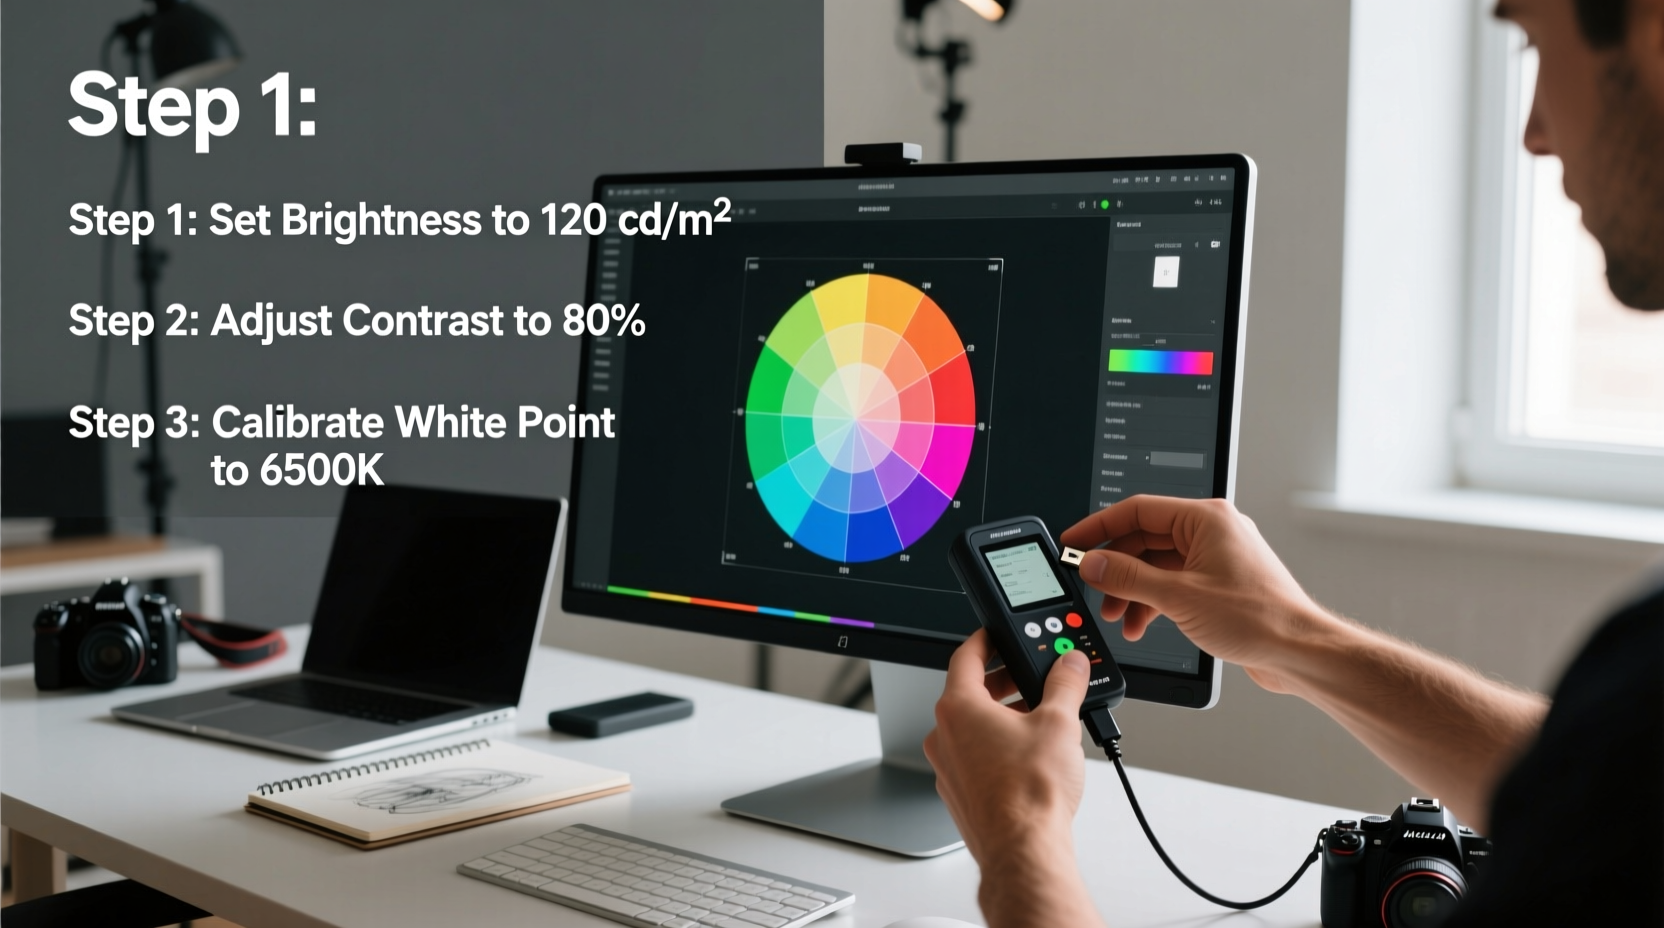
Step 3: Use a Hardware Calibration Device
Software-only calibration lacks precision. For reliable results, use a colorimeter like the X-Rite i1Display Pro, Datacolor SpyderX, or Calibrite ColorChecker Display. These devices measure actual light output from your screen and generate a custom ICC profile.
- Attach the sensor to the screen using the included suction cup or frame.
- Run the calibration software provided (e.g., i1Profiler, SpyderX Software).
- Select your target settings: typically D65 white point, gamma 2.2, luminance 120 cd/m².
- Let the device read multiple color patches across the screen.
- Save the generated ICC profile and assign it to your monitor.
The software will create a profile that maps your monitor’s behavior and corrects deviations. On macOS, this appears under System Settings > Displays > Color. In Windows, go to Color Management > Devices > Add Profile.
Step 4: Validate with Test Images
After calibration, test the results using known reference images. Look for gradients without banding, skin tones that appear natural, and grayscale images that show no color casts. Tools like Lagom LCD tests or ISO 12646 soft-proofing targets can help evaluate neutrality and tonal range.
Step 5: Maintain Regular Recalibration
Monitors drift over time. LED backlights dim, panels age, and environmental changes affect performance. Recalibrate every 4–6 weeks for critical work. Set calendar reminders to ensure consistency.
Essential Tools and Software for Reliable Calibration
While built-in operating system tools offer basic adjustments, they lack the precision needed for professional photo editing. Below is a comparison of recommended hardware and software solutions.
| Device | Key Features | Best For | Approximate Price |
|---|---|---|---|
| X-Rite i1Display Pro | Polarization filter, high accuracy, supports wide gamut displays | Professionals needing lab-grade precision | $250 |
| Datacolor SpyderX Pro | Faster sensor, lens-based light capture, user-friendly interface | Semi-pros and enthusiasts | $150 |
| Calibrite ColorChecker Display | Open-source compatible, excellent build quality | Cross-platform workflows | $180 |
| DisplayCAL (Free) | Open-source, works with multiple devices, advanced profiling options | Budget-conscious users seeking control | Free |
Pairing a quality sensor with robust software gives you full control over calibration parameters. DisplayCAL, for instance, offers more granular settings than proprietary apps and integrates well with open-color workflows.
Common Mistakes That Undermine Calibration Accuracy
Even with the right tools, poor practices can compromise results. Avoid these common pitfalls:
- Calibrating in inconsistent lighting: Changing room light between sessions skews perception and measurement.
- Using glossy screens without anti-glare shields: Reflections distort perceived brightness and color.
- Relying solely on visual judgment: Human eyes adapt quickly; instruments don’t.
- Ignoring ambient white balance: Warm room lighting makes a D65 screen look cool, prompting incorrect adjustments.
- Skipping warm-up time: Monitors behave differently when cold, especially older IPS and CCFL-backlit models.
“Most color issues I see in client files stem not from bad editing, but from uncalibrated monitors. It’s the weakest link in the chain.” — Laura Chen, Print Lab Manager at ImageCraft Studios
Mini Case Study: From Frustrated Freelancer to Confident Editor
Jamie, a freelance portrait photographer based in Portland, struggled with inconsistent print results. Clients complained that skin tones looked too yellow or flat compared to online proofs. Initially assuming the issue was with her printer, she invested in premium paper and ink—only to face the same problems.
After consulting a color specialist, Jamie learned her five-year-old monitor had never been calibrated. Its brightness had drifted upward, and the white point leaned heavily toward blue. She was unknowingly warming up her images excessively to compensate, creating unnatural yellows in print.
She purchased a Datacolor SpyderX and followed a strict calibration protocol. Within a week, her prints matched her screen consistently. Client satisfaction improved, and she reduced wasted materials by 70%. More importantly, she regained confidence in her editing process.
Checklist: Monitor Calibration Best Practices
Use this checklist before every calibration session to ensure optimal conditions and outcomes:
- ✅ Work in a neutral lighting environment (no direct sunlight or colored bulbs)
- ✅ Power on the monitor at least 30 minutes prior
- ✅ Disable adaptive brightness, eco modes, and night shift features
- ✅ Clean the screen gently with microfiber cloth
- ✅ Reset monitor to factory defaults
- ✅ Attach calibration device securely and avoid movement during measurement
- ✅ Select appropriate color space (Adobe RGB for print, sRGB for web)
- ✅ Save and install the ICC profile correctly
- ✅ Test with grayscale and gradient images
- ✅ Schedule next calibration in 4–6 weeks
Frequently Asked Questions
Can I calibrate my laptop screen accurately?
Yes, but with limitations. Built-in laptop screens often have narrower color gamuts and viewing angle constraints. Use a hood to block ambient light and ensure the lid remains at a fixed angle during measurement. External calibration is still possible and highly recommended for creative work.
Do I need to recalibrate after changing graphics cards or drivers?
Not necessarily, but it’s wise to verify. New drivers can alter color output or reset GPU scaling settings. If you notice shifts in brightness or tint, run a quick verification with your calibration tool.
Is monitor calibration necessary if I only post photos online?
Yes. Even for web-only work, calibration ensures you’re making intentional edits. Without it, you risk over-saturating or over-sharpening because the screen looks dull. Plus, many clients and collaborators use calibrated devices—your work should hold up across platforms.
Conclusion: Trust What You See
Accurate photo editing begins with trust—in your eyes, your tools, and your monitor. Calibration transforms your display from a variable into a reliable instrument. By investing a small amount of time and resources upfront, you eliminate guesswork, reduce revision cycles, and deliver higher-quality results consistently.
Whether you're printing fine art photographs or curating a portfolio for digital presentation, a calibrated monitor is non-negotiable. Start today: gather your tools, follow the steps outlined here, and make color accuracy part of your standard workflow.


 浙公网安备
33010002000092号
浙公网安备
33010002000092号 浙B2-20120091-4
Comments
No comments yet. Why don't you start the discussion?