
The beauty blender has become a staple in makeup routines worldwide. Its unique sponge texture allows for seamless foundation blending, creating a natural, airbrushed finish. However, with regular use comes inevitable buildup of bacteria, oils, and leftover cosmetics. A dirty sponge doesn’t just compromise your skin’s health—it can also degrade faster if cleaned improperly. The key challenge? Removing grime thoroughly while preserving the delicate foam structure. Aggressive scrubbing or harsh chemicals can cause tears, reduce elasticity, and shorten the sponge’s lifespan. Fortunately, with the right techniques and consistent care, you can keep your beauty blender hygienic, soft, and intact for weeks longer than average.
Why Proper Cleaning Matters
Makeup sponges absorb more than just product—they trap bacteria, dead skin cells, and environmental pollutants. Studies have shown that unwashed beauty tools can harbor dangerous microbes, including E. coli and staphylococcus, especially when stored in damp environments like bathrooms. Over time, accumulated residue breaks down the polyurethane foam, making it brittle and prone to cracking.
But cleaning isn’t just about hygiene; it’s about performance. A clean beauty blender applies makeup more evenly, absorbs less product (saving you money), and feels better on the skin. When done correctly, cleaning actually extends the life of the sponge by preventing internal clogs and material fatigue.
“Many people ruin their sponges not from use, but from misuse during cleaning. Gentle handling is as important as the cleanser you choose.” — Dr. Lena Torres, Cosmetic Dermatologist and Skincare Tool Specialist
Step-by-Step Guide: How to Clean Your Beauty Blender Safely
Cleaning a beauty blender doesn’t require special equipment, but it does demand patience and attention to detail. Follow this method to remove deep-seated makeup without damaging the foam.
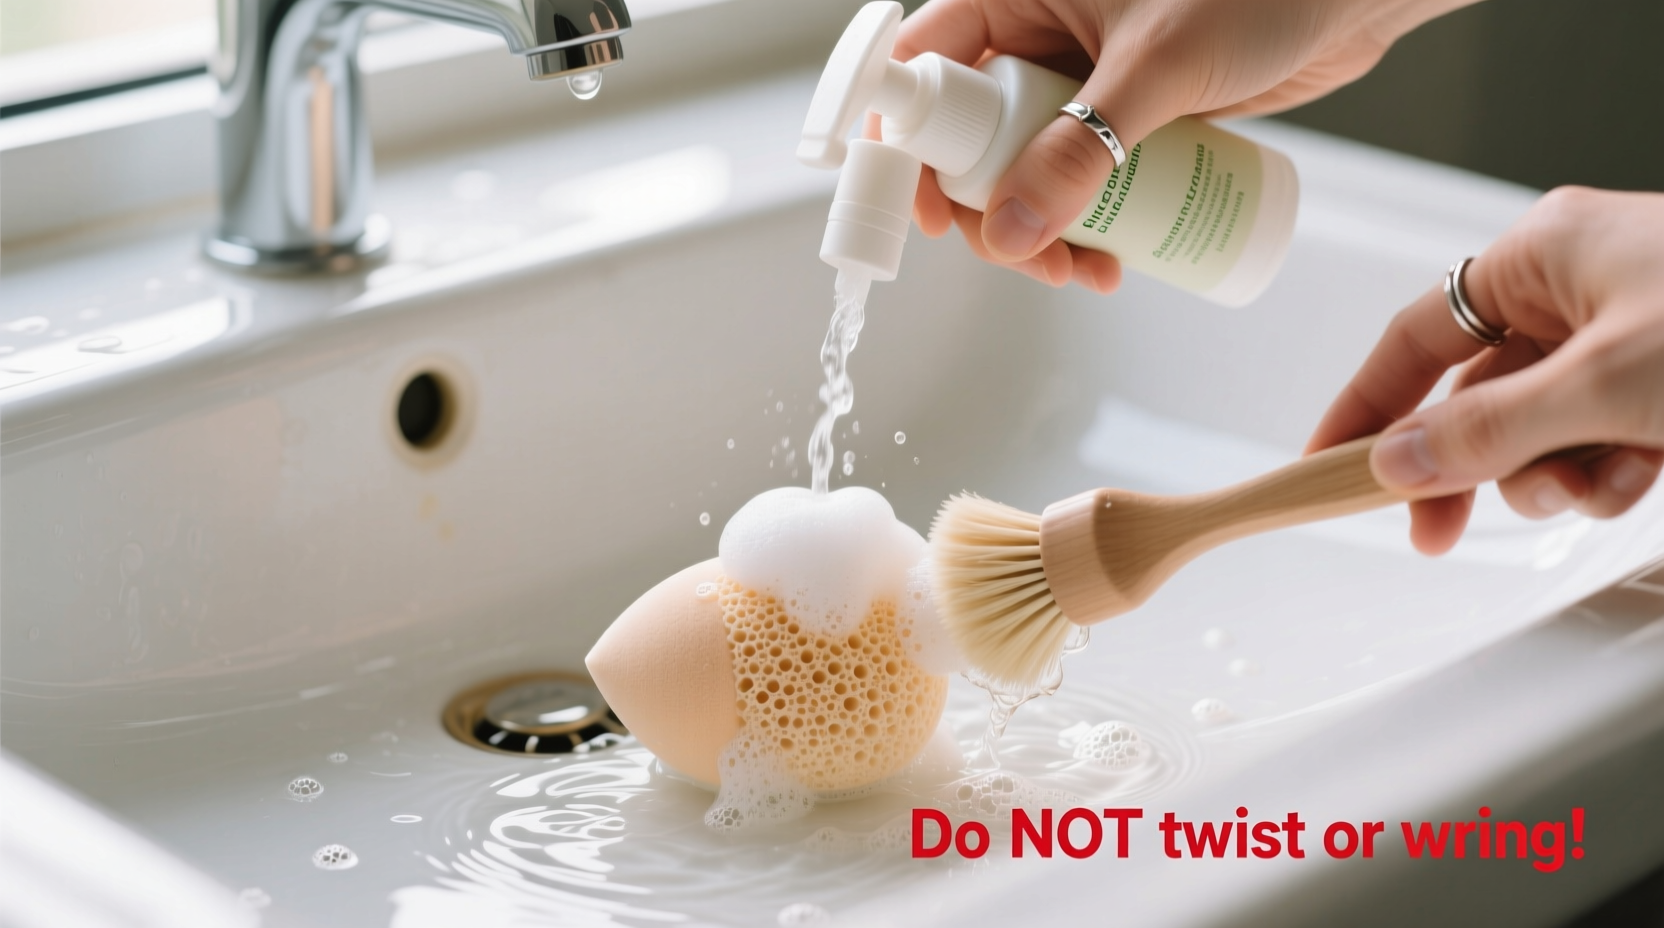
- Wet the Sponge Thoroughly
Run warm water over the beauty blender until it expands to its full size. This opens up the foam pores, allowing trapped makeup to be released more easily. Never squeeze dry sponge under running water—always let it expand first. - Apply a Gentle Cleanser
Use either a dedicated sponge cleanser, baby shampoo, or mild liquid hand soap. Avoid bar soaps or anything with exfoliants or thick oils. Place 2–3 drops on your palm or a silicone cleansing mat. - Press and Roll—Never Rub or Twist
Gently press the sponge into the soapy surface, then roll it between your palms. Let the foam compress and release repeatedly, forcing out dirt through natural expansion and contraction. Do not twist, wring, or scrub aggressively—this shears internal fibers. - Rinse Completely
Hold under lukewarm water, continuing to press and release until the runoff is clear. Residual soap can break down foam over time, so ensure all traces are gone. - Squeeze Out Excess Water Gently
Place the sponge on a clean towel and press down lightly with the flat of your hand. Avoid folding or twisting. For extra moisture removal, wrap it in the towel and leave for 5 minutes. - Air Dry in a Ventilated Area
Stand the sponge upright on a drying rack or cup to allow airflow on all sides. Never store it in a closed container while damp. Ideal drying spots are well-lit, ventilated areas away from direct sunlight.
Do’s and Don’ts of Beauty Blender Care
| Do | Don’t |
|---|---|
| Clean after every use or at least twice a week | Wait more than 3 days without cleaning |
| Use non-abrasive, pH-balanced cleansers | Use alcohol-based wipes or strong detergents |
| Press and roll to clean | Twist, wring, or stretch the sponge |
| Dry upright in open air | Store in a sealed case while wet |
| Replace every 3–6 months | Keep using if it develops odor or splits |
Alternative Cleaning Methods That Work Without Damage
While hand-washing is ideal, some users prefer faster or deeper-cleaning options. These alternatives are effective when performed carefully:
- Microwave Method (With Caution): Soak the wet sponge in a mix of water and mild soap, then microwave for 30 seconds. Steam helps kill bacteria. Let cool before handling and rinse thoroughly. Only use with heat-safe sponges and never leave unattended.
- Vinegar Soak (Weekly Deep Clean): Mix one part white vinegar with three parts warm water. Submerge the expanded sponge for 5–10 minutes. Swirl gently, then rinse completely. Vinegar disinfects without degrading foam when diluted properly.
- Baby Shampoo Soak: Fill a bowl with warm water and a teaspoon of tear-free baby shampoo. Let the sponge soak for 10 minutes, then follow standard pressing-and-rinsing steps. Baby shampoo lifts oil-based products without stripping foam integrity.
Real Example: From Frayed to Flawless
Sophia, a freelance makeup artist in Austin, used her beauty blender daily for client work. Within two months, the sponge began shedding foam and developed small tears at the tip. She assumed frequent use was the culprit—until a colleague suggested reviewing her cleaning routine. Sophia had been rinsing quickly under cold water and storing the sponge in a zipped pouch overnight. After switching to warm water expansion, baby shampoo cleansing, and upright drying on a mesh rack, her next sponge lasted five months without fraying. “I didn’t realize I was damaging it every night,” she said. “Now I treat cleaning like part of my prep routine—just as important as sanitizing brushes.”
Checklist: Weekly Beauty Blender Maintenance Routine
Stay consistent with this simple weekly checklist to maximize sponge longevity and hygiene:
- ✅ Rinse sponge after each use with warm water
- ✅ Perform full wash with gentle cleanser 2–3 times per week
- ✅ Use vinegar or microwave method for deep clean once every 7–10 days
- ✅ Inspect for discoloration, odor, or thinning edges
- ✅ Ensure complete drying before storage
- ✅ Replace if foam feels gritty, smells sour, or cracks easily
Frequently Asked Questions
Can I use dish soap to clean my beauty blender?
Dish soap is designed to cut grease and may be too harsh for delicate foam. While occasional use of a tiny amount of mild dish soap (like Dawn Free & Clear) won’t destroy the sponge immediately, repeated use strips moisture-retaining agents in the foam, leading to brittleness. Opt for gentler alternatives like baby shampoo or specialized sponge cleansers.
How often should I replace my beauty blender?
Even with perfect care, replace your beauty blender every 3 to 6 months. Frequent use, exposure to oils, and daily compression reduce its effectiveness over time. Signs it’s time to replace include persistent odor after washing, visible wear on the surface, loss of bounce, or flaking foam.
Is it safe to share a beauty blender?
No. Sharing any makeup applicator increases the risk of transferring bacteria, viruses (including herpes simplex), and fungi. Even if cleaned thoroughly, microtears in the foam can harbor pathogens. Each user should have their own sponge, clearly labeled and stored separately.
Conclusion: Treat It Like Skin, Not a Tool
A beauty blender isn’t just another makeup brush—it behaves more like an extension of your skin. It absorbs, reacts, and deteriorates based on how it's treated. Cleaning it effectively isn’t about scrubbing harder; it’s about understanding its delicate nature and responding with care. By adopting gentle techniques, avoiding common mistakes, and maintaining a consistent routine, you protect both your skin and your investment. The result? A tool that performs beautifully, lasts longer, and supports a healthier complexion.


 浙公网安备
33010002000092号
浙公网安备
33010002000092号 浙B2-20120091-4
Comments
No comments yet. Why don't you start the discussion?