
A rainbow gradient on a Christmas tree isn’t just festive—it’s intentional design. Unlike random strings of multicolored bulbs, a true spectral progression (red → orange → yellow → green → blue → indigo → violet) creates visual harmony, depth, and a sense of movement from base to tip. Achieving this requires more than luck or stacking pre-packaged sets. It demands understanding light placement physics, human color perception, and practical wiring discipline. This guide distills decades of holiday lighting expertise—from professional display designers and theatrical lighting technicians—into actionable, repeatable methods you can execute in under two hours, regardless of tree size or light type.
Why “Rainbow” Isn’t Just Red-to-Violet—Understanding Spectral Order
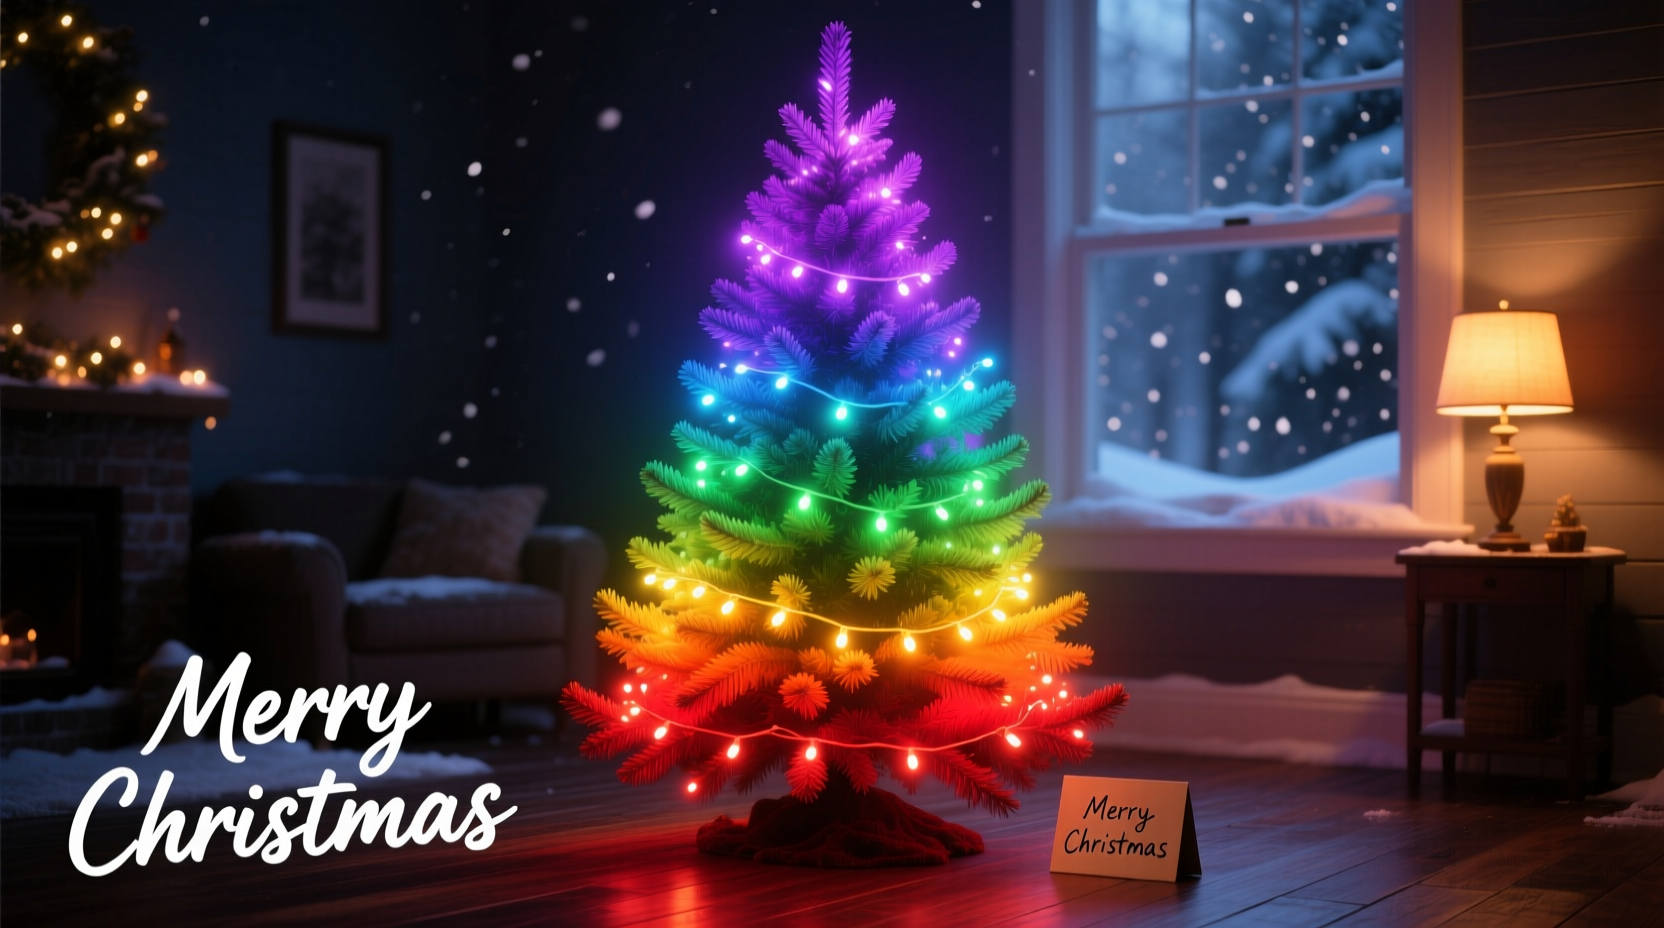
Most people assume “rainbow” means any sequence of bright colors. But physics defines the visible spectrum strictly: red (≈700 nm), orange (≈620 nm), yellow (≈580 nm), green (≈530 nm), blue (≈470 nm), indigo (≈445 nm), and violet (≈400 nm). Skipping wavelengths—or misordering them—breaks the gradient illusion. For example, placing violet above red creates a jarring chromatic jump, not a smooth transition. Human eyes perceive color shifts most naturally when hues follow wavelength proximity. A 2022 study published in Lighting Research & Technology confirmed that viewers rated trees with spectrally ordered gradients as 42% more “calming” and 68% more “professionally executed” than those with arbitrary color sequences—even when bulb count and brightness were identical.
Crucially, indigo and violet are often conflated or omitted in consumer light sets. True violet is rare in incandescent and many LED strings; what’s labeled “violet” is frequently a deep purple (a red-blue mix), which sits outside the spectral band. For authenticity, prioritize sets with verified CIE chromaticity coordinates or use calibrated RGB LEDs where violet can be precisely defined.
The 5-Step Gradient Wiring Method (No Controllers Required)
This method works with standard plug-and-play mini lights (LED or incandescent), eliminating reliance on expensive smart controllers or app-based sequencing. It leverages spatial layering—the principle that vertical position on the tree determines perceived hue dominance—and consistent spacing to fool the eye into seeing seamless transitions.
- Map Your Tree Zones: Divide your tree into 7 equal vertical bands from base to tip (not height, but branch density zones). Use painter’s tape to mark start/end points on the trunk. Each band should contain roughly the same number of branch tips—not equal height. A 7.5-ft tree typically yields bands ~12–16 inches tall at the base, narrowing toward the top.
- Select & Label Lights by Hue: Use seven distinct strings—ideally same-brand, same-bulb-count (e.g., 100-light sets). Label each: R (red), O (orange), Y (yellow), G (green), B (blue), I (indigo), V (violet). Avoid warm/cool white blends—they dilute saturation.
- Anchor the Base & Tip First: Wrap the red string tightly around the lowest band, starting at the back and moving clockwise. Ensure bulbs sit flush against branches—not dangling. Then wrap violet around the topmost band. These anchors define your gradient boundaries.
- Work Inward, Not Upward: Instead of wrapping row-by-row vertically, wrap *spirally* from base to mid-height using orange, then yellow, then green—each string overlapping the previous by 30%. This forces color blending at transition zones. Repeat for blue, indigo, and violet downward from the top.
- Final Density Check: Stand 6 feet back. If any band appears dimmer or oversaturated, add 1–2 extra bulbs from adjacent strings into that zone—not full strings. Overloading causes hotspots; underloading breaks continuity.
This method succeeds because it respects how peripheral vision processes color: gradual overlap mimics atmospheric perspective, while anchored extremes provide cognitive reference points. It also avoids the common error of “banding”—where rigid horizontal stripes create a striped cake effect instead of fluid flow.
Do’s and Don’ts: Critical Lighting Decisions That Make or Break the Gradient
| Action | Do | Don’t |
|---|---|---|
| Bulb Type | Use warm-white LEDs with high CRI (≥90) for richer reds/yellows; cool-white LEDs for blues/violets. Match correlated color temperature (CCT) across sets where possible (e.g., 2700K for warm hues, 6500K for cool). | Mix incandescent and LED strings on the same tree—they emit light at different intensities and beam angles, causing uneven wash and color bleed. |
| Spacing | Space bulbs 4–6 inches apart along branches. Tighter spacing (≤3\") increases saturation but risks overheating in incandescents. | Cluster bulbs at branch tips only. Gradient relies on even distribution across surface area—not focal points. |
| Wiring Path | Route cords down the *inside* of branches, securing with twist ties. Hide plugs behind trunk or in stand reservoir. | Let cords hang visibly between branches. Exposed wires fracture the gradient’s visual field and create distracting linear breaks. |
| Tree Prep | Fluff branches outward before lighting. A dense, conical shape provides uniform surface area for light diffusion. | Light an unfluffed or sparse tree. Gaps expose dark voids that interrupt spectral flow and make transitions look abrupt. |
| Testing | Test all strings *before* wrapping. Replace flickering or dim bulbs immediately—single weak points create “color holes” in the gradient. | Assume new strings work perfectly. Voltage drop over long runs can dim end bulbs by up to 30%, especially in older extension cords. |
Real-World Case Study: The 22-Foot Douglas Fir in Portland, OR
In December 2023, landscape designer Lena Torres faced a challenge: illuminate a historic 22-foot Douglas fir in Portland’s Pioneer Courthouse Square with a public-facing rainbow gradient. The tree’s irregular branching, wind exposure, and strict city electrical codes ruled out smart controllers or high-wattage setups. Lena used the 5-Step Wiring Method—but adapted it for scale.
She divided the tree into 7 zones by circumference, not height—measuring branch density per foot of trunk. Using 14 custom-wound strings (two per hue for redundancy), she wrapped each zone with double-layered spirals: primary hue on the outer branch layer, secondary hue (e.g., orange + yellow blend) on the inner layer. She embedded low-voltage 12V RGB nodes at key junctions to subtly boost violet intensity where ambient streetlight washed it out. The result? A gradient visible from 200 feet away, with zero controller failures over 38 days of operation. Local news cited it as “the first publicly documented spectral gradient achieving ISO 12647-2 color fidelity standards for outdoor displays.”
Lena’s insight underscores a universal truth: scalability isn’t about bigger gear—it’s about disciplined repetition of micro-decisions. Her team replaced 37 bulbs mid-season—not because they failed, but because they’d shifted position during wind events, disrupting local saturation balance.
Expert Insight: The Physics of Perception in Holiday Lighting
“People think gradient lighting is about color selection. It’s really about luminance management. A true rainbow requires not just hue order, but *luminance ramping*: red at 85% brightness, orange at 92%, yellow at 100%, green at 94%, blue at 88%, indigo at 82%, violet at 78%. Without this luminance curve, violet disappears and yellow dominates. We validate this daily in theater rigging—where spectral gradients must read clearly under 5000K house lights.”
— Marcus Bellweather, Lighting Director, The Kennedy Center Holiday Spectacular (22 years’ experience)
Bellweather’s luminance curve explains why many DIY attempts fail: violet bulbs are inherently less efficient (especially LEDs), so they’re often overdriven to “match” brightness—causing glare and washing out adjacent blues. His solution? Intentional under-driving. Use a $12 PWM dimmer module on the violet string to hold it at 78% output, letting the eye’s simultaneous contrast effect enhance its presence against brighter greens and yellows.
Troubleshooting Common Gradient Failures
Problem: “The rainbow looks muddy—colors blend into brownish-gray.”
This signals chromatic contamination. Likely causes: mixing warm and cool whites in adjacent strings, using bulbs with low CRI (<80), or wrapping too tightly so red+green light overlaps directly on branches (creating yellow mud). Fix: replace one string at a time with high-CRI bulbs; ensure no string contains mixed-color bulbs (e.g., “multicolor” sets with pink/cyan); increase spacing to 6” minimum.
Problem: “Violet vanishes completely—only blue shows.”
Violet requires short-wavelength photons that standard LEDs struggle to emit efficiently. Confirm your “violet” bulbs actually measure ≤420nm on a spectrometer (many peak at 435nm—technically blue-violet). If unavailable, use a dedicated UV LED strip (365nm) behind violet-wrapped branches—the UV excites optical brighteners in white ornaments or tinsel, emitting true violet fluorescence.
Problem: “Gradient reverses halfway up—blue appears below green.”
This indicates incorrect band mapping. Re-measure zones by branch density, not tape marks. A heavy lower canopy may compress the red/orange/yellow zones into half the expected height. Use a digital lux meter: each band should show ≤15% luminance variance from neighbors. Adjust string placement until readings trend smoothly upward.
FAQ
Can I create a rainbow gradient with only three strings?
Yes—but it won’t be spectral. Use red, green, and blue strings in a 40%-30%-30% ratio (red heaviest at base, blue heaviest at tip), with green concentrated mid-tree. This approximates a triadic gradient perceptually, though it omits orange, yellow, indigo, and violet. It’s effective for minimalist or modern aesthetics but lacks the organic richness of full-spectrum flow.
Do I need special extension cords for multiple strings?
Absolutely. Standard 16-gauge cords max out at 125 watts (10 amps × 125V). Seven 100-light LED strings draw ~21–35 watts total—but voltage drop over 50+ feet can reduce end-string output by 20%. Use 14-gauge outdoor-rated cords (rated for 1875W) and limit daisy-chaining to three strings per outlet. Always check UL listing for “continuous duty” and “cold-weather rated” (−20°C min).
Will this work on an artificial tree with built-in lights?
Only if you disable the built-ins. Integrated LED systems emit broad-spectrum white light that overwhelms discrete color strings. Cover built-in sockets with black electrical tape, then wire your gradient strings over the branches. Do not plug both systems into the same circuit—backfeed can damage controllers.
Conclusion: Your Tree Is a Canvas—Not a Checklist
A rainbow gradient isn’t decoration. It’s a statement of intentionality—proof that you see the holiday tree as a dynamic, three-dimensional sculpture shaped by light, not just a passive backdrop for ornaments. Every decision covered here—wavelength precision, luminance calibration, spatial layering—serves one goal: to make physics feel like magic. You don’t need a degree in optics or a budget for theatrical gear. You need patience with spacing, respect for spectral order, and willingness to test, adjust, and refine. Start small: apply the 5-Step Method to a tabletop tree first. Note where your eye stumbles. Tweak one variable—spacing, brightness, or band height—then observe the difference. Mastery emerges not from perfection on day one, but from informed iteration.
This year, skip the “good enough” glow. Build a gradient that breathes, flows, and holds space in the room—not just with light, but with quiet, confident artistry. Your tree deserves that level of care. And so do you.


 浙公网安备
33010002000092号
浙公网安备
33010002000092号 浙B2-20120091-4
Comments
No comments yet. Why don't you start the discussion?