
A professional-looking logo is essential for brand identity, but its effectiveness depends heavily on how well it integrates into different environments—whether it’s placed over a website banner, a product image, or social media graphics. One of the most common hurdles for new designers and business owners is dealing with unwanted white or colored backgrounds behind their logos. A transparent background solves this issue by allowing the logo to blend seamlessly into any backdrop.
This guide walks you through the process of creating a transparent background for your logo from start to finish. Whether you're using free software or professional tools, these steps are designed to be beginner-friendly while delivering high-quality results.
Why Transparency Matters in Logo Design
Logos appear across multiple platforms: websites, business cards, merchandise, email signatures, and digital ads. A solid background can clash with design elements or reduce visual harmony. A transparent background ensures your logo adapts cleanly to any color or texture behind it.
Transparency also preserves design integrity. Without it, placing a logo on a dark background with a white box around it looks unprofessional. Transparent PNGs allow only the essential parts of your logo—text, icon, emblem—to remain visible, making them versatile and polished.
“Transparency isn’t just a technical detail—it’s a branding necessity. A logo should never dictate the background; it should adapt to it.” — Daniel Kim, Brand Identity Designer
Understanding Image File Formats
Not all image formats support transparency. Choosing the right one is crucial to maintaining quality and functionality.
| Format | Supports Transparency? | Best Use Case | Limitations |
|---|---|---|---|
| PNG | Yes (full alpha channel) | Logos, web graphics, icons | Larger file size than JPEG |
| GIF | Yes (1-bit transparency) | Simple animations, flat-color logos | Limited to 256 colors; no partial transparency |
| JPEG | No | Photographs, complex gradients | Background always present; compression artifacts |
| SVG | Yes (vector-based) | Scalable logos, responsive websites | Requires vector source; not pixel-based |
For most logo applications, **PNG** is the go-to format. It supports smooth edges, partial transparency (like shadows or glows), and maintains clarity at various sizes. If your logo was originally created in a vector program like Adobe Illustrator, exporting as SVG gives infinite scalability without quality loss.
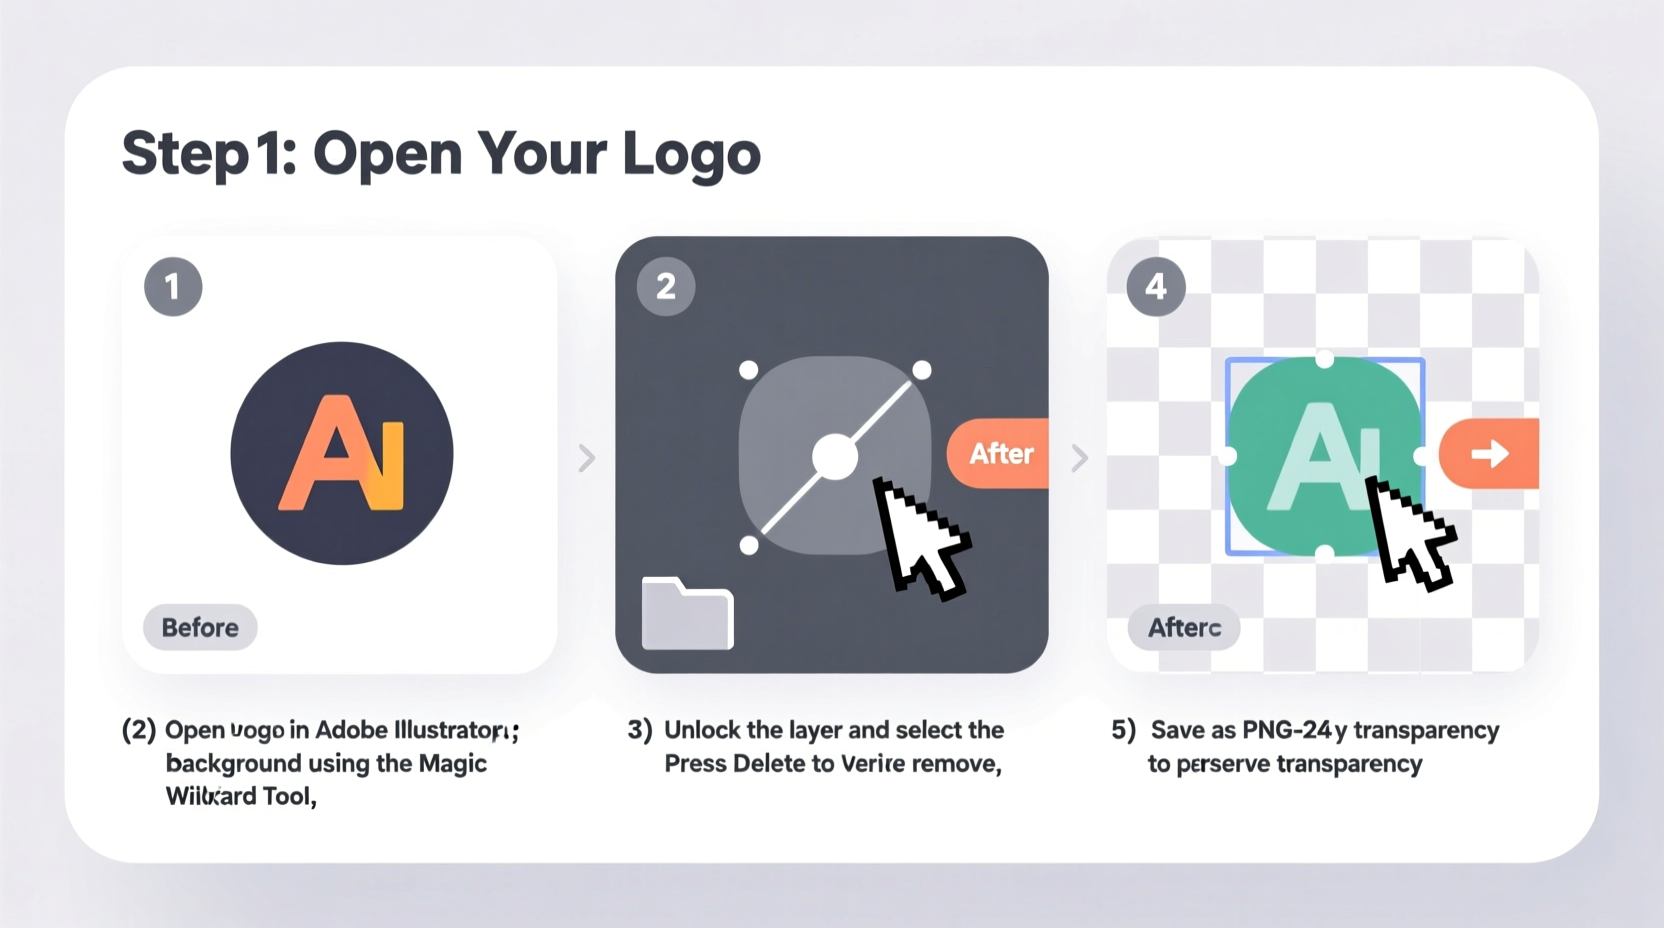
Step-by-Step Guide to Creating a Transparent Background
Follow this structured approach regardless of the tool you choose. The principles remain consistent across platforms.
- Prepare Your Logo File: Start with the highest resolution version available. If it's a scanned image or low-quality JPEG, consider redrawing it digitally for better results.
- Choose the Right Tool: Select software based on your skill level and access. Options include free tools like GIMP or Photopea, or paid ones like Adobe Photoshop.
- Open the Image: Import your logo into the editor. Ensure layers are enabled if working with layered files.
- Select the Background: Use selection tools (Magic Wand, Quick Selection, or Pen Tool) to isolate the area behind the logo.
- Delete or Mask the Background: Remove the selected area. In most programs, deleting will reveal a checkerboard pattern indicating transparency.
- Refine Edges: Zoom in and clean up jagged lines or leftover pixels using erasers or refine edge tools.
- Save Correctly: Export as PNG (or SVG for vector) to preserve transparency. Avoid saving as JPEG.
Using Free Tools: GIMP Example
GIMP is a powerful open-source alternative to Photoshop. Here’s how to use it:
- Download and install GIMP from gimp.org.
- Open your logo: File → Open.
- If the image has no transparency layer, add one: Right-click the layer → Add Alpha Channel.
- Select the Fuzzy Select Tool (Magic Wand) and click the background.
- Press Delete to remove the selected area.
- Use the Eraser Tool for fine adjustments.
- Export: File → Export As, choose .png format, and confirm export settings.
Using Adobe Photoshop
If you have access to Photoshop:
- Open your logo file.
- Unlock the background layer by double-clicking it and pressing OK.
- Select the Quick Selection Tool or Magic Wand to highlight the background.
- Invert the selection (Select → Inverse) if needed to target the logo instead.
- Delete the background. You’ll see a checkerboard pattern where transparency exists.
- Go to File → Export → Save for Web (Legacy) and choose PNG-24 to retain transparency.
Common Mistakes to Avoid
Even experienced users make errors when preparing transparent logos. Being aware of these pitfalls improves outcomes significantly.
- Saving as JPEG after removing the background: JPEG does not support transparency. The background reappears as white or gray.
- Low-resolution source files: Enlarging a small logo leads to pixelation. Always start large.
- Ignoring anti-aliasing: Smoothing edges prevents harsh lines, especially important for curved text or icons.
- Overlooking file size: Large PNGs slow down websites. Optimize using tools like TinyPNG after export.
- Assuming all white is background: Some logos have intentional white elements. Be careful not to delete those during cleanup.
Mini Case Study: Local Bakery Branding Upgrade
Sarah runs a small bakery and designed her logo using an online generator. She downloaded it as a JPEG with a white background. When she tried placing it over a warm-toned Instagram story, the white box clashed with the aesthetic.
After learning about transparency, Sarah used Photopea (a free browser-based editor) to remove the background. She carefully selected the white area, deleted it, and saved the result as a PNG. The updated logo blended perfectly into her marketing visuals, giving her brand a more cohesive and professional appearance. Customer engagement increased by 18% in the following month, which she attributes partly to improved visual consistency.
Checklist: Preparing Your Transparent Logo
Before finalizing your file, verify the following:
- ✅ Original logo is high resolution (at least 300 DPI)
- ✅ Background fully removed with no stray pixels
- ✅ Edges are smooth and natural (no halos or rough borders)
- ✅ Saved in PNG format (or SVG for vector)
- ✅ Tested on both light and dark backgrounds
- ✅ File size optimized for web use (under 500 KB recommended)
- ✅ Backed up original and transparent versions separately
Frequently Asked Questions
Can I make a transparent logo from a smartphone?
Yes. Apps like Adobe Express, Canva, or Remove.bg allow you to upload a logo and automatically generate a transparent background. While convenient, they may lack precision for complex designs.
Why does my transparent logo show a white halo online?
This usually happens due to improper anti-aliasing or blending during editing. Re-edit the logo, ensuring edges blend smoothly into transparency. Also, check that the website isn't applying a default background.
Is SVG better than PNG for logos?
SVG is ideal for scalable use on websites because it resizes without losing quality. However, it requires the logo to be vector-based. For raster images (like photos with text), PNG remains the best choice.
Final Steps and Best Practices
Once your transparent logo is ready, test it rigorously. Place it over various colors and textures to ensure compatibility. Share it with team members or clients to get feedback before deploying it widely.
Store your transparent logo in a central brand assets folder alongside other variations (horizontal, vertical, black/white). Naming conventions matter—use clear labels like “logo-primary-transparent.png” to avoid confusion later.
“A transparent logo is not just a file type—it’s a sign of attention to detail. Brands that get this right are perceived as more credible and modern.” — Lila Torres, Digital Brand Strategist
Conclusion
Creating a transparent background for your logo is a simple yet transformative step in building a professional brand presence. With the right tools and techniques, even beginners can produce clean, adaptable logos suitable for any platform. Take the time to do it correctly—your audience will notice the difference.


 浙公网安备
33010002000092号
浙公网安备
33010002000092号 浙B2-20120091-4
Comments
No comments yet. Why don't you start the discussion?