
Nothing undermines the festive charm of outdoor holiday lighting faster than asymmetry: one window frame glowing with precision while its neighbor droops unevenly; eaves strung with lights that taper off too soon on the right side; corners where cords vanish mid-span while the left side overflows. Symmetry isn’t about rigid perfection—it’s visual balance that signals care, intention, and quiet confidence in your holiday presentation. It’s what makes passersby pause, not because the display is the brightest, but because it feels *resolved*. Achieving it doesn’t require professional tools or years of experience. It does require method—not magic. This guide distills decades of collective wisdom from professional holiday installers, architectural lighting designers, and seasoned homeowners who’ve moved beyond trial-and-error to repeatable, reliable symmetry.
Why Symmetry Matters Beyond Aesthetics
Symmetry in holiday lighting serves a psychological and functional purpose far deeper than “looking nice.” Human vision is wired to detect imbalance instinctively—even subconsciously. A 3-inch discrepancy between light strands on either side of a double-hung window triggers mild cognitive dissonance; viewers may not articulate why the display feels “off,” but they’ll feel it. In residential architecture, windows and eaves are structural anchors—horizontal and vertical reference points that define a home’s rhythm. When lights follow that rhythm, they reinforce the building’s inherent order. When they defy it, they compete with it.
Architectural lighting consultant Lena Torres observes:
“Symmetry in exterior holiday lighting isn’t decorative—it’s architectural punctuation. You’re not just adding light; you’re completing the line work of the façade. A misaligned strand on the eave is like a misplaced comma in a sentence: technically functional, but emotionally disruptive.” — Lena Torres, FAIA, Lighting Director at Form & Glow Studio
Beyond perception, symmetry also improves longevity and safety. Even weight distribution across clips prevents sagging and strain on gutters. Consistent spacing reduces hot spots where wires bunch and overheat. And crucially—symmetrical layouts simplify troubleshooting. If one section dims, you know exactly where to compare it against its mirrored counterpart.
The 5-Step Symmetry Framework (No Tape Measure Required)
Forget starting at one corner and hoping for the best. True symmetry begins with establishing fixed reference points—and then working outward from them. Follow this sequence precisely:
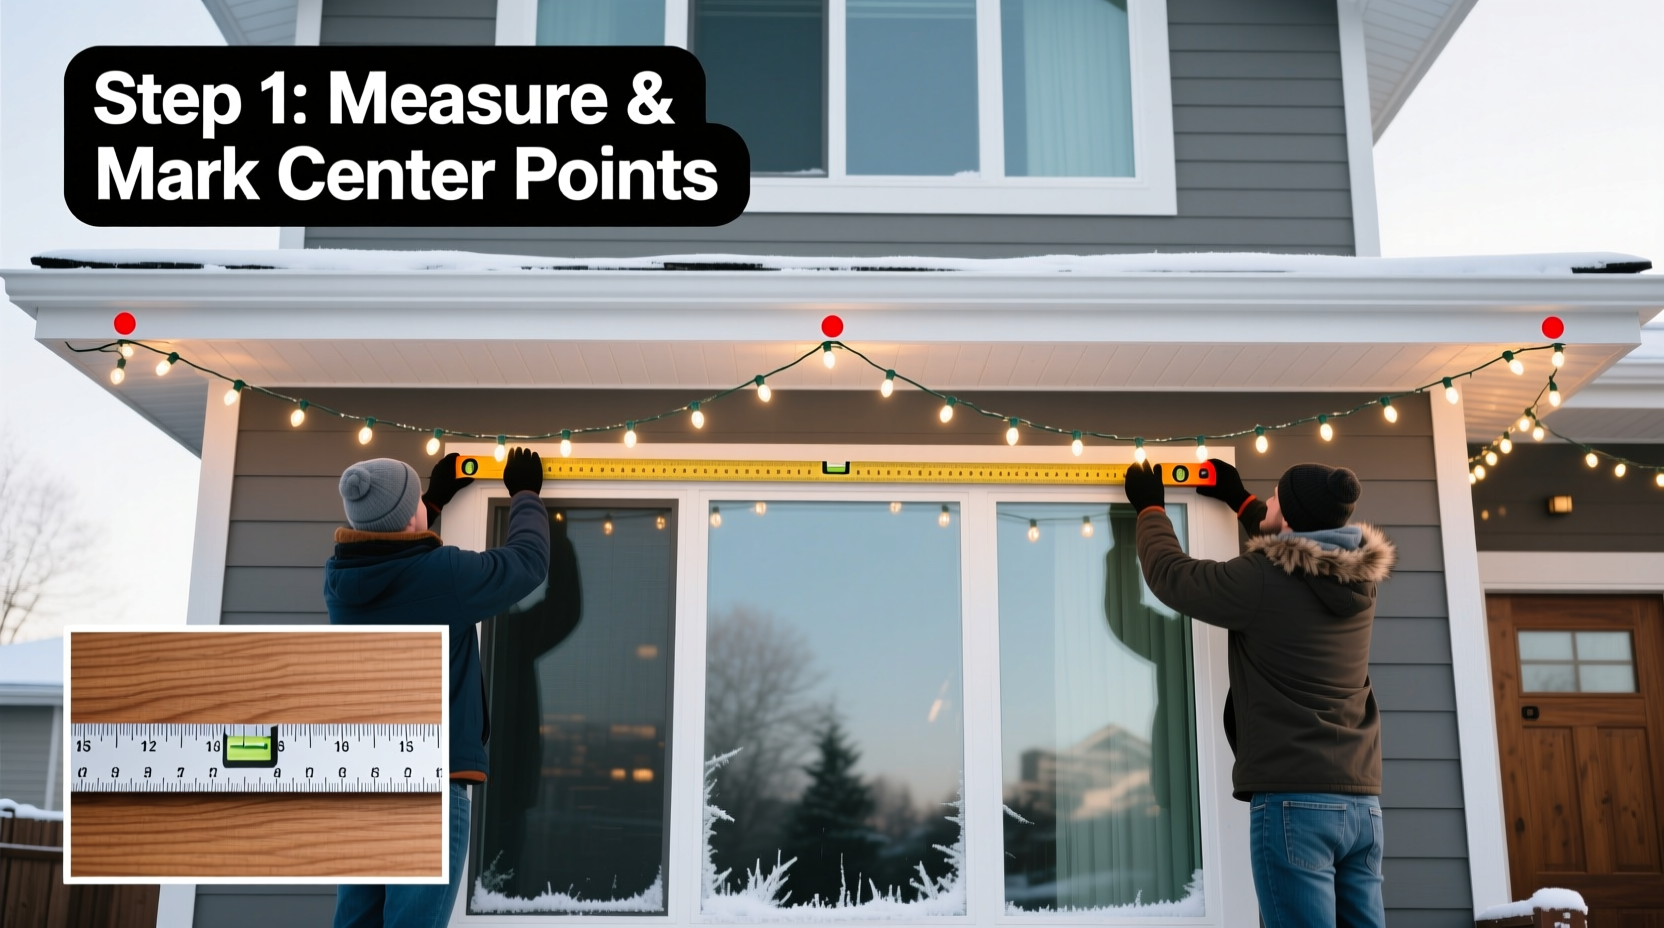
- Identify the Center Axis: Stand back 15–20 feet from the structure. Visually locate the central vertical plane of the window or eave run. For a single window, this is the mullion or center of the frame. For multi-window façades, find the midpoint between outermost edges. Mark it lightly with removable chalk or painter’s tape.
- Measure Light Strand Length Against the Span: Lay your unlit strand flat on the ground. Measure its total length. Divide that number by two. That’s your half-span target. Do not assume manufacturer “100 ft” labels are accurate—test each box.
- Anchor at the Center First: Clip the midpoint of the strand directly to the center axis mark. Use a heavy-duty clip designed for outdoor use (e.g., S-shaped gutter hooks with rubberized grips). This is your non-negotiable anchor point.
- Work Outward in Equal Increments: From the center clip, count identical numbers of bulbs or consistent intervals (e.g., every 6 inches) toward both ends. Use a retractable tape measure only for verification—not as your primary guide. Your eye, calibrated from the center, is more reliable than a stretched tape.
- Adjust Tension, Not Placement: Once fully clipped, gently tug each segment taut—starting from the center and moving outward. If one side sags, loosen the nearest clip and reposition it slightly inward (never outward), then retighten. Never stretch the cord to compensate.
Window-Specific Symmetry Tactics
Windows present unique challenges: varying heights, mullions, casements, and proximity to doors or corners. Here’s how to adapt the framework:
- Double-Hung Windows: Treat the entire frame—not just the glass—as the symmetrical unit. Run lights along the outer perimeter: top header, both side jambs, and bottom sill. Start at the center of the top header, then mirror down both sides simultaneously. Avoid stopping at the glass edge—extend to the full frame for proportional weight.
- Bay or Bow Windows: These demand radial symmetry. Identify the central window pane, then treat each flanking pane as a mirrored segment. Use flexible LED rope lights for curved sections—they maintain even spacing without kinking. For traditional mini-lights, add extra clips at curve peaks and valleys to prevent drooping.
- Windows with Shutters or Trim: Anchor lights to the shutter frame or trim—not the window itself—if those elements are symmetrical. This leverages existing architectural balance. If shutters are mismatched (e.g., one missing), revert to the window frame and use uniform spacing to override the asymmetry visually.
- Multi-Window Rows: Don’t treat each window independently. Instead, establish one continuous center axis across the entire row. Then divide the total horizontal span into equal segments matching the number of windows plus one (e.g., three windows = four equal zones). This prevents “drift”—where small errors compound across multiple frames.
Eave Symmetry: Managing Corners, Gutters, and Overhangs
Eaves introduce directional complexity: horizontal runs, 90-degree turns, and transitions between roof planes. Symmetry here relies on continuity—not isolation.
| Challenge | Symmetrical Solution | Why It Works |
|---|---|---|
| Cornet transitions (e.g., front-to-side) | Run lights continuously around the corner—do not stop and restart. Use corner clips that pivot 90° without kinking the wire. | Breaks in the light line create visual “stops” that fracture rhythm. Continuous flow preserves the eave’s horizontal emphasis. |
| Gutter dips or sagging sections | Install supplemental support clips every 18–24 inches—regardless of bulb count—to maintain level tension. Place them directly beneath the lowest point of the dip. | Compensating with longer spans between clips exaggerates sag. Frequent, evenly spaced supports enforce consistency. |
| Asymmetrical rooflines (e.g., dormers, additions) | Extend the dominant eave line with lights—even across blank wall sections—using discreet mounting brackets. Match spacing and height to the main eave. | The eye follows the strongest horizontal line. Extending it overrides irregularities rather than highlighting them. |
| Short eave sections (under 4 ft) | Use a single strand cut to exact length + 6 inches, anchored at center, then folded back on itself (“U-loop”) to fill the space evenly. Hide the loop behind the gutter lip. | Forcing a full strand creates crowding at ends. The U-loop ensures identical density on both sides of center. |
Real-World Case Study: The Elm Street Bungalow
When Sarah Chen renovated her 1920s Craftsman bungalow, she inherited an asymmetrical façade: a large front window offset slightly left, a narrow side window, and an eave that dipped 1.5 inches over the garage wing. Her first attempt—hanging lights “by eye”—resulted in a right-side eave strand that ended 8 inches short of the corner, while the left side spilled 10 inches past it. Neighbors politely called it “eclectic.”
She applied the 5-Step Symmetry Framework: First, she marked the true center of the entire front façade—not the window, but the midpoint between the outermost clapboard edges. She measured her 25-ft strands, confirmed each was actually 24 ft 10 in, and anchored the center bulb at the façade’s midpoint. Working outward, she placed clips every 6 inches—counting bulbs only to verify spacing. At the garage wing dip, she added three extra support clips. For the offset window, she extended the top header lights 14 inches beyond the frame on the shorter side to match the longer side’s visual weight.
The result? Passersby now comment on how “grounded” and “intentional” the house looks. More importantly, Sarah completed the job in under 90 minutes—half the time of her first attempt—because she wasn’t constantly repositioning or second-guessing.
Common Symmetry Pitfalls (and How to Avoid Them)
Even experienced decorators fall into these traps—often because they prioritize speed over structure:
- The “Start-and-Go” Fallacy: Beginning at one end and stringing linearly guarantees cumulative error. A ¼-inch misplacement per clip becomes 2 inches over 8 clips. Always anchor at center first.
- Ignoring Bulb Density: Using 100-light strands on a 10-ft span (1 bulb per inch) versus a 20-ft span (1 bulb per 2 inches) creates inconsistent visual weight. Match strand density to span length—not arbitrary “coverage” claims.
- Over-Reliance on Manufacturer Spacing: Pre-wired strands vary in actual bulb spacing due to manufacturing tolerances. Measure 10 consecutive intervals yourself; average them. Use that number—not the box label—for all calculations.
- Clipping Only to Visible Points: Attaching only at corners, mullions, or gutters ignores the need for intermediate support. Without clips every 18–24 inches, gravity pulls the strand downward, breaking horizontal alignment.
- Forgetting Vertical Symmetry: Matching left/right is essential—but so is matching top/bottom. If your eave lights sit 2 inches below the roofline on the left, they must sit 2 inches below on the right. Use a level or laser pointer to verify vertical placement.
FAQ
What if my house has no obvious center point—like a long ranch-style façade?
Establish a modular center instead. Divide the total façade length by 3, 5, or 7 (odd numbers ensure a true center zone). Use the middle third or fifth as your anchor band—then apply the 5-Step Framework within that zone. This creates rhythmic repetition, which reads as intentional symmetry even without a single axis.
Can I achieve symmetry with mixed light types—e.g., warm white on windows and cool white on eaves?
Yes—if spacing, density, and mounting height are identical. Color contrast doesn’t break symmetry; inconsistent rhythm does. Keep bulb spacing within 0.25 inches of match across all strands, and mount all at the same distance from their respective edges (e.g., 1.5 inches from window frame, 1.5 inches from eave lip).
How do I handle symmetry on vinyl or aluminum siding where clips won’t grip?
Use specialized siding clips with integrated rubber gaskets that grip the vertical seams—not the panels. Install them at precise intervals (every 24 inches) before stringing lights. Never staple or nail directly into siding; thermal expansion will loosen fasteners over time, breaking symmetry.
Conclusion: Symmetry Is a Habit, Not a Holiday
Symmetry in Christmas lighting isn’t a seasonal task—it’s a practice in spatial awareness, patience, and respect for the architecture you inhabit. It transforms decoration from an afterthought into dialogue: between light and line, between effort and elegance, between your home and the neighborhood it anchors. The techniques here require no special tools, no advanced math—just the willingness to pause, identify the center, and move outward with intention. Once mastered, this discipline extends beyond December: you’ll notice imbalances in picture hanging, furniture arrangement, even garden path layout. That’s the quiet power of symmetry—it trains your eye to see harmony where others see chaos.
This year, don’t just hang lights. Compose with them. Anchor at the center. Count with purpose. Adjust with patience. Let your home speak in balanced lines—and watch how often strangers slow down to appreciate the quiet confidence of a perfectly resolved glow.


 浙公网安备
33010002000092号
浙公网安备
33010002000092号 浙B2-20120091-4
Comments
No comments yet. Why don't you start the discussion?