
Gaming headsets endure more than most electronics—they're pressed against skin, exposed to sweat, oils, and dust, and used for hours on end. Over time, grime builds up on ear cushions, microphones, and headbands, creating a breeding ground for bacteria and degrading both hygiene and performance. While cleaning seems obvious, many gamers hesitate, fearing they might accidentally void their warranty. The good news: you can deep clean your headset thoroughly and safely—if you follow the right steps and respect manufacturer guidelines.
This guide walks you through a warranty-safe deep cleaning process, combining practical techniques with insights from audio engineers and customer support policies from major brands like SteelSeries, HyperX, and Logitech. You’ll learn what tools to use, which areas to avoid, and how to maintain peak condition without risking coverage.
Why Cleaning Matters—And Why Warranties Are at Risk
A dirty headset isn’t just unpleasant—it’s unhygienic. Studies show that ear cushions can harbor more bacteria than a toilet seat after prolonged use. Sweat, dead skin cells, and environmental dust accumulate rapidly, especially in porous foam and fabric materials. Beyond health concerns, buildup can degrade sound quality, clog microphone ports, and weaken structural integrity over time.
Yet many users avoid cleaning because they fear breaching warranty terms. Most manufacturers explicitly state that physical damage, liquid exposure, or disassembly beyond user guidance can void coverage. However, routine maintenance using approved methods is not only allowed—it’s encouraged.
“Proper cleaning is part of responsible ownership. We don’t cover devices damaged by improper handling, but we absolutely support safe, recommended care.” — Jordan Lee, Technical Support Lead, HyperX
The key distinction lies in *how* you clean. Using harsh chemicals, submerging components, or removing non-user-serviceable parts crosses the line. But gentle, surface-level cleaning with appropriate tools falls well within warranty-friendly practices.
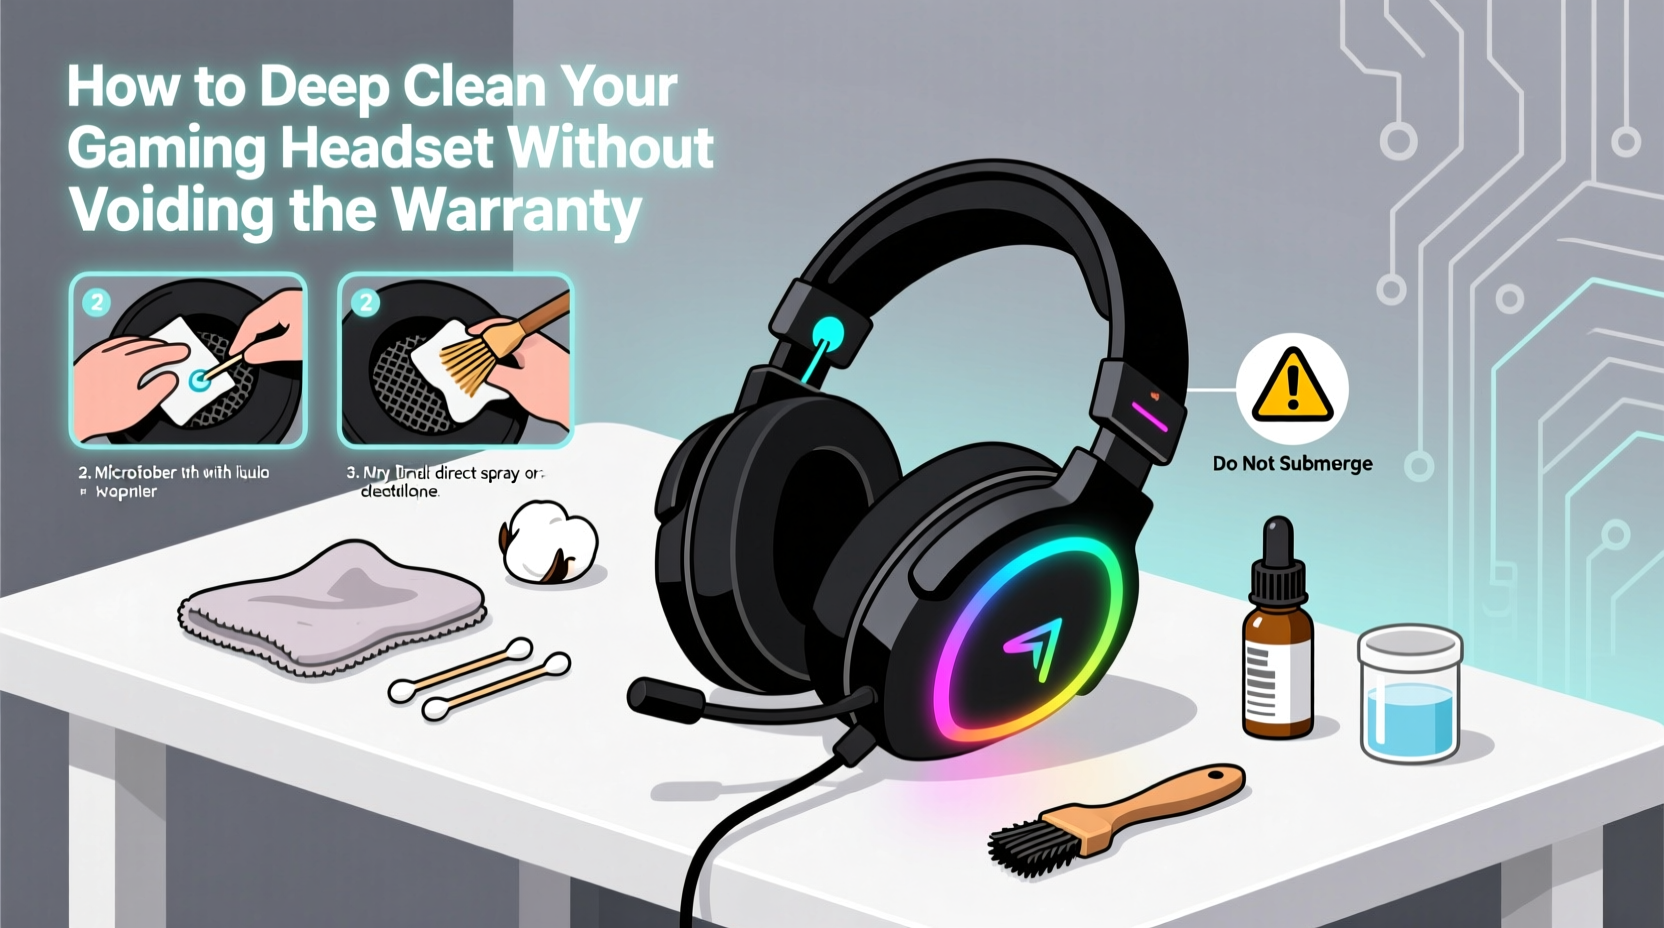
Step-by-Step: Deep Cleaning Without Voiding Coverage
Follow this methodical approach to deep clean your headset while staying within manufacturer safety parameters. This timeline assumes a standard over-ear wired or wireless gaming headset with removable or fixed ear cushions.
- Power down and disconnect: Turn off the headset and unplug it from any device. If wireless, ensure it’s powered off and not charging. Never clean a powered or connected unit.
- Check the manual: Locate your model’s official user guide. Look for “cleaning,” “maintenance,” or “care” sections. Some brands (e.g., Astro A50) warn against using alcohol-based cleaners; others permit diluted solutions.
- Gather approved supplies: Use only non-abrasive, low-moisture tools. See checklist below.
- Remove ear cushions (if designed to do so): Only detach cushions if the manual confirms they’re user-replaceable. Forcing them off can damage connectors or stitching.
- Dry wipe exterior surfaces: Use a microfiber cloth to gently remove surface dust from the headband, yoke, and outer shell.
- Clean ear cushions and headband padding: Dampen a corner of the cloth with distilled water or a 70% isopropyl alcohol solution (only if permitted). Wipe in circular motions, applying minimal pressure. Avoid soaking.
- Tackle the microphone: Use a cotton swab lightly dampened with alcohol to clean the mic mesh. Do not insert into ports or scrub aggressively.
- Address the microphone boom (if detachable): Wipe down with a dry cloth first, then a slightly damp one if needed. Let air dry completely before reattaching.
- Let everything air dry: Place components in a well-ventilated area away from direct sunlight or heat sources. Never use a hairdryer. <10> Reassemble and test: Once fully dry (wait at least 30 minutes), reattach ear cushions and power on the headset. Test audio and mic function.
Warranty-Safe Cleaning Checklist
Use this quick-reference checklist before every cleaning session to stay within safe boundaries:
- ✅ Consulted the official user manual for cleaning guidelines
- ✅ Powered off and disconnected the headset
- ✅ Used only microfiber cloths, cotton swabs, and soft brushes
- ✅ Applied no liquids directly to the device
- ✅ Avoided bleach, ammonia, acetone, or abrasive cleaners
- ✅ Did not disassemble non-user-accessible parts (e.g., speaker drivers, circuit boards)
- ✅ Allowed all components to air dry completely before reuse
- ✅ Documented the cleaning process (optional but helpful for support claims)
Do’s and Don’ts: Manufacturer Comparison
Different brands have varying tolerance for cleaning methods. The table below summarizes policies from five leading gaming audio companies based on publicly available documentation and support statements.
| Brand | Approved Cleaners | Removable Cushions? | Avoid At All Costs |
|---|---|---|---|
| SteelSeries | Damp microfiber cloth, mild soap + water (for cushions only) | Yes, on most models | Submerging, alcohol on plastic shells |
| HyperX | 70% isopropyl alcohol wipes (external only) | Yes | Disassembling drivers, washing in machine |
| Logitech G | Distilled water, soft cloth | Some models | Harsh solvents, steam cleaning |
| Razer | Electronics-safe disinfectant wipes | No (except select models) | Removing ear pads unless specified |
| Corsair | Mild detergent + water (for cushion covers only) | Yes, on most | Using compressed air near ports |
Note: Razer, for example, has historically warned against removing ear cushions on models like the Kraken X, as doing so may break retention clips. Always verify per model.
Real Example: A Close Call With a HyperX Cloud II
Mark, a streamer from Austin, noticed his HyperX Cloud II was emitting muffled audio and a faint odor after two years of daily use. He considered buying a replacement but decided to clean it first. He watched several YouTube tutorials—some recommending full disassembly and alcohol baths. Instead, he checked HyperX’s support site and found a note advising against immersion.
He followed the official guidance: removed the memory foam cushions (confirmed as user-replaceable), wiped them with a cloth dampened with 70% isopropyl alcohol, cleaned the headband with a dry microfiber, and let everything dry overnight. After reassembly, audio clarity improved dramatically, and the smell disappeared. When he later contacted support about a separate issue, they confirmed his warranty remained valid because no unauthorized modifications were made.
His mistake? Almost using a vacuum cleaner to suck out dust from the ear cup interior—a method not endorsed by the manufacturer. He caught himself in time, avoiding potential damage to delicate diaphragms.
“Following community hacks might seem efficient, but only manufacturer-backed methods guarantee warranty protection.” — Lena Torres, Audio Hardware Technician
Frequently Asked Questions
Can I wash my ear cushions in the washing machine?
No. Even if the cushions are made of fabric, machine washing can distort the foam, weaken adhesives, and introduce moisture into areas that can’t dry properly. This is universally considered misuse and will void most warranties. Hand-wipe only with a damp cloth and mild soap if specified by the manufacturer.
Is it safe to use disinfectant wipes?
Only if they are labeled safe for electronics and contain no more than 70% isopropyl alcohol. Avoid wipes with bleach, hydrogen peroxide, or citric acid, as these can corrode plastics and coatings. Brands like Clorox Electronics Wipes are generally accepted, but always test on a small, inconspicuous area first.
What if my headset has built-in RGB lighting?
Extra caution is required. Moisture near LED housings can cause short circuits. Never spray or drip liquid near glowing areas. Use a dry brush or compressed air (from 6+ inches away) to remove dust around light zones. If the lights flicker post-cleaning, stop immediately and let the unit dry for 24 hours before testing again.
Preserving Long-Term Performance
Deep cleaning once every 3–6 months is sufficient for most users. More frequent wiping (weekly) of ear cushions and headbands prevents buildup and reduces the need for aggressive cleaning later. Consider rotating between two headsets if you game heavily—this extends the life of each and allows thorough drying time between uses.
Storage also plays a role. Keep your headset in a cool, dry place, preferably on a stand or hook that minimizes contact with surfaces. Avoid leaving it in hot cars or humid basements, as temperature extremes accelerate material degradation and encourage mold growth in foam.
Final Thoughts: Clean Smart, Play Longer
Your gaming headset is an investment in immersion, communication, and competitive edge. Treating it with care doesn’t mean avoiding use—it means maintaining it responsibly. Deep cleaning is not only possible without voiding the warranty, but it’s a sign of thoughtful ownership when done correctly.
By sticking to manufacturer guidelines, using the right tools, and respecting the limits of user serviceability, you extend both the lifespan and performance of your gear. You also protect your right to support if real hardware issues arise later.
Don’t let fear of voiding coverage keep your headset grimy. Instead, arm yourself with knowledge, follow this guide, and clean with confidence. Your ears—and your teammates—will thank you.


 浙公网安备
33010002000092号
浙公网安备
33010002000092号 浙B2-20120091-4
Comments
No comments yet. Why don't you start the discussion?