
Mechanical keyboards are built to last, but over time they collect dust, grime, oils from fingertips, and even food particles. These contaminants not only affect performance but can also shorten the lifespan of switches and degrade typing feel. While many users hesitate to clean their keyboards deeply for fear of damaging components, a proper cleaning process is both safe and essential. This guide walks through a complete, step-by-step method to deep clean your mechanical keyboard—preserving key integrity, protecting switches, and restoring like-new responsiveness.
Why Deep Cleaning Matters
A mechanical keyboard isn't just a tool—it's an investment in comfort, precision, and durability. Unlike membrane keyboards, mechanical models use individual physical switches under each keycap, which can trap debris more easily due to their exposed design. Over months of use, accumulated dirt alters tactile feedback, causes sticky keystrokes, or leads to intermittent registration. Regular surface wipes won’t reach beneath the keycaps, where most buildup occurs.
Deep cleaning goes beyond aesthetics; it restores function. A well-maintained keyboard performs more consistently, lasts longer, and provides a hygienic typing environment. The misconception that removing keycaps risks breakage often deters users—but when done correctly, key removal is not only safe but recommended every 3–6 months depending on usage.
“Cleaning your mechanical keyboard regularly can prevent long-term switch wear and improve actuation consistency.” — David Lin, Mechanical Switch Engineer at Kailh
Essential Tools and Materials
Before starting, gather the right supplies. Using improper tools—like metal scrapers or excessive water—can damage plastic housings or corrode internal circuits. Here’s what you’ll need:
- Keycap puller: Plastic or silicone-coated versions prevent scratching.
- Compressed air: For blowing out loose debris between switches.
- Soft-bristle brush: An old toothbrush works if unused and clean.
- Isopropyl alcohol (70% minimum, ideally 90%): Effective at dissolving oils without leaving residue.
- Cotton swabs: For precise cleaning around switch stems.
- Dish soap and lukewarm water: Only for soaking keycaps—never the PCB.
- Microfiber cloth: To dry surfaces gently.
- Tray or container: For organizing removed parts.
- Towel or mat: To protect your desk during disassembly.
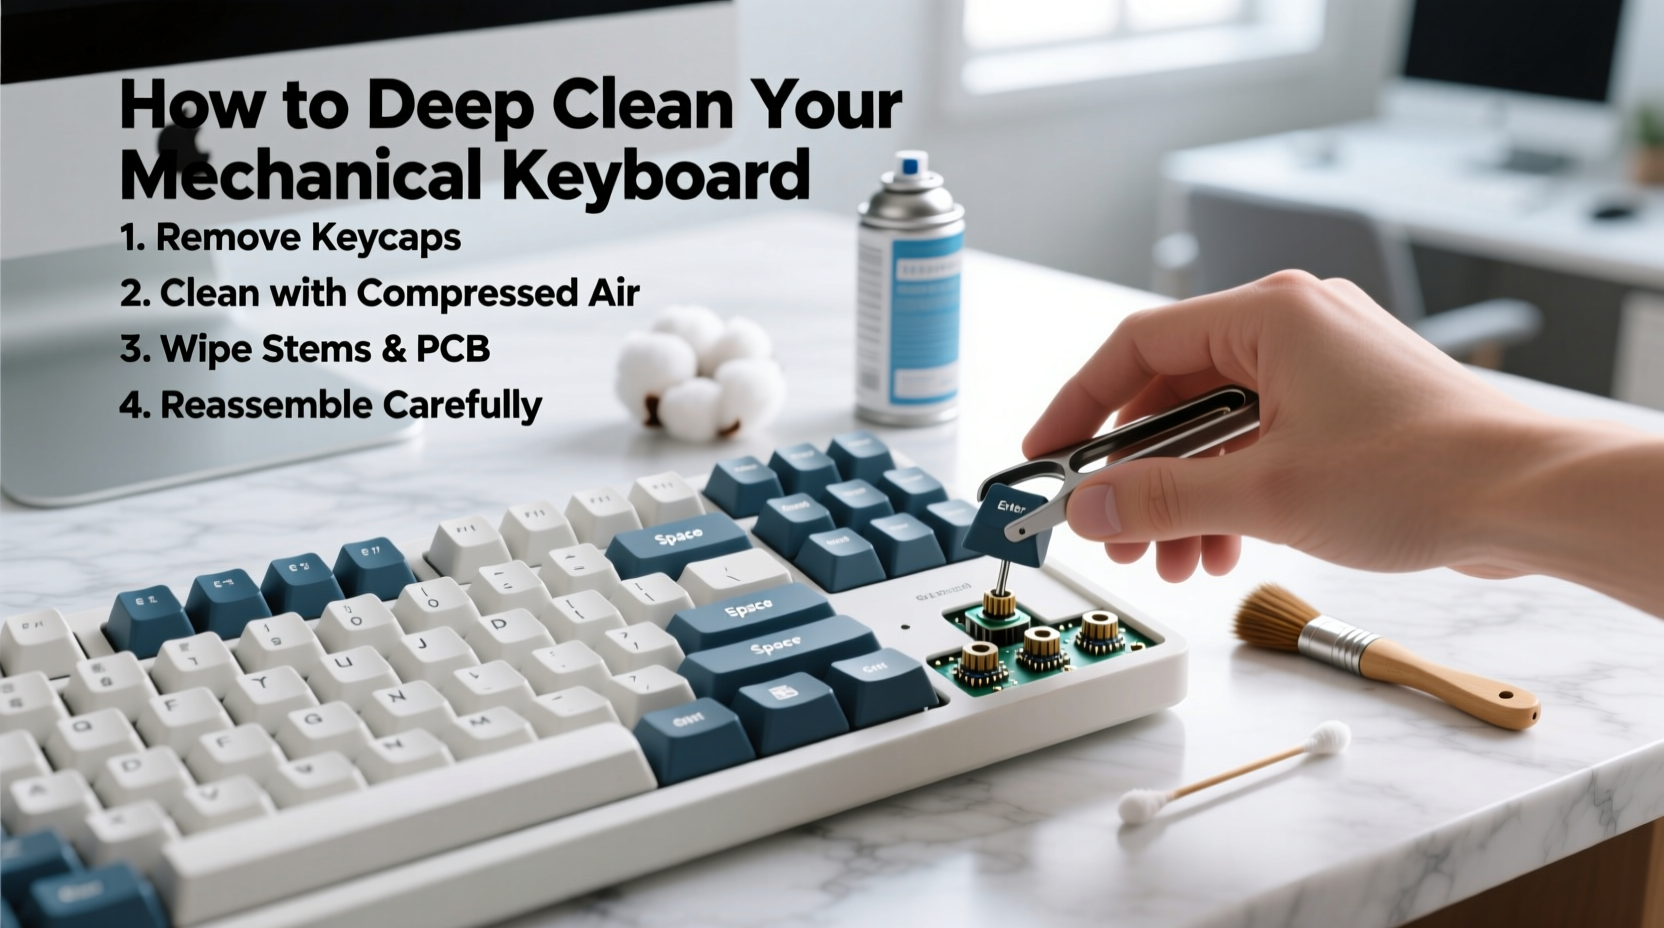
Step-by-Step Deep Cleaning Process
Follow this timeline-based approach to ensure thoroughness while minimizing risk. Total time: approximately 2–3 hours, including drying.
- Power down and disconnect: Unplug the keyboard or turn off wireless mode. Never clean a powered device.
- Flip and shake: Turn the keyboard upside down over a trash can and gently tap to dislodge large debris.
- Blow with compressed air: Hold cans upright and spray between keys at a 45-degree angle to avoid moisture condensation.
- Remove keycaps: Use a keycap puller starting from the outer edges, working inward. Avoid yanking straight up—lift evenly to prevent stem damage.
- Label unusual layouts (optional): If using non-standard key sizes (e.g., staggered spacebar), take a photo before removal for reassembly reference.
- Soak keycaps: Place them in warm soapy water for 30 minutes. For stubborn grime, add a denture tablet or sprinkle baking soda.
- Scrub keycaps: Gently brush each cap with a soft toothbrush, focusing on underside grooves where oils accumulate.
- Rinse and dry: Rinse thoroughly under cool water and lay flat on a towel. Let air-dry completely—do not reinstall damp caps.
- Clean the board surface: Dip cotton swabs in isopropyl alcohol and carefully wipe around switch stems. Do not flood the plate.
- Brush residual dust: Use a dry soft brush to sweep loosened particles toward the edges.
- Final air blast: One last round of compressed air ensures no hidden lint remains.
- Reattach keycaps: Begin with larger stabilizer-equipped keys (spacebar, shift, enter). Press straight down until they click securely.
- Test all keys: Open a text editor and press every key to confirm registration.
Special Considerations for Stabilizers
Larger keys rely on stabilizers—metal wires that keep movement smooth. These often become noisy or sticky over time. While full stabilizer lubrication requires desoldering (advanced), basic maintenance is possible:
- After removing keycaps, inspect stabilizer bars for misalignment.
- If wobbly, remove the key and check if the stabilizer clip is seated properly into the case.
- Use a cotton swab with a tiny amount of IPA to clean the stabilizer stem and housing.
- Do not force keys back on if resistance is felt—realignment may be needed.
Do’s and Don’ts: Keycap and Switch Safety
To prevent accidental damage, refer to this comparison table outlining best practices versus common mistakes.
| Do | Don’t |
|---|---|
| Use a plastic keycap puller | Use tweezers or metal tools to pry off caps |
| Let keycaps air-dry naturally for 4+ hours | Reinstall wet or damp keycaps |
| Clean the PCB with alcohol-dampened swabs (lightly) | Submerge the entire keyboard in liquid |
| Store removed keycaps in labeled containers | Leave them scattered on fabric that sheds lint |
| Use 90% isopropyl alcohol for better evaporation | Apply window cleaner or vinegar solutions |
| Press keycaps straight down when reattaching | Angle or twist them during installation |
Real Example: Recovering a Sticky WASD Cluster
Jamal, a freelance writer and avid typist, noticed his ‘A’ and ‘S’ keys registering double inputs after six months of heavy use. He avoided cleaning because he feared breaking the keyboard—a custom-built model with expensive PBT keycaps. After researching safe methods, he followed the steps outlined here: disconnected the keyboard, used a keycap puller, soaked caps overnight in soapy water with a denture tablet, then cleaned the switch area with alcohol swabs.
The result? Not only did the ghosting stop, but the entire board felt crisper. He discovered a small popcorn kernel lodged under the ‘W’ key—a reminder that even indoor workspaces generate debris. By maintaining a cleaning schedule every four months now, Jamal reports consistent performance and no further issues.
“People treat keyboards like appliances—you plug them in and forget maintenance. But like any precision instrument, they demand care.” — Lena Park, Peripheral Technician at TechCare Labs
Checklist: Your Deep Cleaning Preparation Guide
Print or bookmark this checklist before beginning:
- ☐ Back up open documents and close all applications
- ☐ Disconnect the keyboard from power/USB
- ☐ Gather tools: keycap puller, IPA, swabs, brush, container
- ☐ Take a photo of your keyboard layout (especially non-standard ones)
- ☐ Shake out loose debris
- ☐ Blow compressed air between switches
- ☐ Remove all keycaps systematically
- ☐ Soak keycaps in warm soapy water (max 1 hour)
- ☐ Scrub and rinse caps thoroughly
- ☐ Lay caps flat to dry (minimum 4 hours)
- ☐ Clean switch stems and PCB with alcohol swabs
- ☐ Final blowout with compressed air
- ☐ Reinstall keycaps starting with largest ones
- ☐ Test every key for input accuracy
- ☐ Store remaining tools properly for next use
Frequently Asked Questions
Can I wash my keycaps in the dishwasher?
No. Dishwashers expose plastics to high heat and aggressive detergents, which can warp keycaps or fade legends (printed characters). Hand washing is safer and equally effective.
How often should I deep clean my mechanical keyboard?
Every 3 to 6 months for regular users. Heavy typists, gamers, or those who eat near their desks should aim for every 3 months. Visible grime or inconsistent keystrokes are signs it’s time.
Will removing keycaps damage Cherry MX switches?
No. Mechanical switches are designed to withstand repeated keycap removal. The risk lies in improper technique—not the action itself. Always use a proper puller and lift evenly.
Conclusion: Maintain Performance, Extend Lifespan
Your mechanical keyboard deserves more than occasional dusting. A comprehensive deep clean revitalizes its performance, eliminates hygiene hazards, and preserves the integrity of every switch. With the right tools and methodical approach, there’s no need to fear breaking keys—especially when prevention and care go hand-in-hand.
This isn’t a one-time fix but part of an ongoing maintenance routine. Just as you’d service a car or condition leather, periodic attention keeps your keyboard functioning at its peak. Whether you're a professional typist, programmer, or gamer, a clean board translates directly to smoother input, fewer errors, and greater satisfaction.


 浙公网安备
33010002000092号
浙公网安备
33010002000092号 浙B2-20120091-4
Comments
No comments yet. Why don't you start the discussion?