
Personalizing your smartphone goes beyond wallpapers and app layouts—your ringtone is one of the most expressive ways to make your device uniquely yours. Whether it’s a clip from your favorite song, a voice message from a loved one, or a sound effect that brings a smile, setting a custom ringtone adds personality and helps you instantly recognize your phone in a crowded room. While many assume this process is complicated or limited to preloaded options, adding a custom ringtone is simpler than most people think. This guide walks you through everything you need to know, from choosing the right audio file to installing it on both iOS and Android devices.
Understanding Ringtone Formats and Requirements
Before diving into the setup, it's essential to understand the technical basics. Not all audio files work as ringtones, and each operating system has specific format and length requirements.
iOS devices require ringtones in the .m4r format, which is essentially an AAC audio file with a special extension recognized by iPhones. The maximum length for an iPhone ringtone is 40 seconds. Android phones are more flexible, supporting common formats like MP3, OGG, and WAV, with no strict time limit—though keeping ringtones under 30 seconds is recommended for usability.
To convert a standard audio file (like an MP3) into a compatible ringtone, you’ll need to trim it to the desired length and export it in the correct format. Several free tools can help with this, including Audacity (for desktop), online converters like Zamzar or CloudConvert, or mobile apps such as Ringdroid (Android) and GarageBand (iOS).
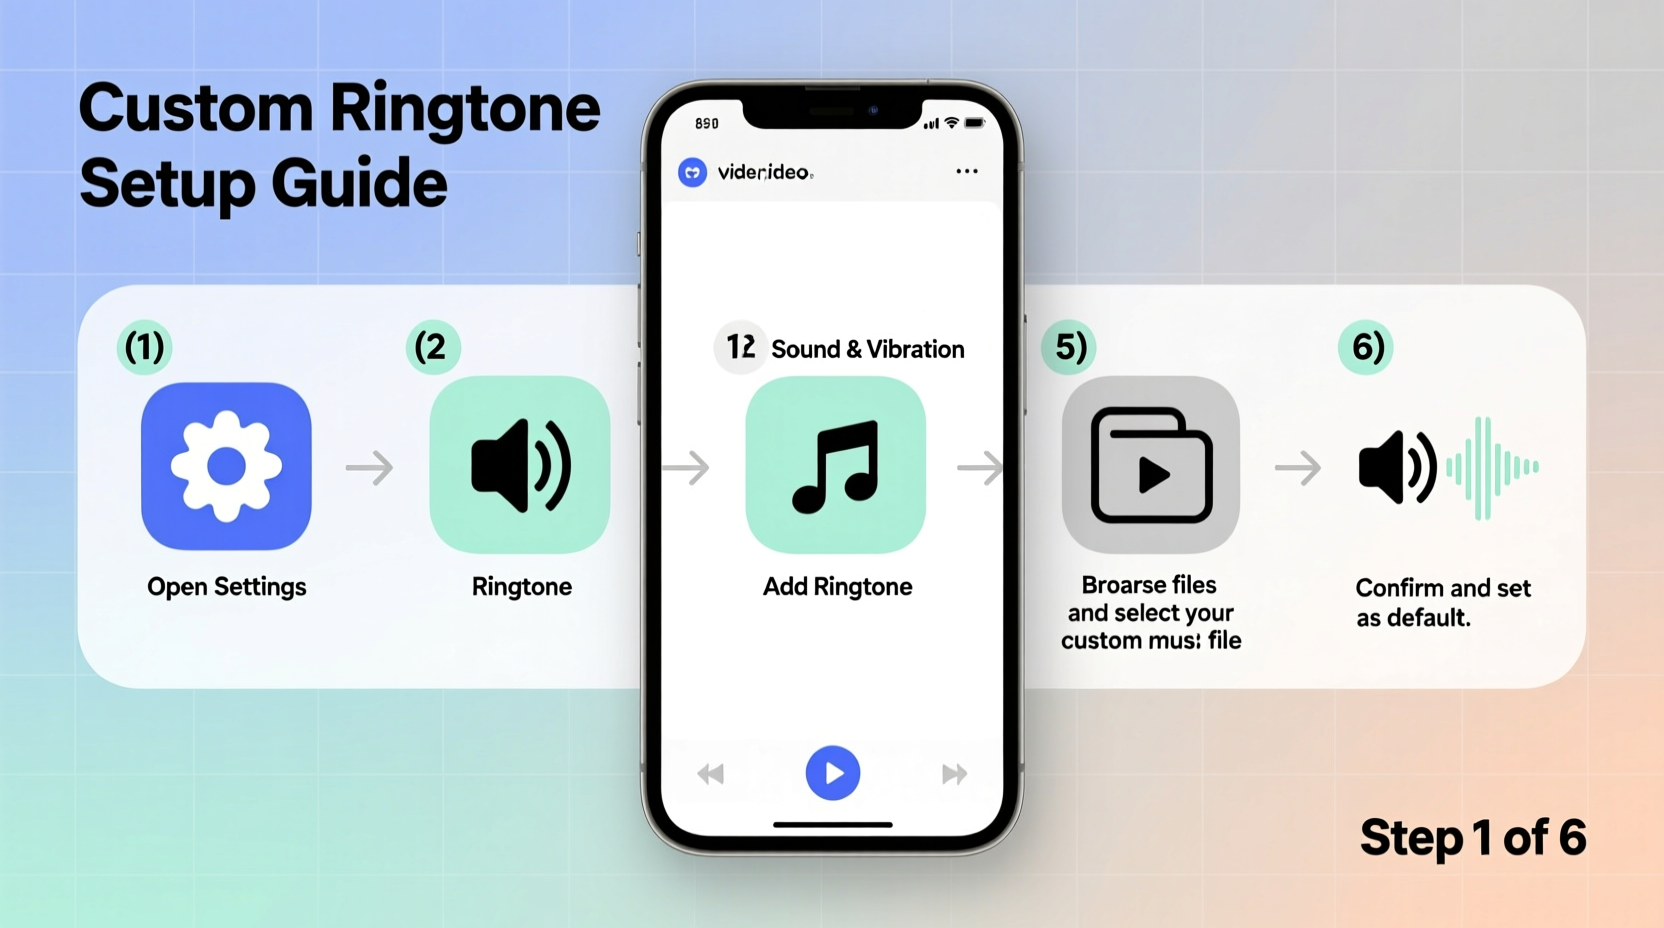
Step-by-Step: Adding a Custom Ringtone on iPhone
Apple’s ecosystem requires a bit more setup than Android, but once configured, the process is repeatable and reliable. Follow these steps using iTunes (or Finder on macOS Catalina and later):
- Trim your audio file using software like GarageBand or an online tool. Keep it under 40 seconds and save it as a .m4a file.
- Open iTunes or Finder and locate your music library.
- Add the .m4a file to your library by dragging it into the interface.
- Right-click the track and select “Get Info.” Go to the “Options” tab and set the start and stop times if not already trimmed.
- Change the file type to “AAC Encoder” under “Create AAC Version” in the File menu. This creates a shorter version in your library.
- Locate the newly created AAC file in your iTunes folder (usually under Music > iTunes Media > Automatically Add to iTunes).
- Rename the file extension from .m4a to .m4r.
- Drag the .m4r file back into iTunes or Finder. It will now appear under the “Tones” section.
- Synchronize your iPhone with your computer. Ensure “Sync Tones” is enabled in the device settings.
- On your iPhone, go to Settings > Sounds & Haptics > Ringtone. Your new tone will appear under “Custom.”
“GarageBand remains the most user-friendly option for iPhone users who want full control over their ringtone creation.” — Mark Lin, Mobile Software Developer
Step-by-Step: Adding a Custom Ringtone on Android
Android offers a more direct approach, thanks to its open file system. Most modern Android phones allow you to set any audio file as a ringtone without third-party software or a computer.
- Prepare your audio clip. Trim it to your preferred length using a free app like Ringdroid or WaveEditor.
- Save the file as MP3 (most widely supported) and ensure it’s stored in your phone’s internal storage.
- Create a folder named “Ringtones” in your phone’s main storage directory if it doesn’t already exist. Place your audio file inside this folder.
- Go to Settings > Sound > Phone Ringtone.
- Select “Add” or “Choose from device storage” (wording varies by brand).
- Navigate to the Ringtones folder and pick your file.
- Confirm selection. The ringtone will now be available whenever your phone rings.
Some manufacturers, like Samsung and Google Pixel, even allow you to record a sound directly and assign it as a ringtone via the Sound settings menu, making the process nearly instantaneous.
Do’s and Don’ts When Creating Custom Ringtones
| Do’s | Don’ts |
|---|---|
| Keep ringtones under 40 seconds for clarity and battery efficiency. | Use excessively long clips that drain battery or delay call pickup. |
| Choose high-quality audio files (minimum 128 kbps) to avoid distortion. | Compress audio too much, resulting in muffled or tinny sound. |
| Store ringtones in designated folders (Ringtones, Alarms) for easy access. | Leave files buried in Downloads or random folders where the system may not detect them. |
| Test the ringtone at different volumes to ensure audibility. | Assume all music clips will work—copyrighted tracks may be blocked on some platforms. |
Real Example: How Sarah Personalized Her Phone for Family Calls
Sarah, a busy mother of two, often missed calls because her phone blended in with others at school pickups. She decided to create custom ringtones for her closest contacts. Using a free audio editor on her laptop, she clipped a cheerful 25-second segment from her daughter’s favorite nursery rhyme and converted it to MP3. After placing it in the Ringtones folder on her Android phone, she assigned it to her child’s contact. Now, when her daughter calls from daycare, the familiar tune cuts through the noise instantly. She repeated the process for her husband and parents, assigning distinct melodies to each. Within a week, she hadn’t missed a single important call.
FAQ: Common Questions About Custom Ringtones
Can I use a song from Spotify or YouTube as a ringtone?
You cannot directly extract audio from Spotify due to DRM protection. However, you can record a short segment using screen recording tools (where permitted), then edit and convert it. For YouTube, download the audio via legal conversion tools, ensuring compliance with copyright laws. Only use music you have the right to use personally.
Why isn’t my custom ringtone showing up on my phone?
This usually happens if the file is in the wrong format or saved in an unrecognized folder. Double-check that MP3 files are in the “Ringtones” folder on Android, and that iPhone files are properly converted to .m4r and synced via iTunes/Finder. Restarting the phone can also prompt the system to rescan for new tones.
Can I set different ringtones for different types of notifications?
Absolutely. Both iOS and Android allow separate customization for calls, texts, emails, and app alerts. Navigate to Settings > Sounds (or Notifications) to assign unique tones for each category, helping you respond faster based on the sound alone.
Checklist: How to Successfully Add a Custom Ringtone
- ✅ Choose a short, recognizable audio clip (under 40 seconds)
- ✅ Convert the file to the correct format (.m4r for iPhone, MP3 for Android)
- ✅ Save the file in the proper location (iTunes for iPhone, Ringtones folder for Android)
- ✅ Sync or transfer the file to your phone
- ✅ Assign the tone in your phone’s Sound settings
- ✅ Test the ringtone with a call or alert
Final Thoughts: Make Your Phone Uniquely Yours
Your ringtone is more than just a sound—it’s a reflection of your personality, lifestyle, and priorities. With just a few minutes of effort, you can replace generic chimes with something meaningful, memorable, and practical. Whether you’re a parent needing instant caller recognition or a music lover wanting your favorite guitar riff to announce every call, custom ringtones offer a simple yet powerful way to personalize your device.


 浙公网安备
33010002000092号
浙公网安备
33010002000092号 浙B2-20120091-4
Comments
No comments yet. Why don't you start the discussion?