
A running toilet isn't just annoying—it can waste up to 200 gallons of water per day, spiking your utility bill and contributing to unnecessary water waste. The good news? Most causes are simple mechanical issues that you can diagnose and repair in under 30 minutes with basic tools and no professional help. Understanding the internal components of your toilet tank and how they interact allows you to troubleshoot effectively and restore quiet, efficient operation.
Understanding How a Toilet Tank Works
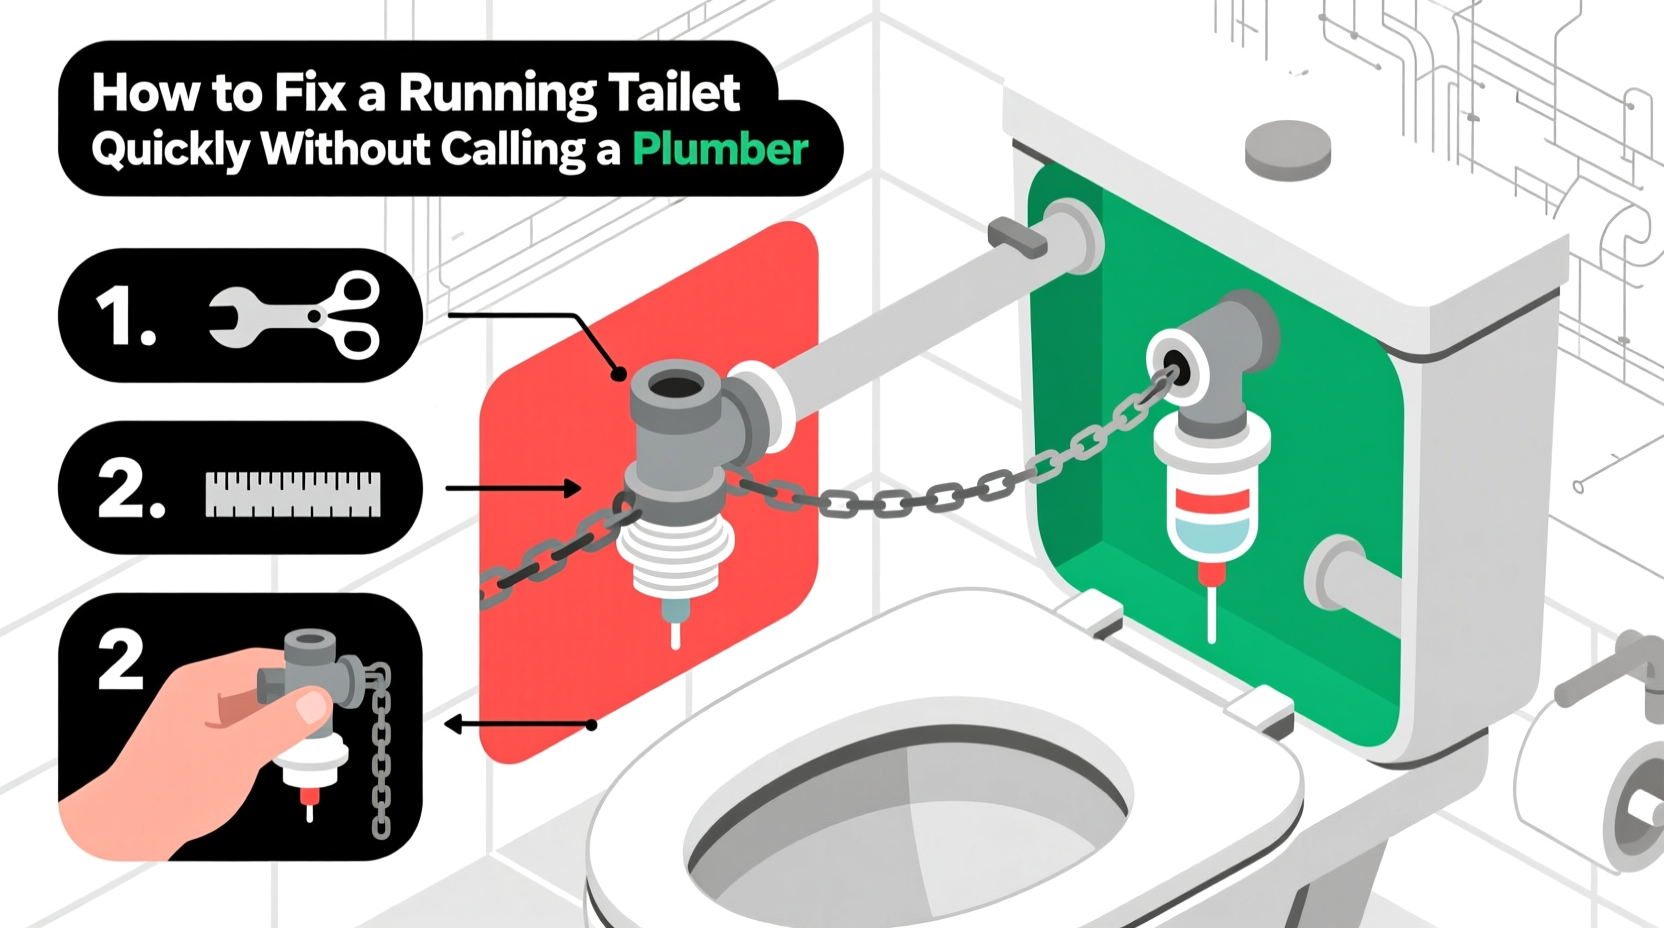
The toilet tank is a self-contained system designed to store water and release it in a controlled flush. When you press the handle, a chain lifts the flapper, allowing water to rush from the tank into the bowl. As the tank empties, the float drops, triggering the fill valve to refill the tank. Once the water reaches the proper level, the float shuts off the valve. A running toilet typically means this cycle doesn’t stop—water continuously flows either into the overflow tube or through a leaky flapper.
Key components involved in a running toilet include:
- Fill Valve: Controls water entering the tank after a flush.
- Float: Rises with water level and shuts off the fill valve when full.
- Flapper: Seals the flush valve; if worn or misaligned, it leaks water into the bowl.
- Overflow Tube: Prevents flooding by directing excess water into the bowl.
- Chain: Connects the flush handle to the flapper; too tight or too loose, and it affects sealing.
Step-by-Step Guide to Diagnose and Fix the Problem
Follow this systematic approach to identify and resolve the cause of your running toilet. Most fixes require only an adjustable wrench, a sponge, and replacement parts available at any hardware store.
- Turn Off the Water Supply
Locate the shutoff valve on the wall or floor behind the toilet. Turn it clockwise until tight. Flush the toilet to empty the tank. - Inspect the Flapper
Lift the tank lid and check the flapper (the rubber seal at the bottom of the tank). Look for warping, cracks, or mineral buildup. If it’s not sitting flat or shows signs of wear, replace it. Most flappers cost under $10 and take two minutes to swap out. - Test the Flapper Seal
Add a few drops of food coloring to the tank. Wait 15–20 minutes without flushing. If color appears in the bowl, the flapper is leaking and needs replacement. - Adjust the Chain Length
Ensure the chain connecting the flush handle to the flapper has about 1/4 inch of slack. Too much slack prevents a full flush; too little keeps the flapper slightly lifted, causing a constant trickle. - Check the Float Level
If water is rising above the top of the overflow tube, the float is set too high. For ball-style floats, bend the brass arm downward slightly. For modern cylinder floats, twist the adjustment screw or slide the clip to lower the float. - Clean or Replace the Fill Valve
If the fill valve hisses or runs constantly, sediment may be preventing a proper seal. Shut off water, disconnect the supply line, and clean the inlet screen. If noise persists, replace the entire fill valve assembly—a $15 part that installs in 10 minutes. - Verify Overflow Tube Height
The water level should be about 1 inch below the top of the overflow tube. If it’s higher, adjust the float. If water flows into the tube even after adjustment, the fill valve may need replacing.
Common Causes and Quick Fixes at a Glance
Different symptoms point to specific problems. Use this table to match what you’re seeing with the most likely solution.
| Symptom | Most Likely Cause | Recommended Fix |
|---|---|---|
| Continuous running sound | Fill valve not shutting off | Adjust float or replace fill valve |
| Intermittent trickling | Leaky flapper | Replace flapper or clean flush valve seat |
| Water flowing into overflow tube | Float set too high | Lower float level |
| No sound but tank refills every 10–20 mins | “Ghost flushing” due to slow flapper leak | Replace flapper and check for debris |
| Weak flush or incomplete refill | Clogged inlet jets or low water level | Clear clogs, adjust float, inspect flapper |
Real Example: Fixing a Ghost-Flush Toilet in a 1990s Home
In a suburban home built in 1996, the upstairs bathroom toilet began refilling every 15 minutes with no one using it. The homeowner heard no continuous running sound, ruling out a stuck fill valve. Following the dye test, blue water appeared in the bowl after 20 minutes, confirming a flapper leak. Upon inspection, the flapper showed visible warping and calcium deposits around the seal. Replacing the flapper with a universal model ($8.99) stopped the phantom flushes immediately. The entire process took 22 minutes, including turning off the water and cleanup. This case highlights how silent leaks can go unnoticed yet still waste hundreds of gallons weekly.
“Over 70% of running toilets I see during service calls are caused by degraded flappers or improper float settings—both DIY-friendly fixes.” — Carlos Mendez, Master Plumber with 18 years of residential experience
Essential Checklist for a Fast, Complete Repair
Use this checklist before and after repairs to ensure nothing is overlooked:
- ✅ Shut off water supply and drain tank
- ✅ Inspect flapper for wear, warping, or debris
- ✅ Perform dye test to confirm leaks
- ✅ Adjust chain so flapper closes fully
- ✅ Check water level relative to overflow tube
- ✅ Adjust float to correct height
- ✅ Clean fill valve inlet screen if water flow is weak
- ✅ Replace fill valve if it won’t shut off
- ✅ Turn water back on slowly to avoid pipe shock
- ✅ Test flush multiple times and monitor for leaks
When Replacement Parts Are Necessary
While some components can be cleaned and reused, others degrade over time and must be replaced. Here’s what to know:
Flappers: Last 4–5 years on average. Rubber deteriorates due to chlorine and minerals in water. Replace if brittle, cracked, or soft.
Fill Valves: Modern versions last 5–7 years. Signs of failure include constant noise, slow filling, or inability to shut off. FluidMaster and Korky are reliable brands offering universal kits.
Flush Valves: Rarely fail, but if the flush valve seat is cracked or heavily pitted, water will leak regardless of flapper condition. Resealing or replacing the entire flush valve may be needed—a slightly more advanced task involving tank removal.
Frequently Asked Questions
Why does my toilet run randomly every few minutes?
This is commonly known as “ghost flushing” and occurs when a small amount of water leaks from the tank into the bowl, lowering the water level enough to trigger the fill valve. The most frequent cause is a worn flapper. Perform a dye test to confirm.
Can I use vinegar to clean the tank components?
Yes, white vinegar is excellent for dissolving mineral buildup. Soak the flapper and flush valve in vinegar for 30 minutes to remove scale. Avoid abrasive scrubbing, which can damage rubber seals.
How do I know if my fill valve needs replacing?
If adjusting the float doesn’t stop the running sound, or if you hear a persistent hissing even when the tank is full, the fill valve is likely failing. Replacement is straightforward and usually takes less than 15 minutes.
Prevent Future Issues with Regular Maintenance
Just like changing the oil in your car, periodic toilet maintenance prevents small issues from becoming major problems. Experts recommend inspecting the tank every six months:
- Check for corrosion on connections.
- Ensure all moving parts operate smoothly.
- Clean mineral deposits from the overflow tube and inlet holes under the rim.
- Verify the water level remains stable after each flush.
Installing a water meter or smart leak detector can alert you to hidden leaks early. Even silent leaks add up—fixing them promptly protects both your wallet and the environment.
Conclusion
Fixing a running toilet is one of the simplest and most impactful home repairs you can perform. With a clear understanding of how the tank components work together, a few basic tools, and a methodical approach, you can silence that constant running sound in under half an hour. Most issues stem from inexpensive, easily replaceable parts like flappers and fill valves. By taking action now, you’ll save water, reduce your bills, and avoid the inconvenience and cost of emergency plumbing calls. Don’t let a small leak become a big problem—tackle it today and enjoy a quieter, more efficient bathroom.


 浙公网安备
33010002000092号
浙公网安备
33010002000092号 浙B2-20120091-4
Comments
No comments yet. Why don't you start the discussion?