
A ceiling fan should provide quiet comfort, not an annoying creak with every rotation. When your fan starts squeaking, the instinct might be to dismantle it entirely—but that’s rarely necessary. Most squeaks stem from simple mechanical issues that can be resolved in under 30 minutes using basic household tools. With the right approach, you can silence that noise, improve airflow efficiency, and extend the life of your fan—all without removing a single blade or disconnecting wiring.
The key is understanding where the sound originates and applying targeted fixes. Whether it's loose hardware, dry bearings, or minor misalignment, most problems are accessible from the outside or require only minimal access. This guide walks through practical, non-invasive solutions backed by HVAC technicians and home maintenance experts.
Locate the Source of the Squeak
Before reaching for tools, spend a few minutes diagnosing the issue. Turn the fan on at different speeds and listen carefully. The type and timing of the noise often reveal its origin:
- High-pitched squeal during startup: Likely due to dry motor bearings or lubrication breakdown.
- Rhythmic creaking synced with blade rotation: Could indicate a loose blade iron (the metal bracket connecting the blade to the motor).
- Constant grinding or rattling: May point to loose mounting hardware or a wobbling canopy.
- Intermittent ticking or tapping: Often caused by blades hitting a light kit or nearby object.
Use a long wooden dowel or screwdriver as a makeshift stethoscope. Hold one end near your ear and gently touch the other to different parts of the fan housing, blade brackets, and downrod. This amplifies internal vibrations and helps isolate problem areas.
Step-by-Step Fix: Tighten All Accessible Hardware
Loose screws are the most common cause of squeaks. Over time, constant vibration loosens fasteners throughout the assembly. You don’t need to take the fan down to address this—most critical points are reachable with a ladder and the right tool.
- Turn off power at the breaker. Confirm no electricity is flowing by testing the wall switch.
- Inspect blade attachments. Use a Phillips screwdriver or hex key (depending on model) to tighten each blade iron screw. Don’t overtighten—this can strip threads or warp plastic housings.
- Check the canopy screws. These hold the fan body to the ceiling mount. If loose, the entire unit may shift slightly, creating friction and noise. Tighten evenly.
- Examine the downrod ball joint. Where the downrod connects to the motor housing, there's usually a ball-and-socket coupling secured with a setscrew. A loose setscrew allows micro-movement that wears rubber grommets and generates squeaks.
- Secure light fixture hardware (if applicable). Wobbly globes or mounting rings can rattle against the motor housing.
After tightening, restore power and test the fan at high speed. If the squeak persists, move to deeper diagnostics.
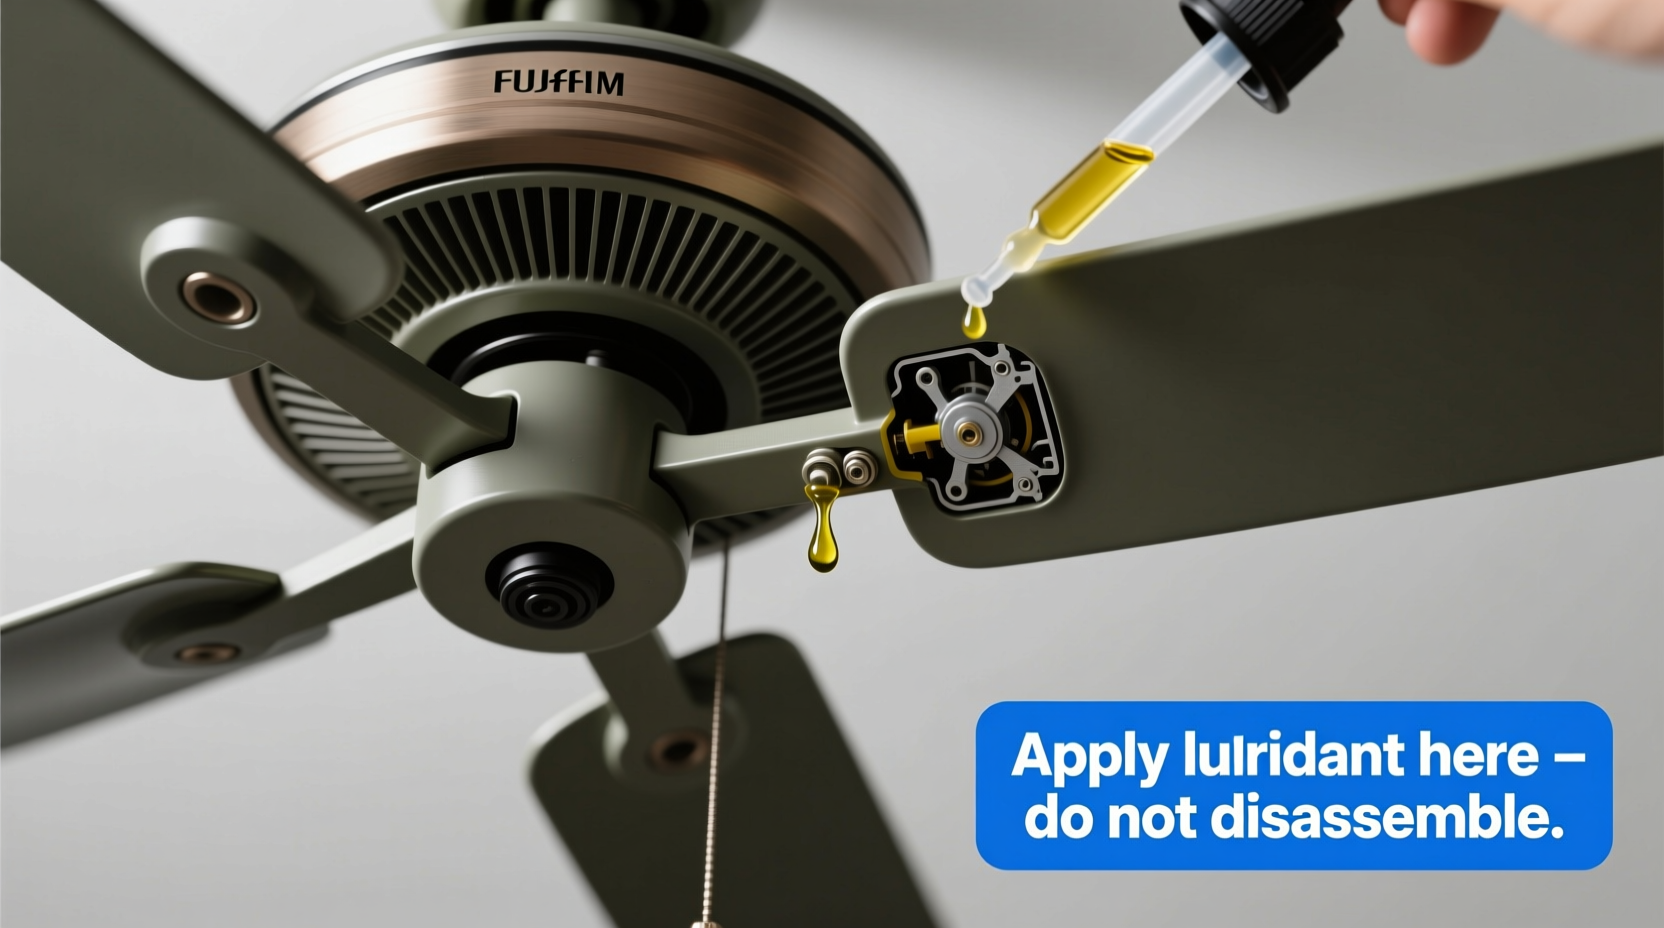
Lubricate the Motor Housing (When Applicable)
Some ceiling fans have sealed motors with lifetime lubrication and no oil ports. Others—especially older or higher-end models—feature small oil caps on the top of the motor housing. These allow periodic lubrication to prevent bearing wear.
To determine if your fan is lubricatable:
- Look for a small brass or plastic plug on the top center of the motor casing.
- Check the manufacturer’s manual or model number online.
- If uncertain, assume it’s sealed and avoid drilling or forcing entry.
For lubricatable units:
- Turn off power and position a ladder securely.
- Clean dust around the oil port with a dry cloth.
- Apply 3–5 drops of lightweight machine oil (SAE 10 or electric motor oil). Do not use WD-40 as a lubricant—it displaces moisture but evaporates quickly and doesn’t provide lasting protection.
- Wipe excess oil immediately to prevent dripping onto blades or ceilings.
- Run the fan for 10 minutes to distribute the oil evenly.
“Proper lubrication reduces internal friction by up to 70%, which directly lowers operating temperature and noise.” — Greg Thompson, HVAC Technician with 22 years of residential experience
Address Blade Wobble and Alignment Issues
Even slight imbalance can strain motor components and create harmonic squeaks. Misaligned blades rub against air resistance unevenly, causing vibration that resonates through the housing.
You don’t need special tools to correct this. A simple visual inspection and adjustment go a long way.
Blade Inspection Checklist
- All blades securely attached? ✅
- No visible warping, cracks, or moisture damage? ✅
- Each blade pitched at same angle relative to others? ✅
- No debris caught between blade and motor housing? ✅
If one blade appears lower than the rest, gently adjust its iron bracket until level. Some brackets have slotted holes allowing minor repositioning. Use a yardstick or ruler held vertically against the tip of each blade while rotating the fan slowly by hand. Differences greater than 1/8 inch indicate misalignment.
For persistent wobble, consider using adhesive balancing kits available at hardware stores. These attach small weights to the top of individual blades to counteract imbalance—similar to tire balancing in cars.
Common Mistakes That Make Squeaks Worse
Well-intentioned homeowners sometimes worsen the problem. Here are frequent errors to avoid:
| Don’t | Why It’s Harmful | Do Instead |
|---|---|---|
| Using WD-40 on motor bearings | WD-40 is a solvent, not a lubricant. It cleans residue but dries out quickly, leaving metal surfaces unprotected. | Use synthetic motor oil or SAE 10 non-detergent oil. |
| Overtightening blade screws | Can crack plastic blade irons or strip threads in soft metal housings, leading to permanent instability. | Tighten until snug, then stop. Use thread-locker on recurring loose screws. |
| Ignoring dust buildup inside motor housing | Dust mixes with old grease to form abrasive paste that accelerates bearing wear. | Gently blow out debris with compressed air (do not use water or cleaners). |
| Assuming all fans can be oiled | Forcing oil into sealed motors can damage internal seals and void warranties. | Verify lubrication access before attempting. |
Real-World Example: Resolving a Persistent Bedroom Squeak
Sarah M., a homeowner in Austin, TX, noticed her bedroom ceiling fan developed a high-pitched whine every time she turned it on. She initially assumed the motor was failing and budgeted for replacement. Instead, she followed a methodical troubleshooting process:
- First, she turned off the power and tightened all visible screws—no change.
- Next, she checked blade alignment. One blade sat 3/16\" lower than the others due to a shifted bracket. After adjusting it, the wobble reduced but the squeak remained.
- Upon closer inspection, she spotted a small oil cap on top of the motor. Her fan model (Hunter Original) is known for serviceable bearings.
- She applied four drops of electric motor oil and ran the fan for 15 minutes.
The result? Complete silence. “I saved $180 on a new fan and fixed it in less than 20 minutes,” Sarah said. “The oil made a huge difference—I wish I’d known sooner.”
Frequently Asked Questions
Can I use cooking oil or WD-40 to lubricate my fan motor?
No. Cooking oils degrade over time, attract dust, and can gum up bearings. WD-40 removes moisture but lacks viscosity for sustained lubrication. Use only lightweight machine oil designed for electric motors.
My fan squeaks only when I use the reverse setting. Is that normal?
Not exactly. While some fans run slightly louder in winter mode due to altered airflow dynamics, a distinct squeak suggests increased stress on worn components. Check for looseness in the mounting bracket or degraded rubber isolators in the downrod.
How often should I maintain my ceiling fan to prevent squeaks?
Perform a quick inspection every 6 months: tighten screws, clean blades, and check for wobble. Lubricate annually if your model supports it. In dusty environments or coastal areas with humidity, inspect quarterly.
Prevent Future Squeaks with Routine Care
Prevention is more effective than repair. Incorporate these habits into your seasonal home maintenance routine:
- Dust regularly: Accumulated grime increases load on the motor and interferes with smooth operation.
- Monitor performance changes: Note shifts in speed, noise, or balance early.
- Use the correct oil sparingly: Over-lubrication can lead to leaks and staining.
- Ensure secure mounting: Periodically check that the fan isn’t pulling away from the ceiling box, especially in older homes.
Fans installed in vaulted ceilings or exposed to temperature swings (like sunrooms) benefit from biannual checks. Vibration from daily use compounds faster in such environments.
Conclusion: Silence Starts with Smart Action
A squeaky ceiling fan isn’t a sentence to sleepless nights or costly replacements. In most cases, the fix lies in careful observation, proper tools, and a few minutes of focused attention. By tightening hardware, aligning blades, and lubricating where appropriate, you restore quiet function without dismantling a single component.
These methods are used daily by professional technicians—not because they’re complex, but because they work. Your fan was designed for airflow, not noise. Give it the care it deserves, and it will serve you quietly for years to come.


 浙公网安备
33010002000092号
浙公网安备
33010002000092号 浙B2-20120091-4
Comments
No comments yet. Why don't you start the discussion?