
Stucco exteriors offer a timeless, textured aesthetic that enhances curb appeal—but they also present unique challenges when it comes to seasonal decorating. One of the most common concerns homeowners face is how to hang Christmas lights without compromising the integrity of the stucco surface. Traditional fasteners like nails or staples can crack or puncture the brittle finish, potentially leading to moisture intrusion and costly repairs. Even worse, improper installation may void manufacturer or contractor warranties tied to the exterior system.
The good news is that with the right tools, techniques, and a bit of planning, you can achieve a festive, professional-looking light display while preserving your stucco’s durability and appearance. This guide outlines safe, effective methods for hanging Christmas lights on stucco walls—methods endorsed by contractors, holiday decorators, and building material specialists.
Understanding Stucco: Why It Requires Special Care
Stucco is a cement-based plaster applied in layers over a wire mesh lath. It’s durable and weather-resistant when properly maintained, but it’s also rigid and prone to cracking under stress. Unlike wood siding or vinyl, which can absorb minor punctures without significant consequences, any penetration in stucco risks creating pathways for water. Over time, trapped moisture can lead to mold, efflorescence (salt deposits), or structural damage behind the wall.
Additionally, many modern stucco systems come with multi-year warranties—often 10 to 25 years—provided the finish remains intact and maintenance guidelines are followed. Drilling holes or hammering nails directly into the surface typically violates these terms. Contractors often stipulate that no mechanical fasteners be used unless installed by certified professionals during construction or repair phases.
“Once you pierce stucco with a nail or screw, you’re not just risking a crack—you’re potentially inviting water behind the wall assembly. That’s a repair that can cost thousands.” — Marcus Tran, Licensed Building Inspector and Exterior Consultant
Given these risks, it’s essential to use non-invasive or minimally invasive hanging methods that distribute weight evenly and avoid direct contact with the stucco surface whenever possible.
Safe Methods for Hanging Lights on Stucco Walls
Several proven techniques allow homeowners to decorate their stucco homes without causing damage. The best method depends on the layout of your house, the weight of the lights, and local weather conditions.
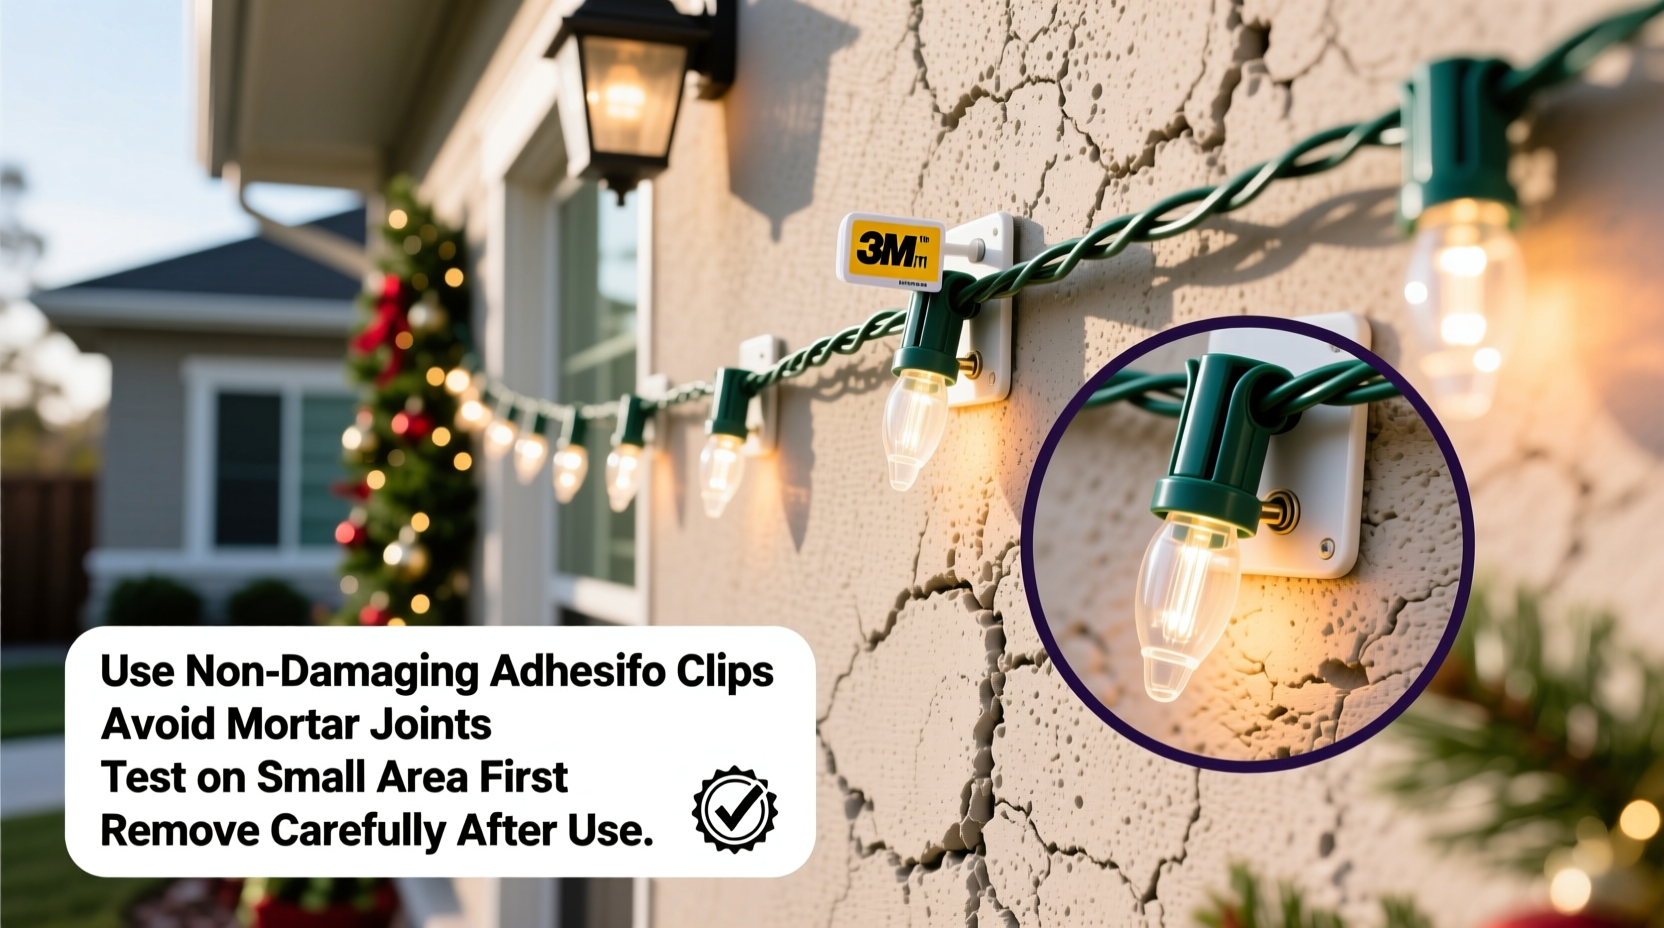
1. Adhesive Hooks and Clips
High-quality outdoor adhesive hooks are one of the most popular and accessible solutions. These products are designed to bond securely to smooth and textured surfaces, including stucco, and are removable without residue when used correctly.
- Recommended types: Look for UV-resistant, weatherproof hooks rated for outdoor use (e.g., 3M Command Outdoor Products, Gorilla Heavy-Duty Mounting Squares).
- Installation tip: Clean the stucco surface thoroughly with isopropyl alcohol before application. Press and hold the hook for 30 seconds to ensure strong adhesion.
- Weight limit: Most heavy-duty outdoor hooks support up to 4–5 pounds per unit. Use multiple clips to distribute the load of longer light strands.
2. Magnetic Hangers (for Metal Gutters or Trim)
If your home has metal gutters, downspouts, or trim near the stucco walls, magnetic hangers offer a completely non-contact solution. These powerful neodymium magnets attach to the metal component and suspend lightweight lights along the edge of the roofline or fascia.
This method works best for outlining eaves or upper corners where stucco meets the roof. However, it’s not suitable for brick, vinyl, or wooden trim, nor for heavier LED rope lights or incandescent strands.
3. Tension Cords and Wire Systems
A tension line system uses taut nylon cords or steel wires anchored between two stable points—such as posts, trees, or structural beams—to suspend lights above or alongside stucco walls. Since the cord doesn’t touch the stucco directly, there’s no risk of surface damage.
These systems are ideal for large displays or multi-story homes. Install end brackets on non-stucco elements (like wooden soffits or porch columns), stretch the line tightly, and clip lights onto it using insulated hangers.
4. Freestanding Frames and Light Trees
For ground-level stucco walls or foundation areas, consider using freestanding metal frames or inflatable light trees placed several inches away from the wall. These structures support entire light arrangements independently, eliminating any need for wall attachment.
They’re particularly useful for renters or those with strict HOA regulations. Modern versions are collapsible, weather-resistant, and easy to store.
5. Over-the-Gutter Hangers
Plastic or rubber-coated hangers that rest over the top of gutters provide a secure anchor point for lights without touching the stucco below. Ensure the gutter is clean and structurally sound before loading it with lights.
Use only lightweight LED strings with this method—older incandescent sets may be too heavy and could cause gutter sagging.
Step-by-Step Guide: Installing Lights Using Adhesive Clips
Adhesive clips are the most practical option for most homeowners. Follow this timeline for a successful, damage-free installation:
- Day 1 – Plan & Prepare (30 minutes): Walk around your home and sketch a lighting plan. Mark where lights will start, turn corners, or connect to power sources. Measure total linear feet needed.
- Day 1 – Gather Supplies (15 minutes): Purchase LED string lights (lightweight, energy-efficient), outdoor-rated adhesive clips, extension cords, and a ladder. Choose clips with a minimum 4-lb capacity.
- Day 2 – Clean & Apply Clips (1 hour): Wipe each stucco section with rubbing alcohol. Allow to dry completely. Apply clips every 12–18 inches along planned routes. Press firmly for 30 seconds per clip. Let cure for 24 hours.
- Day 3 – Hang Lights (45 minutes): Starting from the outlet, drape lights into each clip. Avoid pulling or stretching. Secure connections with electrical tape if exposed to rain.
- Day 4 – Test & Adjust (20 minutes): Turn on the display. Check for flickering or loose sections. Add extra clips if needed. Do not overload circuits.
- Post-Season Removal (1 day): After the holidays, remove lights first. Then follow manufacturer instructions to release adhesive (usually a slow peel downward). Most leave no residue if removed correctly.
Do’s and Don’ts: A Quick Reference Table
| Do | Don’t |
|---|---|
| Use UV-resistant, outdoor-rated adhesive hooks | Hammer nails or screws into stucco |
| Clean stucco surface before applying adhesives | Use indoor-only tapes or glues |
| Distribute weight with multiple clips | Hang heavy garlands or icicle lights on single points |
| Remove lights and clips carefully after the season | Leave lights up year-round (UV degradation weakens materials) |
| Inspect clips annually for wear | Reuse damaged or weakened clips |
Mini Case Study: Preserving a Historic Stucco Home in Santa Barbara
Jessica R., a homeowner in Santa Barbara, California, owns a 1920s Spanish-style residence with original stucco siding covered under a restoration warranty. For years, she avoided holiday lights out of fear of damaging the historic finish. In 2022, she consulted a local landscape lighting designer who recommended a hybrid approach: using 3M Outdoor Hooks for vertical runs and a tension wire system anchored to porch columns for rooftop outlines.
She installed 300 warm-white LED mini lights across the front facade using 18 adhesive clips spaced every 15 inches. The entire process took two days, including curing time. The display remained secure through winter rains and coastal winds. After New Year’s, she removed the lights and peeled off the clips without any marks or residue.
“I finally got the cozy holiday look I wanted,” Jessica said. “And my contractor confirmed the stucco was unharmed. It was worth the extra planning.”
Checklist: Preparing for a Damage-Free Holiday Display
- ☐ Inspect stucco for existing cracks or damage—repair before decorating
- ☐ Choose lightweight LED string lights (under 0.5 lbs per strand)
- ☐ Buy outdoor-rated adhesive clips or alternative hanging system
- ☐ Clean stucco surface with alcohol wipes before applying clips
- ☐ Allow 24-hour curing time after clip installation
- ☐ Test all lights before mounting
- ☐ Use grounded outlets and GFCI-protected extension cords
- ☐ Remove lights and clips promptly after the holiday season
- ☐ Store lights coiled gently in labeled containers for next year
Frequently Asked Questions
Can I use suction cups on stucco?
No. Suction cups require perfectly smooth, non-porous surfaces to create a seal. Stucco’s texture prevents proper adhesion, making suction cups ineffective and unreliable, even in calm weather.
Will adhesive hooks damage painted stucco?
Most high-quality outdoor adhesives are designed to release cleanly from painted surfaces when removed properly. However, older paint or poor adhesion may result in peeling. Test one hook in an inconspicuous area first and wait 48 hours before full installation.
Are there permanent solutions that won’t void my warranty?
Some contractors install discreet mounting rails or J-channels during construction or renovation, specifically for holiday lighting. These are integrated into the stucco system and do not compromise the warranty. If you're planning a major exterior project, discuss this option with your builder.
Conclusion: Celebrate Safely and Smartly
Hanging Christmas lights on stucco walls doesn’t have to mean choosing between beauty and preservation. With thoughtful preparation and the right tools, you can create a dazzling holiday display that respects your home’s craftsmanship and long-term value. By avoiding invasive fasteners and embracing modern, non-damaging alternatives, you protect both your investment and your warranty.
The key is patience: take time to plan, prepare the surface, and use quality materials built for outdoor resilience. Whether you opt for adhesive clips, tension lines, or freestanding frames, your efforts will pay off in seasons of joyful, hassle-free decorating.


 浙公网安备
33010002000092号
浙公网安备
33010002000092号 浙B2-20120091-4
Comments
No comments yet. Why don't you start the discussion?