
Christmas lights transform a home—but the tangled web of extension cords trailing across floors, stapled to baseboards, or snaking down walls can undermine the magic. Poorly concealed cords aren’t just visually jarring; they’re among the top causes of holiday-related electrical incidents, tripping hazards, and property damage. According to the U.S. Consumer Product Safety Commission, over 13,000 home fires each year are linked to decorative lighting—and nearly 40% involve improper cord routing or overheating due to concealment under rugs or insulation. Hiding cords isn’t about aesthetics alone. It’s about responsibility: protecting your family, your home, and your investment in quality lights. This guide delivers field-tested, code-conscious strategies that prioritize safety without sacrificing polish—methods used by professional holiday installers, interior stylists, and certified electricians alike.
Why “Just Taping It Down” Is a Dangerous Shortcut
Many homeowners reach for painter’s tape, duct tape, or zip ties as quick fixes. But these shortcuts carry real risk. Tape degrades under temperature fluctuations, loses adhesion, and leaves residue that damages paint and wood finishes. More critically, wrapping cords tightly with zip ties restricts heat dissipation—especially with older incandescent or high-output LED strings. When cords overheat inside bundled wraps or beneath carpet edges, insulation can crack, exposing live wires. UL (Underwriters Laboratories) explicitly warns against covering extension cords with rugs, carpets, or furniture—even temporarily—as it traps heat and prevents airflow critical for safe operation.
Equally overlooked is mechanical stress. Cords stretched taut across doorways or pinned under heavy furniture experience constant tension and abrasion. A single nick in the outer jacket can lead to short circuits—or worse, electrocution. Professional installers never rely on adhesives alone. Instead, they use engineered solutions that secure *and* ventilate, route *and* protect, all while remaining invisible to the eye.
Five Proven Cord-Hiding Methods—Ranked by Safety & Cleanliness
The most effective cord concealment balances three criteria: electrical safety (ventilation, strain relief, code compliance), visual discretion (no visible hardware, seamless integration), and reversibility (no wall damage, no permanent alterations). Below is a comparative breakdown of five widely used techniques, evaluated using those standards.
| Method | Safety Rating (1–5) | Cleanliness Rating (1–5) | Reversibility | Best For |
|---|---|---|---|---|
| Paintable Cord Covers (UL-rated, surface-mount) | 5 | 4 | Excellent | Baseboards, stair risers, door frames—where color-matching matters |
| Decorative Molding or Crown Trim Integration | 5 | 5 | Good (requires minor installation) | Permanent or semi-permanent indoor displays; high-end interiors |
| Flat, Low-Profile Cable Raceways (adhesive-backed) | 4 | 4 | Very Good (leaves minimal residue) | Smooth walls, painted trim, rental-friendly spaces |
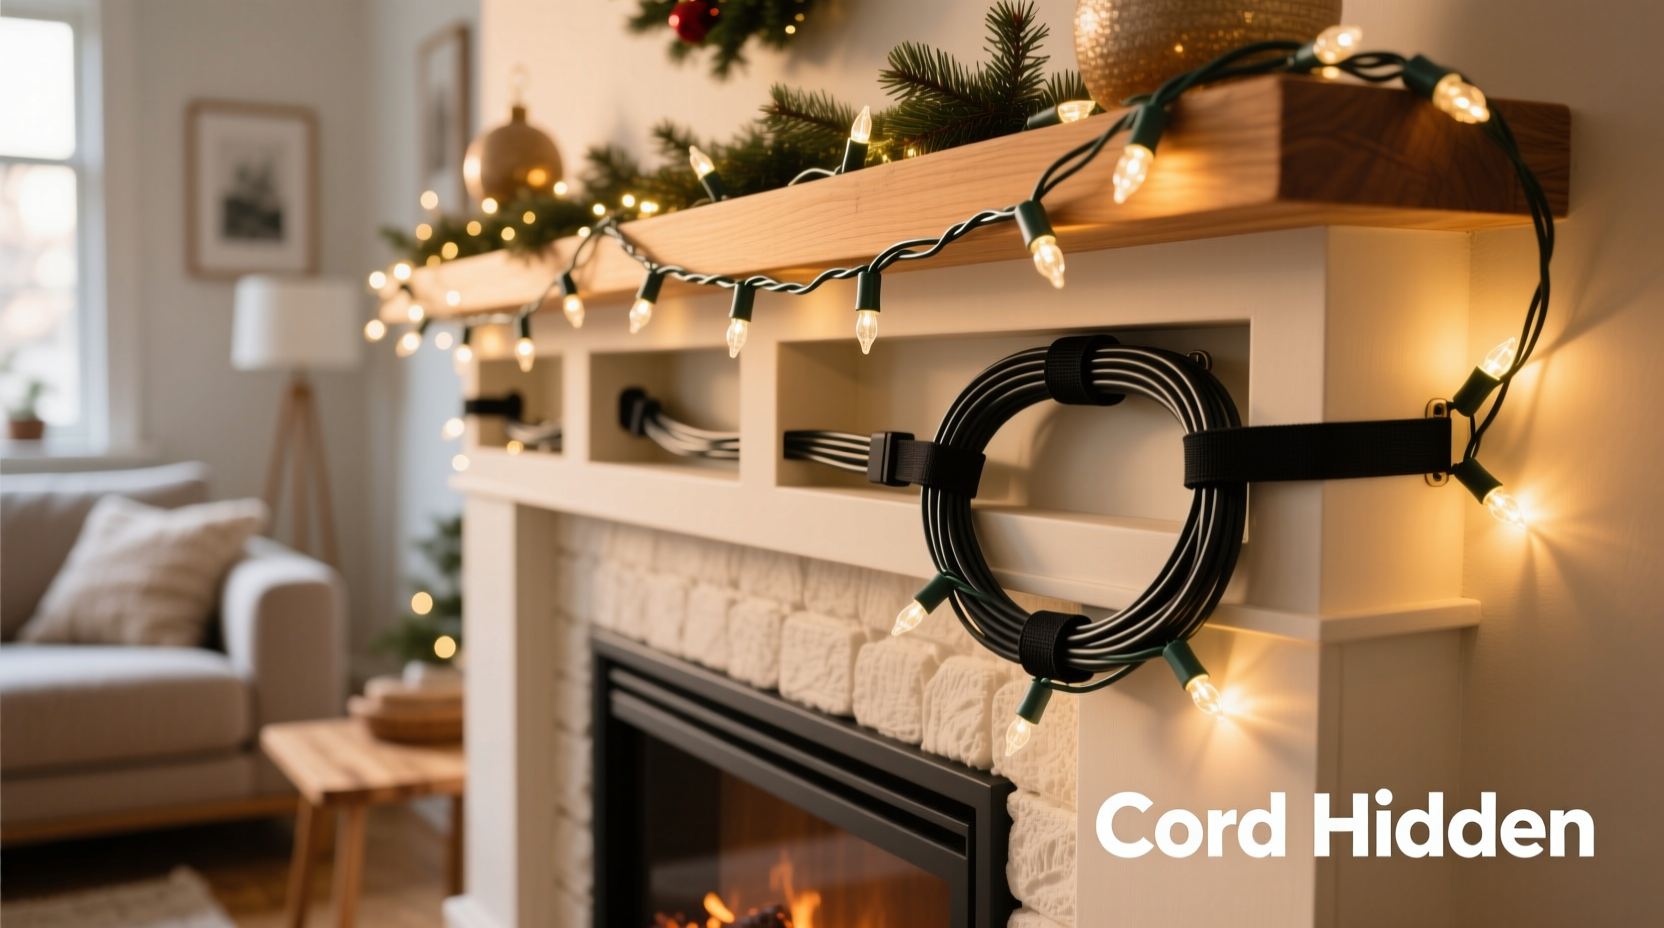
| Natural Concealment (greenery, garlands, fabric swags) | 5 | 4 | Excellent | Fireplaces, mantels, stair railings, window frames—where decor supports function |
| Strategic Outlet Relocation (GFCI-protected power strips + cord management) | 5 | 3 | Excellent | Rooms with limited outlets; eliminating long cord runs entirely |
Note: All methods assume use of UL-listed, outdoor-rated cords for exterior applications and indoor-rated cords for interior use. Never mix ratings. Always verify cord gauge (e.g., 16 AWG or thicker for longer runs) and total load against outlet capacity (standard 15-amp circuit = 1,800 watts max).
Step-by-Step: Installing Paintable Cord Covers Like a Pro
Paintable cord covers are the gold standard for clean, safe, and renter-friendly concealment. Unlike generic plastic raceways, premium models like Wiremold® or Legrand’s Q-Line feature rigid PVC construction, integrated strain-relief clips, and matte finishes that accept latex or oil-based paint without peeling. Here’s how to install them flawlessly:
- Measure and Plan: Map your light path from outlet to farthest string. Add 6 inches of slack at both ends. Note corners, transitions (e.g., wall-to-floor), and obstacles. Avoid running covers across expansion joints (e.g., where drywall meets trim).
- Select & Cut: Choose a cover width that fully encloses your thickest cord bundle (typically ½\" or ¾\"). Use a fine-tooth miter saw or utility knife with a straight edge—never scissors—to cut cleanly. Sand cut edges smooth.
- Test-Fit & Mark: Dry-fit the cover along the path. Hold it flush against the surface. Use a pencil to mark screw locations every 12–16 inches—closer on vertical runs or near corners. Avoid nailing into electrical boxes or plumbing.
- Mount Securely: Drill pilot holes slightly smaller than your screws (No. 6 x 1\" for drywall; No. 8 x 1¼\" for wood trim). Drive screws until the cover sits flat—no gaps. Use wall anchors if mounting into hollow drywall.
- Load & Seal: Feed cords gently into the channel, avoiding sharp bends (minimum 2-inch radius). Snap the cover lid shut. Touch up paint only after 24 hours of curing. Test all lights before final sealing.
This process takes 45–90 minutes for a typical living room setup—and yields results indistinguishable from built-in wiring. The covers remain accessible for seasonal removal and inspection, satisfying both NFPA 70 (National Electrical Code) and insurance requirements for accessible, non-permanent modifications.
A Real Example: How the Chen Family Solved Their Staircase Hazard
The Chen family lives in a 1928 Craftsman bungalow with open-riser wooden stairs—a beloved architectural feature that became a holiday liability. For years, they draped white LED lights along the banister, but cords dangled freely down each riser, creating a trip hazard for their two young children and elderly grandmother. Temporary solutions failed: double-sided tape lifted in humidity, cord clips pulled off historic wood, and a rented cord cover clashed with their stained-oak balusters.
Working with a local holiday lighting specialist, they chose a custom solution: a ¾\"-wide, pre-finished oak veneer cord cover, stained to match the staircase. It was mounted directly to the underside of each horizontal tread—not the riser—so cords ran parallel to the step, fully shielded from foot traffic. The installer added subtle recessed LED strip lighting *inside* the cover’s channel, casting soft upward light onto the stairwell without exposing any wiring. Total project time: 3.5 hours. Zero wall damage. Zero tripping incidents. And the system has been reused for four consecutive seasons with biannual inspections for cord integrity.
Their success hinged on two principles professionals follow without exception: route along structural planes, not across them, and conceal where usage naturally occurs—not where it’s merely convenient.
Expert Insight: What Certified Electricians Prioritize
“Most cord concealment failures start with misdiagnosing the root problem. People ask ‘How do I hide this cord?’ when they should ask ‘Why does this cord need to be here at all?’ Every extra foot of cord adds resistance, heat, and failure points. Start by auditing your outlet layout, then use power distribution—like GFCI-protected multi-outlet strips mounted *at the display site*—to minimize run length. If you must route, treat the cord like a living thing: give it space to breathe, protect its skin from abrasion, and never force it into unnatural positions.” — Rafael Torres, Master Electrician & Holiday Lighting Safety Advisor, National Fire Protection Association (NFPA)
Essential Safety Checklist Before You Plug In
- ✅ Inspect every cord for cracked, frayed, or exposed wiring—discard damaged sets immediately.
- ✅ Verify all outdoor lights and extension cords are rated for exterior use (look for “UL Listed for Outdoor Use” and “WET LOCATION” marking).
- ✅ Never exceed 80% of circuit capacity (e.g., max 1,440W on a 15A circuit). Use a wattage calculator or clamp meter.
- ✅ Install GFCI protection on all outlets powering lights—either via GFCI receptacles or portable GFCI adapters.
- ✅ Keep cords at least 3 feet from heat sources (fireplaces, space heaters, candles).
- ✅ Unplug lights before adjusting, cleaning, or storing—even overnight during extended absences.
- ✅ Label each cord set with its location and wattage for future reference and load balancing.
FAQ: Addressing Common Concerns
Can I use command strips to hold cord covers in place?
Only if the product is explicitly rated for electrical cord management and weight-bearing (e.g., Command™ Outdoor Large Cord Clips). Standard adhesive strips lack shear strength for vertical runs and degrade in temperature swings. For interior use on smooth surfaces, they’re acceptable for lightweight, low-voltage LED rope lights—but never for extension cords carrying full household current.
Is it safe to run cords behind furniture like sofas or bookshelves?
No—unless the furniture is permanently anchored and the cord path is fully ventilated, inspected weekly, and free of pinch points. Sofas shift. Bookshelves tip. Cords behind furniture often get crushed, bent, or covered by blankets or rugs—creating hidden fire risks. Instead, route behind fixed millwork (baseboards, crown molding) or use furniture-integrated solutions like cord-hiding sleeves built into media consoles.
What’s the safest way to hide cords on hardwood or tile floors?
A UL-listed, low-profile floor cord cover with anti-slip backing (e.g., 3M™ Scotchlok™ Floor Cord Protector) is the only code-compliant option. Choose one with a minimum 0.25\" height to prevent tripping, and ensure it’s rated for the cord’s amperage and environment (indoor vs. outdoor). Never use tape, rugs, or rubber thresholds as substitutes—they violate OSHA and NFPA guidelines and void homeowner insurance coverage in case of incident.
Conclusion
Hiding Christmas light cords isn’t a decorative afterthought—it’s foundational to responsible, joyful, and sustainable holiday celebration. When done right, it removes visual noise so your lights become the sole focus: luminous, intentional, and serene. It eliminates daily anxiety about children or pets tripping, protects your home’s electrical integrity, and honors the craftsmanship of both your décor and your dwelling. These methods require modest time and investment—not because they’re complicated, but because they’re deliberate. They reflect care: for your space, your people, and the quiet beauty of a well-lit season.
Start small this year. Pick one high-traffic area—the front entryway, the staircase, the living room mantle—and apply one of these proven techniques. Document what works. Note where friction occurs. Refine next year. That’s how professionals build systems—not with perfection on day one, but with observation, iteration, and respect for physics and safety.


 浙公网安备
33010002000092号
浙公网安备
33010002000092号 浙B2-20120091-4
Comments
No comments yet. Why don't you start the discussion?