
Layering lights and garland isn’t about adding more—it’s about building depth, rhythm, and intention. A poorly layered mantel can look cluttered and chaotic; a thoughtfully layered one feels rich, inviting, and effortlessly festive. Yet most homeowners treat garland and lights as afterthoughts—draping one, then stringing the other haphazardly on top. The result? Flatness, visual noise, or worse: tangled frustration. This guide distills decades of professional holiday styling experience—including insights from interior stylists who design for high-end retail displays and luxury homes—into actionable, room-specific strategies. You’ll learn not just *how* to layer, but *why* certain sequences work, how material choices affect light diffusion, and how to adapt techniques whether you’re styling a 6-foot mantel or a 20-foot staircase railing.
Why Layering Matters More Than Quantity
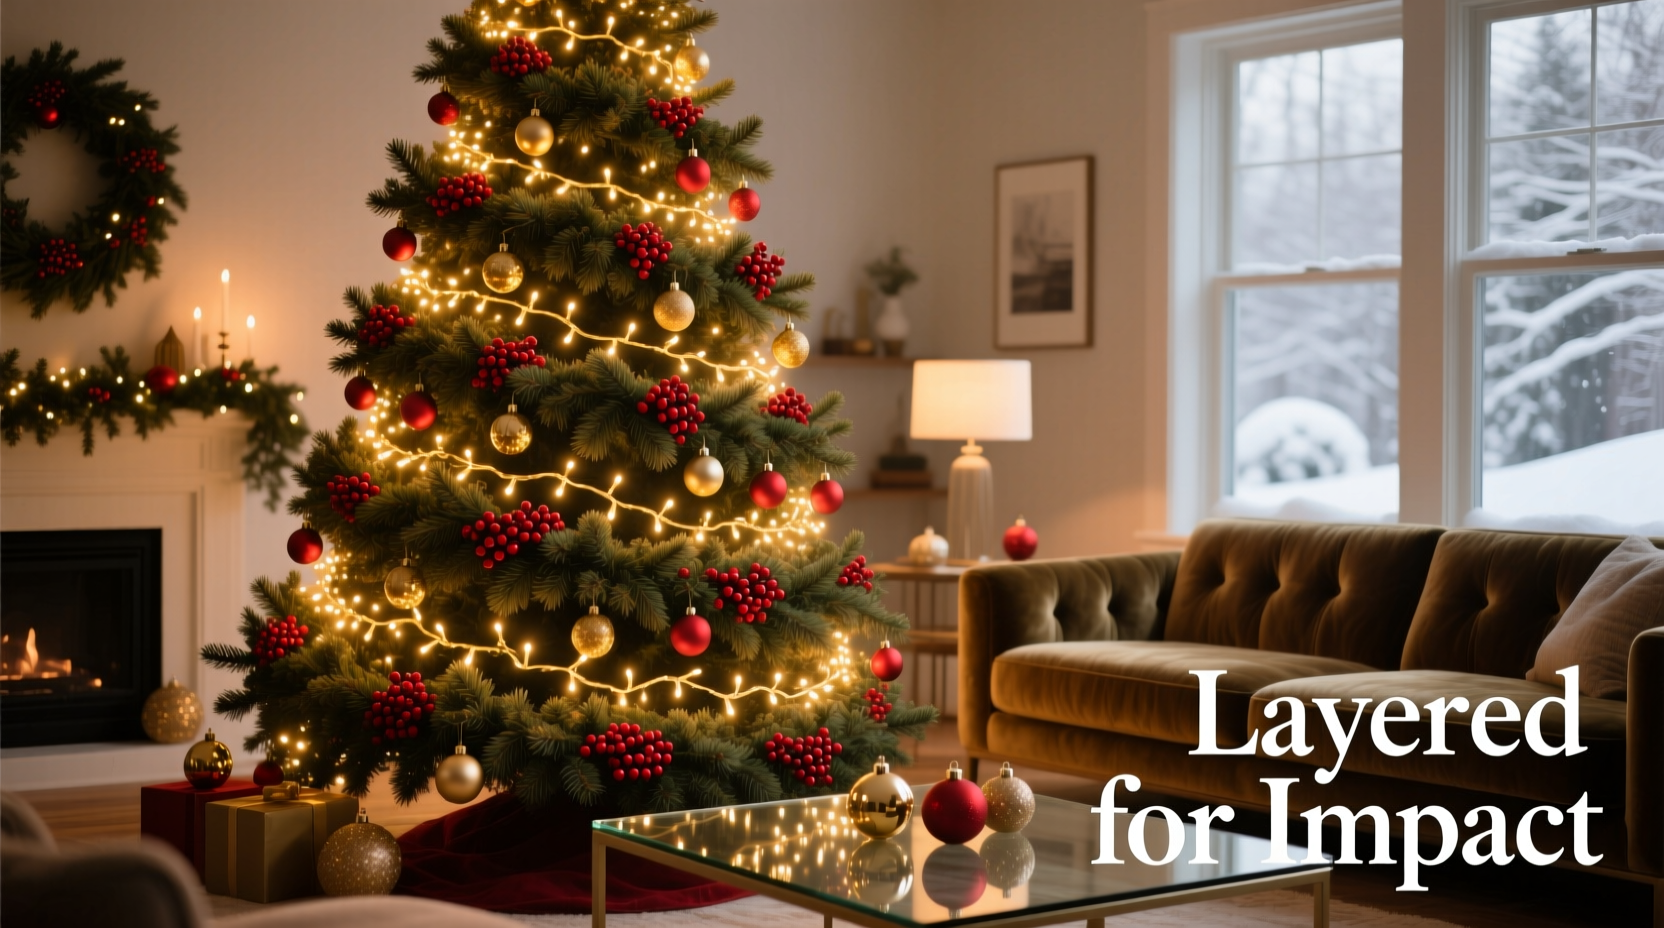
Modern LED lights are brighter and more energy-efficient than ever—but brightness alone doesn’t create warmth or dimension. What transforms a decoration from “festive” to “unforgettable” is contrast in scale, texture, temperature, and placement. A single strand of warm-white micro-lights on a pine garland reads as polite. Add a second layer of vintage-style amber bulbs *woven deeper into the foliage*, then finish with a third layer of frosted white wire-wrapped picks emerging at varying heights—and suddenly, the garland has volume, movement, and narrative. Interior stylist Maya Lin, whose team designs holiday installations for Soho House locations globally, puts it plainly: “People think ‘more lights = more joy.’ In reality, layered light creates *perceived abundance*. One well-placed, multi-textured layer reads richer than three identical strands stacked on top.” This principle applies equally to mantels, staircases, doorways, and even tabletop centerpieces.
The Three-Layer Framework: Structure, Texture, Sparkle
Professional decorators use a consistent three-layer system—not as rigid rules, but as a reliable foundation for visual balance. Each layer serves a distinct purpose and should be installed in sequence:
- Structure Layer: The base. This defines shape, scale, and silhouette. It’s typically the thickest, heaviest, or most voluminous element—like a full 3-inch-wide mixed greenery garland (pine, cedar, eucalyptus) or a dense boxwood swag. Its job is to anchor the composition and provide physical depth for subsequent layers to nestle into.
- Texture Layer: The mid-ground. This adds tactile interest and visual complexity. Think dried orange slices, cinnamon sticks, velvet ribbons, birch branches, or faux berries woven *between* and *slightly behind* the structure layer—not draped over it. This layer breaks up uniformity and invites closer inspection.
- Sparkle Layer: The foreground. This is where lights live—but not just any lights. These are intentionally placed points of luminance that catch the eye and guide movement. They’re rarely evenly spaced. Instead, they cluster near focal points (e.g., above a family photo on the mantel), taper toward ends, and vary in size and warmth to create rhythm.
This framework prevents visual competition. Without it, garland and lights fight for dominance. With it, each element supports the others—structure gives texture something to cling to; texture diffuses and softens sparkle; sparkle highlights the contours of both.
Step-by-Step: Installing Layers on a Standard Mantel (6–7 Feet)
A mantel is the most common—and most scrutinized—holiday surface. Follow this precise sequence for repeatable, magazine-worthy results:
- Prep & Measure: Clear the mantel completely. Use painter’s tape to mark ideal starting/ending points (leave 8–10 inches of bare mantel on each end for breathing room). Measure total length and divide by three—this gives your primary “cluster zone” width (e.g., 6 feet = 24-inch central zone).
- Install Structure Layer: Drape your main garland, securing every 12–15 inches with floral wire or clear zip ties *underneath* the mantel shelf (not visible from front). Let it settle naturally—avoid forcing tight curves. Gently fluff branches outward to create a 4–5 inch depth at the front edge.
- Weave Texture Layer: Working from left to right, tuck ribbon tails, berry clusters, or dried botanicals *behind* the front plane of the garland, angling them to emerge at varied heights. Place 70% of texture elements within the central cluster zone; space remaining pieces sparsely toward the ends.
- Place Sparkle Layer (Lights): Unplug lights first. Starting at the *back* of the garland (closest to the wall), weave warm-white LED mini-lights *through* the structure layer—not over it—so bulbs nestle among branches. Then, add a second, contrasting strand (e.g., amber vintage bulbs or frosted white) *in front* of the garland, weaving loosely along the top edge and draping slightly over the front lip. Finally, place 3–5 statement bulbs (e.g., 1.5-inch glass globes) at key focal points: centered above the fireplace opening, and one each above your two outermost decorative objects.
- Final Adjustments: Step back 6 feet. Turn lights on. Look for “dead zones” (areas with no light reflection or texture variation)—fill with a single berry stem or tiny sprig. Trim any stray wires or stems. Never adjust lights while plugged in.
Do’s and Don’ts: A Practical Comparison Table
| Action | Do | Don’t |
|---|---|---|
| Light Placement | Weave lights *into* garland at multiple depths—back, middle, and front planes | String lights only along the top edge or drape them loosely over the garland |
| Color Temperature | Mix warm-white (2200K–2700K) with subtle amber or soft gold accents | Combine cool-white (5000K+) LEDs with warm elements—they clash and create visual dissonance |
| Garland Density | Use 1.5x the linear foot measurement (e.g., 9 feet of garland for a 6-foot mantel) for natural fullness | Stretch garland taut to cover exact length—it looks thin and artificial |
| Material Pairing | Match light cord color to garland stem (green cord with greenery, brown cord with woodsy textures) | Use bright white cords with natural garlands—they scream “temporary” and break immersion |
| Scale Variation | Combine bulb sizes: micro-lights (2mm), standard mini (5mm), and statement bulbs (12mm+) | Use only one bulb size across all layers—it flattens visual hierarchy |
Real-World Example: The “Overwhelmed Homeowner” Transformation
Sarah K., a graphic designer in Portland, spent three Decembers frustrated with her living room mantel. She’d buy premium garland and premium lights, yet every year it looked “cheap and lopsided.” In December 2023, she applied the three-layer framework. Her baseline: a 6.5-foot mantel, 3-inch mixed greenery garland, and 200-count warm-white micro-lights. Her breakthrough came when she added just two intentional layers: First, she wove 24 inches of burlap ribbon *behind* the garland’s front edge, letting tails cascade asymmetrically. Second, instead of using all 200 lights on the garland, she used 120 lights *within* the foliage (back/mid layers) and reserved 80 lights for a *separate* front-plane strand—hand-strung with irregular spacing (clusters of 3 bulbs, then gaps of 8 inches). She also added five 1-inch amber glass bulbs at key vertical points. The result? Her mantel drew compliments for “depth” and “cozy sophistication”—not just “lots of lights.” As Sarah noted in her follow-up email: “It wasn’t more stuff. It was *better placed* stuff. I finally understood that holiday decor is choreography—not accumulation.”
“Amateur decorators chase coverage. Professionals chase contrast. The most impactful holiday moments happen where light meets shadow, where texture interrupts smoothness, and where scale shifts unexpectedly.” — Derek Chen, Principal Designer, Lumina Holiday Studios (12 years designing for Nordstrom, Williams-Sonoma, and private residences)
FAQ: Solving Common Layering Challenges
How many lights do I really need per foot of garland?
Forget generic “100 lights per foot” advice. For layered impact, use this ratio: 75–100 lights per foot *for the structural layer* (woven deep into foliage), plus 30–50 additional lights per foot *for the sparkle layer* (front-plane, strategic placement). So for a 6-foot mantel: 450–600 lights total, split intentionally—not 600 strung haphazardly.
Can I layer lights and garland on a staircase railing without it looking messy?
Yes—with strict adherence to vertical rhythm. Anchor the structure layer (garland) every 18 inches with discreet hooks or florist wire. Then, run lights *up the inside curve* of the railing (closest to stairs), not over the top. Finish with a single line of larger bulbs *along the outer edge* of each step’s newel post or baluster. This creates ascending light, not horizontal clutter.
What if my garland is pre-lit? Can I still layer effectively?
Absolutely—but treat the built-in lights as your *structural* layer only. Then add your texture layer (ribbons, picks) and a *second*, contrasting light strand as your sparkle layer—placed deliberately on the front plane. Just ensure the pre-lit cord is fully concealed beneath foliage before adding new elements.
Pro Checklist: Before You Begin Layering
- ✅ Test all lights *before* installation (replace dead bulbs or fuses immediately)
- ✅ Choose a dominant light temperature (warm-white) and select *one* accent color (amber, soft gold, or frosted white)—no more than two tones
- ✅ Cut garland into 24–30 inch segments for easier manipulation and natural-looking joins
- ✅ Use floral wire (not tape or glue) for secure, invisible anchoring
- ✅ Plan focal points *first*—where will eyes land? (e.g., above fireplace, center of staircase, front door knocker)—then build layers outward from those anchors
Conclusion: Your Home Deserves Intentional Joy
Holiday decorating shouldn’t feel like a race to fill space. It’s an opportunity to slow down, observe how light moves through your home, and craft moments of quiet wonder. Layering lights and garland with purpose—using structure to ground, texture to intrigue, and sparkle to delight—transforms seasonal tradition into personal expression. You don’t need a decorator’s budget or a Pinterest-perfect home. You need only attention to sequence, respect for material properties, and the willingness to step back, assess, and adjust. Start small: apply the three-layer framework to one mantel this year. Notice how the interplay of shadow and glow changes across morning, afternoon, and evening light. Feel the difference when guests pause—not just to say “how pretty,” but to ask, “How did you make it feel so *alive*?” That’s the impact of intentional layering. Your home isn’t a backdrop for the holidays. It’s the heart of them. Decorate it like it matters.


 浙公网安备
33010002000092号
浙公网安备
33010002000092号 浙B2-20120091-4
Comments
No comments yet. Why don't you start the discussion?