
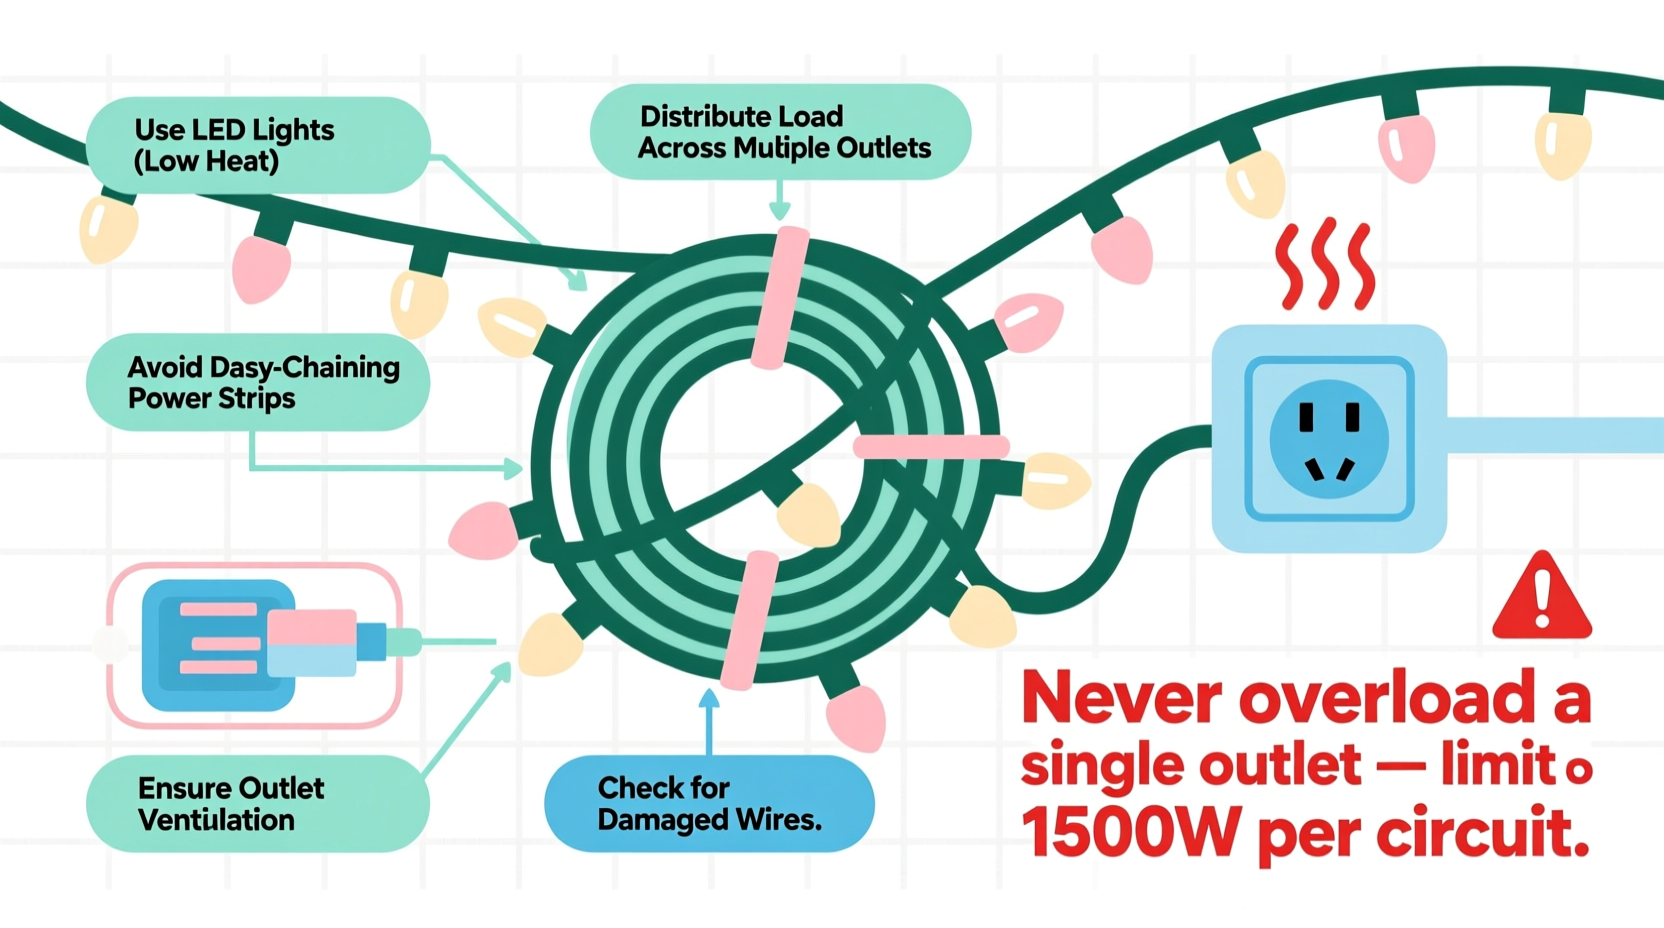
Every holiday season, thousands of homes experience tripped breakers, warm outlets, flickering lights, or worse—smelling plastic insulation or sparking receptacles. These aren’t “quirks” of festive decorating; they’re early warnings of electrical overload. Layering multiple strands of Christmas lights—especially when wrapping trees, outlining roofs, or draping porches—is a beloved tradition. But doing it without understanding your home’s electrical capacity invites risk: damaged wiring, shortened bulb life, fire hazards, and voided insurance coverage in extreme cases. This isn’t about limiting joy—it’s about extending it safely. The solution lies not in fewer lights, but in smarter layering: calculating loads accurately, selecting compatible products, distributing demand across circuits, and verifying performance before final installation.
Understand Your Circuit’s Real Capacity (Not Just the Label)
Most U.S. residential outlets are wired to 15-amp or 20-amp circuits. A 15-amp circuit at 120 volts supports a maximum of 1,800 watts (15 × 120 = 1,800). But the National Electrical Code (NEC) mandates a critical safety buffer: circuits should never exceed 80% continuous load. That means a true safe operating limit is just 1,440 watts for a 15-amp circuit—and 1,920 watts for a 20-amp circuit.
Yet many homeowners assume “if it fits in the outlet, it’s fine.” That’s dangerously misleading. A standard 15-amp outlet may have three or four downstream receptacles on the same circuit—including garage lights, hallway sconces, or even a refrigerator compressor sharing that line. You must map your home’s circuit layout first. Start by turning off one breaker at a time and testing which outlets and fixtures go dark. Label each breaker clearly. Then, before plugging in lights, unplug or turn off all non-essential devices on that circuit.
Calculate Total Load Accurately—Not by Strand Count Alone
Wattage varies dramatically across light types. Assuming all strands draw the same power is the most common cause of overload. LED mini-lights consume as little as 0.8–2.4 watts per 50-light strand. Incandescent C7 or C9 bulbs? Up to 40–120 watts per strand. And newer “warm white” or “color-changing” LEDs with built-in controllers often draw more than basic sets due to internal electronics.
Always check the UL label on the plug end—not the box, not the website description. Look for “Watts,” “VA,” or “A @ 120V.” If only amps are listed, multiply by 120 to get watts. Never rely on manufacturer “up to” claims or marketing terms like “energy efficient”—verify actual measured draw.
| Light Type | Typical Watts per 100-Foot Strand | Max Strands per 15-Amp Circuit (80% Rule) | Key Warning |
|---|---|---|---|
| LED Mini Lights (basic) | 2.4–4.8 W | 240–300 strands | Verify controller draw—some remotes add 1–3W continuously |
| LED Icicle Lights (with timer) | 6–12 W | 120–240 strands | Timers increase baseline load—even when “off,” many draw standby power |
| Incandescent Mini Lights | 20–40 W | 36–72 strands | Heat buildup accelerates filament failure; avoid daisy-chaining more than 3 |
| C9 Bulbs (incandescent) | 100–120 W | 12–14 strands | Never plug into power strips—use only heavy-duty outdoor-rated extension cords |
| Smart RGB LED Net Lights | 15–35 W | 41–96 strands | Wi-Fi modules and microprocessors spike demand during sync/updates |
Note: “Daisy-chaining” (plugging one strand into another) is permitted only if the manufacturer explicitly states how many sets can be connected end-to-end. Exceeding that number violates UL listing and voids fire insurance coverage. For example, many LED mini-light packages say “connect up to 43 sets”—but that assumes *only* those lights on an otherwise empty circuit.
Strategic Layering: Distribution Over Density
Layering isn’t just about stacking strands on one tree or rail—it’s about intelligent spatial and electrical distribution. Instead of running 12 strands from a single porch outlet, split them across three circuits: two strands on the front-porch circuit, five on the garage-circuit (which powers the opener and exterior lights), and five on the living-room circuit (which also feeds lamps and entertainment systems—but only when those are off during display hours).
This requires planning. Sketch your display zones and assign each to a known circuit. Prioritize high-wattage elements—rooftop C9s, large net lights, animated figures—on dedicated or lightly loaded circuits. Reserve low-wattage LED outlines for shared circuits, but only when other loads are minimized.
“The biggest mistake I see during holiday inspections isn’t too many lights—it’s too many lights on *one point of connection*. A single GFCI outlet feeding 1,200 watts of lighting while also powering a dehumidifier and sump pump is a guaranteed trip—and a hidden shock hazard.” — Carlos Mendez, NFPA-Certified Residential Electrical Inspector, Chicago Fire Prevention Bureau
A Step-by-Step Safety Verification Process
Follow this sequence *before* final installation—not after you’ve draped the mantel and lit the tree:
- Map & label every circuit serving intended light zones (use breaker test + outlet tester).
- Unplug or switch off all non-essential loads on target circuits (e.g., coffee maker, phone chargers, smart speakers).
- Calculate total wattage using *actual* labels—not packaging estimates.
- Plug in lights incrementally: Start with 50% of planned load. Wait 10 minutes. Feel the outlet plate, cord connectors, and transformer (if used). Any warmth above ambient room temperature? Stop immediately.
- Use a plug-in energy monitor (like the Kill A Watt EZ) to confirm real-time draw. Compare to your 80% ceiling (1,440W for 15A).
- Test GFCI protection: Press “TEST” on every outdoor and garage GFCI outlet before connecting lights. Reset, then verify “RESET” holds under load.
- Recheck after 30 minutes: Heat builds gradually. If outlet or cord feels warm, reduce load by 20% and retest.
This process takes 25–40 minutes—but prevents hours of troubleshooting and eliminates risk. It also reveals hidden issues: aging outlets with loose contacts (causing arcing), undersized aluminum wiring (common in homes built 1965–1973), or corroded outdoor receptacles.
Mini Case Study: The Overloaded Oak Street Tree
The Thompson family in Portland wanted a “wow factor” for their neighborhood contest: a 12-foot fir wrapped in 22 strands—12 of warm-white LED mini-lights, 6 of copper wire fairy lights, and 4 of battery-operated pine-cone projectors (which they mistakenly plugged into AC via an adapter). They ran all strands from a single 15-amp outdoor GFCI outlet on the front porch circuit.
Within 45 minutes, the outlet grew hot enough to warp its plastic cover. The GFCI tripped repeatedly. A neighbor noticed smoke near the outlet box and alerted them. An electrician found the circuit was already carrying 420 watts from porch lights and a security camera. The added 980 watts from lights pushed total draw to 1,400 watts—just below the 1,440W safe threshold *on paper*. But the GFCI’s internal contacts were degraded from moisture exposure, increasing resistance and heat. The electrician replaced the outlet, installed a dedicated 20-amp circuit for holiday use, and advised switching the projectors to true battery operation.
Their revised plan: 10 LED strands on the new circuit, 8 on the garage circuit (with garage lights turned off), and 4 battery-powered projectors. Total display time increased, reliability improved, and they won “Safest & Most Sustainable Display” in the contest.
Do’s and Don’ts for Safe Light Layering
- DO use only UL-listed, outdoor-rated extension cords (14-gauge minimum for runs over 25 feet; 12-gauge for over 50 feet or high-wattage loads).
- DON’T plug light strands into multi-outlet power strips or surge protectors unless explicitly rated for continuous lighting loads (most consumer-grade strips max out at 1,000–1,200W).
- DO space out plug-in points: Use outlets on different walls, floors, or rooms—even if it means slightly longer cords.
- DON’T run cords under rugs, through doorways, or in gutters where moisture and abrasion accelerate insulation failure.
- DO inspect every strand before use: Look for cracked sockets, exposed wire, bent pins, or discoloration near plugs.
- DON’T mix incandescent and LED strands on the same circuit unless you’ve calculated total wattage—LED drivers can interact unpredictably with older dimmer switches or magnetic transformers.
FAQ
Can I use a 30-amp generator to power all my lights safely?
Only if your generator’s outlets match your home’s circuit ratings—and you distribute loads accordingly. A 30-amp generator typically has one 240V outlet and two 120V 20-amp outlets. Plugging 2,500 watts of lights into a single 20-amp 120V outlet still exceeds its 1,920W safe limit. Generators don’t eliminate load management—they shift where it happens.
Why do my LED lights trip the breaker when my old incandescents didn’t?
It’s rarely about wattage. Modern LEDs often have higher inrush current (a brief 5–10x power surge at startup) that can trip older breakers sensitive to transient spikes. Also, cheap LED drivers generate harmonic distortion, confusing AFCI/GFCI breakers. Try plugging in strands one at a time, waiting 5 seconds between each—or upgrade to breakers rated for LED compatibility (e.g., Siemens QPF series).
Is it safe to leave lights on overnight or while away?
Yes—if all safety steps above are followed *and* you use a programmable timer set to shut off after 6–8 hours. Avoid “always-on” settings. Even LEDs degrade faster with constant thermal cycling, and fault detection (like a shorted bulb) is less likely to trigger a shutdown without timed rest periods.
Conclusion
Layering multiple strands of Christmas lights isn’t about restraint—it’s about intention. It’s choosing the right tool for the job, respecting physics over aesthetics, and treating electricity not as invisible magic, but as a powerful, measurable resource that demands respect. When you calculate loads, map circuits, verify temperatures, and distribute connections thoughtfully, you gain something far more valuable than brightness: peace of mind. Your lights shine brighter because they’re grounded in knowledge—not hope. Your family gathers safely beneath them, not beside a warning sign. And your holiday spirit remains untethered from anxiety about sparks, trips, or service calls.
Start tonight. Pull out your breaker panel. Grab a pen and notebook. Test one circuit. Measure one strand. Feel one outlet. That small act transforms decoration into diligence—and tradition into trust.


 浙公网安备
33010002000092号
浙公网安备
33010002000092号 浙B2-20120091-4
Comments
No comments yet. Why don't you start the discussion?