
As the holidays approach, many look for ways to bring warmth and light into their homes without adding clutter or waste. One often-overlooked resource hiding in storage bins is old string lights—flickering strands from past seasons, perhaps with a few bulbs out, but still full of potential. Rather than discarding them, these lights can be transformed into stunning, conversation-starting centerpieces that blend nostalgia, sustainability, and seasonal sparkle.
Creating a centerpiece from old string lights isn’t just about recycling; it’s about reimagining. With minimal supplies and a bit of creativity, you can craft a luminous focal point for your dining table, mantel, or entryway that captures the spirit of Christmas while reducing environmental impact. This guide walks through practical techniques, design ideas, and expert-backed tips to help you turn outdated décor into something magical.
Why repurpose old string lights?
Every year, millions of string lights end up in landfills after just one season of use. Many are discarded not because they’re completely broken, but because they no longer match a new décor scheme or have a single faulty bulb. Yet, even partially functional lights retain significant visual appeal—especially when used in creative applications like centerpieces.
Repurposing old lights aligns with sustainable design principles. According to the U.S. Environmental Protection Agency, decorative lighting contributes to seasonal electronic waste spikes. By reusing what you already own, you reduce consumption, lower carbon footprint, and embrace a circular approach to holiday decorating.
“Upcycling holiday décor doesn’t mean sacrificing beauty—it means enhancing meaning. A centerpiece made from family heirloom lights carries stories as much as light.” — Clara Mendez, Sustainable Interior Designer
Essential materials and preparation
Before diving into construction, gather your materials. The beauty of this project lies in its accessibility—most items can be found at home or purchased inexpensively.
Basic Supplies Checklist
- Old string lights (incandescent or LED, any length)
- Base structure (vase, lantern, wooden tray, wreath form)
- Battery pack (optional, for cordless display)
- Floral wire or zip ties
- Decorative fillers (pinecones, faux snow, cranberries, greenery)
- Scissors and wire cutters
- Hot glue gun (low-temp recommended)
- Protective gloves (when handling broken bulbs)
Begin by testing your lights. Plug them in to identify working sections. If only part of the strand functions, consider cutting and rewiring the good segments—or incorporate flickering sections intentionally for a vintage glow. For safety, avoid using frayed wires or exposed conductors in high-traffic areas.
If your lights are AC-powered but you want a cord-free centerpiece, replace the plug end with a battery pack. These adapters are widely available online and allow you to place your creation anywhere—perfect for tables where cords would be hazardous.
Step-by-step: Building your light-based centerpiece
The following timeline outlines a reliable method for creating a glowing centerpiece suitable for a dining table or coffee table. This version uses a glass hurricane vase as the base, but variations are endless.
- Prepare the base: Choose a clear glass vase or lantern. Clean thoroughly to remove dust or residue. Ensure it’s dry before assembly.
- Test and segment lights: Plug in the string lights. If only certain sections work, mark them with tape. Cut carefully between bulbs (not through them) to isolate functioning strands.
- Create internal structure: Coil the light strand loosely inside the vase. Begin at the bottom and spiral upward, securing every few inches with small drops of hot glue. Avoid gluing directly onto glass if you plan to reuse it later—use floral wire anchored to the base instead.
- Incorporate natural elements: Add pine branches, cinnamon sticks, or dried orange slices around the lights. Use zip ties or wire to anchor larger pieces. Let some greenery drape over the rim for a rustic effect.
- Add texture and contrast: Fill gaps with pinecones, frosted berries, or cotton “snow.” These diffuse the light and create depth. For a modern twist, use metallic ornaments or mirrored beads.
- Secure power source: If using a battery pack, place it discreetly beneath filler material or outside the vase with only the wire entering. Label batteries clearly for easy replacement.
- Final test and placement: Turn on the lights in a dim room. Adjust positioning of elements to balance brightness. Place the centerpiece on a heat-resistant surface away from flammable materials.
Design variations and creative applications
No two centerpieces need to look alike. The flexibility of string lights allows for multiple interpretations based on theme, space, and personal style.
1. Winter Forest Lantern
Use a metal lantern as the base. Wrap lights vertically along the inner walls. Fill the bottom with moss, miniature evergreen sprigs, and small wooden animals. This creates a whimsical woodland scene illuminated from within.
2. Floating Light Wreath
Take a grapevine wreath form and weave string lights throughout. Lay it flat on a mirrored tray filled with loose cranberries and eucalyptus. The reflection doubles the glow, making it ideal for long tables.
3. Snow Globe Jar
Use a large mason jar. Place coiled lights at the bottom, then add fake snow and a tiny plastic tree or deer figurine. Seal the lid and drill a small hole for the cord. When lit, it mimics a glowing snow globe.
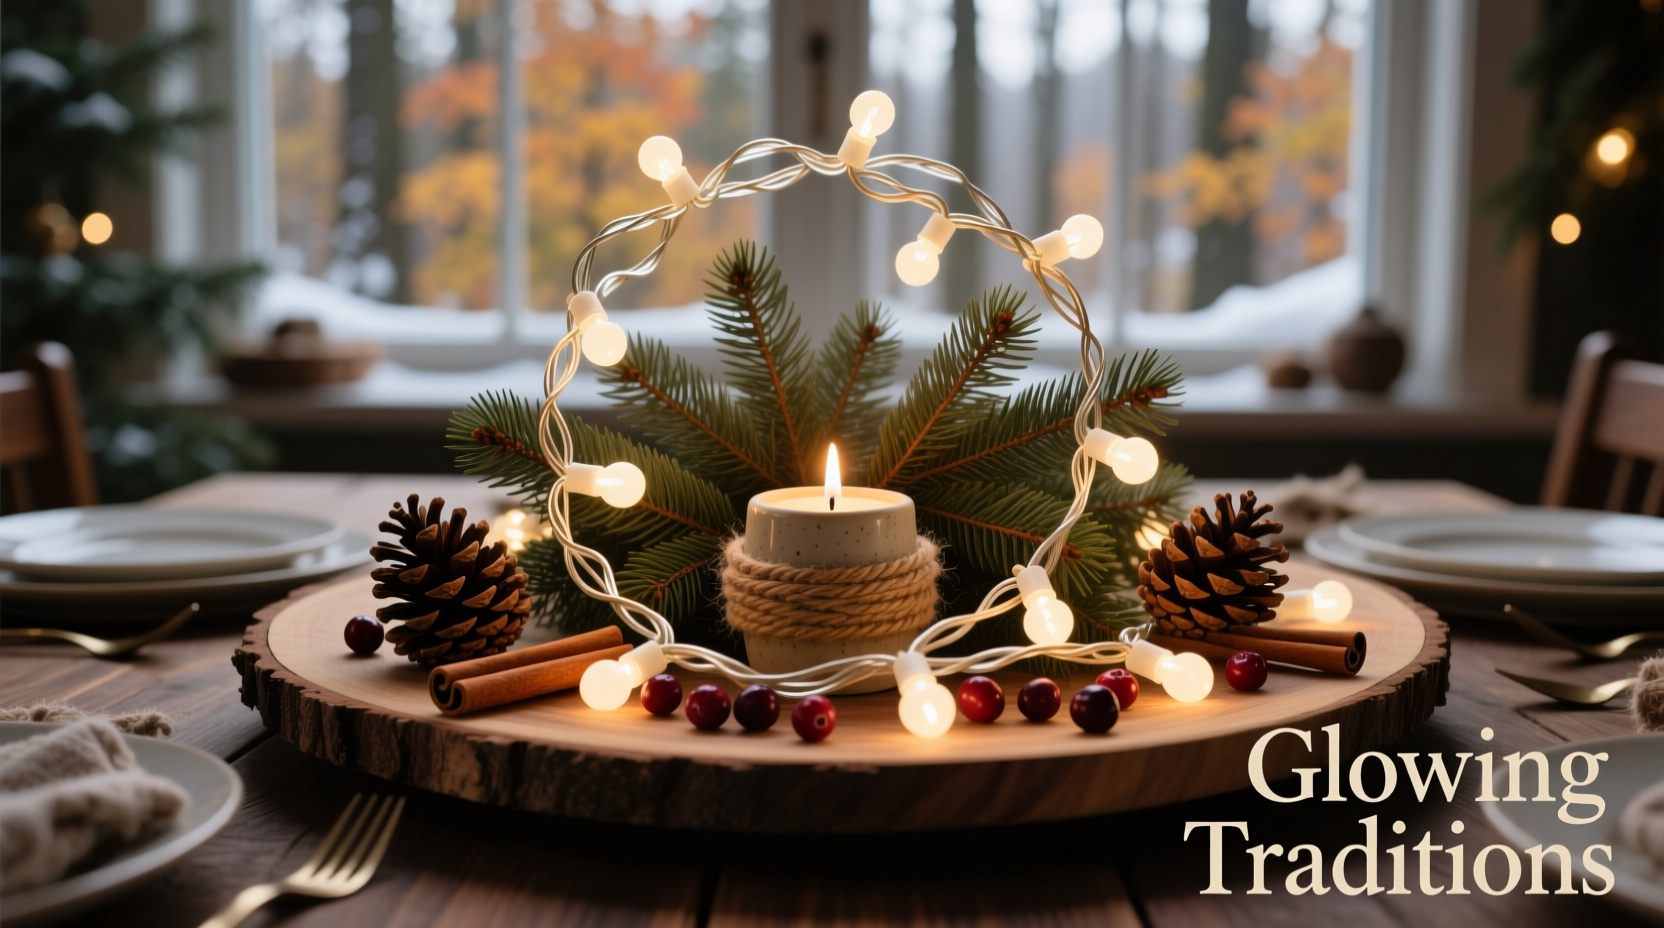
4. Rustic Wood Slice Display
Glue short lengths of lights onto thick wood slices arranged in a staggered line. Nestle between pillar candles and rosemary sprigs. Perfect for farmhouse-style homes.
| Style | Ideal Base | Best Add-Ons | Safety Notes |
|---|---|---|---|
| Modern Minimalist | Clear cylinder or acrylic block | White LEDs, geometric shapes | Avoid overcrowding wires |
| Rustic Farmhouse | Wooden crate or tray | Pinecones, burlap ribbon, cinnamon | Keep lights elevated from fabric |
| Glamorous Elegance | Mirrored stand or crystal bowl | Gold ornaments, sequins, pearls | Use low-heat LEDs only |
| Kids’ Table Fun | Plastic snow dome or toy sled | Felt trees, mini presents, glitter | Supervise closely; use battery packs |
Real example: A family tradition reborn
When Sarah Thompson cleared out her attic before Thanksgiving, she found a tangled box of multicolored mini-lights her father had used since the 1990s. Most bulbs still worked, though the green wire had faded to yellow. Instead of tossing them, she decided to honor his memory by creating a centerpiece for her holiday table.
She used a tall glass vase, wrapping the lights in a helix pattern. Between coils, she added handwritten notes from old Christmas cards—rolled and tied with twine—creating pockets of light and memory. At the base, she placed a photo of her dad holding a string of lights, sealed in waterproof plastic. The result was more than décor; it became a tribute that sparked storytelling throughout dinner.
Guests asked how she’d done it, and several vowed to try similar projects with their own inherited lights. “It wasn’t perfect,” Sarah said, “but it glowed with love. That’s what Christmas is about.”
Safety and maintenance tips
While creativity is encouraged, electrical safety must never be compromised. Even low-voltage lights can pose risks if misused.
- Always unplug lights before adjusting or storing.
- Inspect wires for cracks, kinks, or exposed copper before each use.
- Never leave lit centerpieces unattended, especially around children or pets.
- Use LED lights when possible—they run cooler and consume less energy.
- Store disassembled components in labeled containers to prevent tangling.
Frequently Asked Questions
Can I use broken string lights for a centerpiece?
Yes, as long as the damaged section is isolated. You can cut out non-working bulbs and use the functional portions. Just ensure all connections are insulated and secure. Battery-powered setups are safest for partial strands.
How do I prevent the lights from overheating?
Choose LED string lights—they generate significantly less heat than incandescent ones. Also, avoid packing flammable materials (like paper or dry moss) directly against bulbs. Maintain airflow around light sources, and limit continuous use to 6–8 hours at a time.
What if my lights don’t have a battery option?
You can purchase universal battery converter kits online. These replace the wall plug with a portable battery case. Make sure the voltage matches your light strand. Alternatively, position the centerpiece near an outlet and conceal the cord under a table runner.
Conclusion: Light up the season sustainably
Transforming old string lights into a Christmas centerpiece is more than a craft—it’s a statement. It says you value memory over mass production, ingenuity over excess, and warmth over waste. With simple tools and thoughtful design, you can create a piece that doesn’t just illuminate your table, but also reflects your commitment to mindful living.
This holiday season, look beyond the shiny new boxes at the store. Open your closet, untangle the past, and let those forgotten lights shine again. Whether you craft a serene winter scene or a nostalgic tribute, your centerpiece will carry a glow that store-bought décor simply can’t match.


 浙公网安备
33010002000092号
浙公网安备
33010002000092号 浙B2-20120091-4
Comments
No comments yet. Why don't you start the discussion?