
Raising backyard chickens is more than just a hobby—it’s a commitment to animal care, sustainability, and self-reliance. A well-built hen house protects your flock from predators, harsh weather, and disease while encouraging consistent egg production. For beginners, constructing a functional yet comfortable coop can seem overwhelming. This guide breaks down the entire process into clear, manageable steps, emphasizing durability, comfort, and practicality.
Step 1: Plan Your Hen House Design
Before picking up a hammer, take time to design your hen house based on your flock size, local climate, and available space. A common mistake is building too small or neglecting future expansion. The general rule is 2–3 square feet of indoor space per chicken, with an additional 8–10 square feet in an attached run.
Consider these key design factors:
- Orientation: Position the coop so the long side faces east-west to maximize sunlight exposure without overheating.
- Ventilation: High vents (near the roof) allow warm, moist air to escape while keeping drafts off roosting hens.
- Accessibility: Include a human-sized door for easy cleaning and nesting box access at chest height.
- Mobility: If you plan to move the coop, build it on skids or wheels.
Step 2: Choose Durable and Weather-Resistant Materials
The longevity of your hen house depends heavily on material selection. Rot, moisture, and predator damage are the biggest threats. Use materials that resist these issues while remaining safe for chickens.
| Component | Recommended Material | Avoid |
|---|---|---|
| Framing | Pressure-treated lumber (non-arsenic type) | Untreated pine, reclaimed wood with nails |
| Walls & Roof | Exterior-grade plywood + metal roofing | OSB board, asphalt shingles |
| Floor | Concrete slab or hardware cloth-lined plywood | Dirt floors (unless deeply bedded) |
| Nesting Boxes | Sanded cedar or pine | Particleboard, painted wood with toxic finishes |
| Hardware | Stainless steel or galvanized screws/nails | Regular steel (rusts quickly) |
Metal roofing is ideal—durable, fire-resistant, and sheds snow and rain efficiently. Avoid using treated wood where chickens may peck directly; instead, seal it or place barriers.
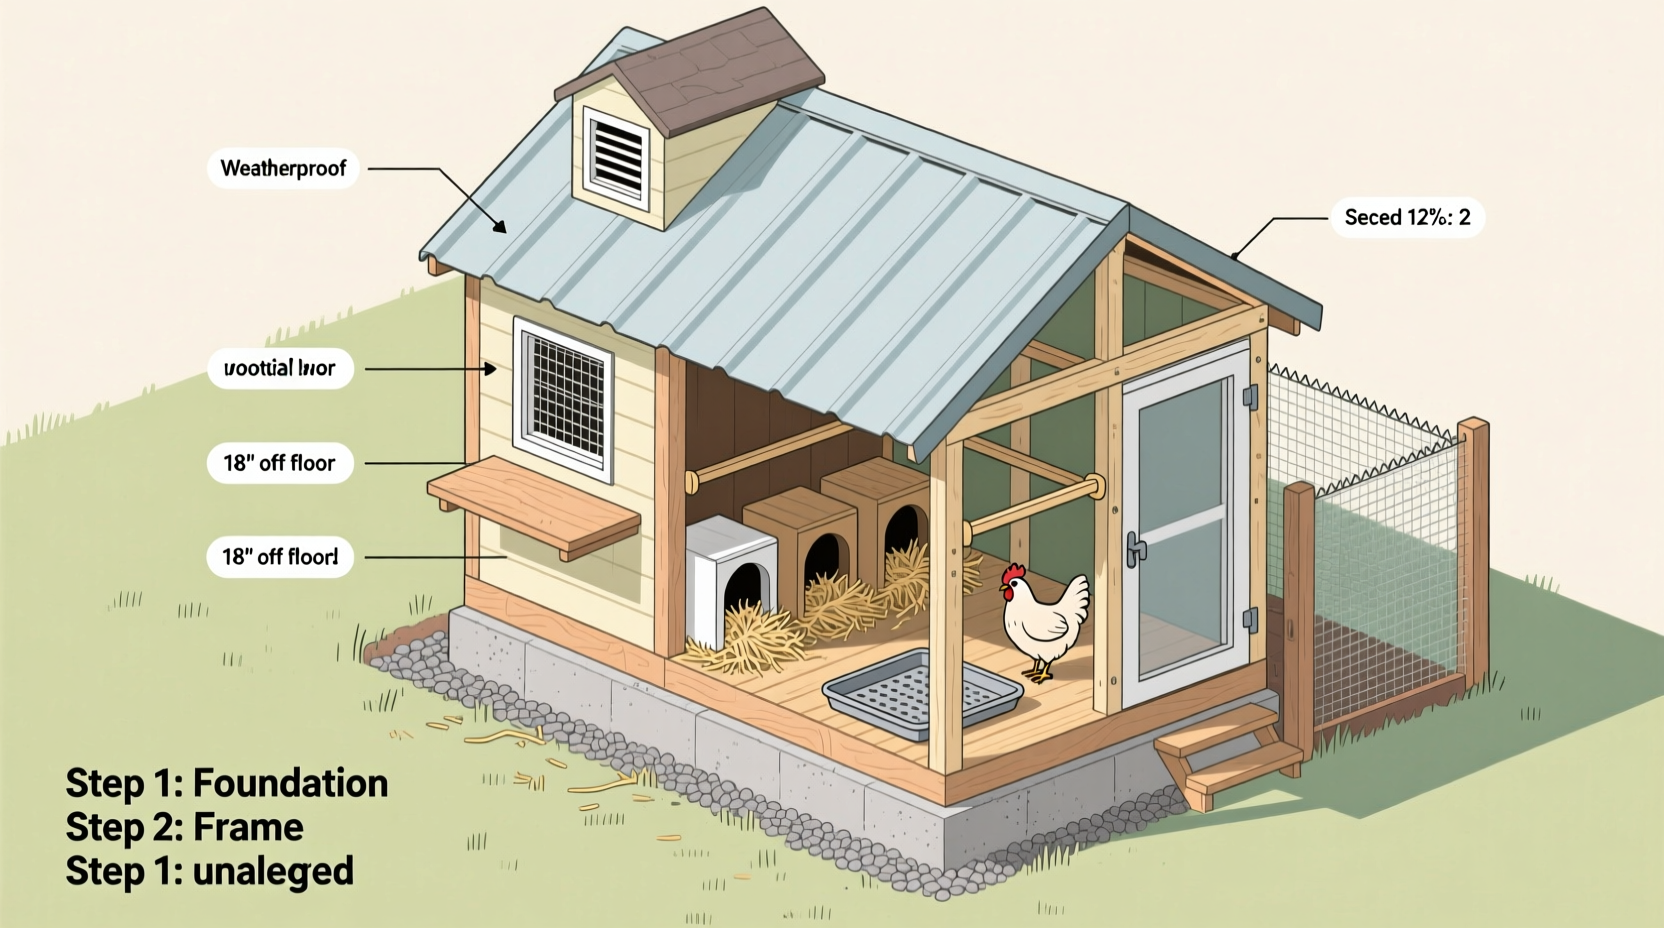
Step 3: Build the Frame and Enclosure
Start with a solid foundation. Even a simple skid foundation should be level and raised at least 6 inches off the ground to prevent water intrusion and rodent access.
- Build the base frame: Use 2x4 pressure-treated lumber to create a rectangle matching your planned dimensions. Reinforce corners with joist hangers.
- Add flooring: Attach exterior plywood or lay a concrete slab. If using wood, line the underside with 1/2-inch hardware cloth to deter burrowing pests.
- Erect walls: Frame walls with 2x4 studs spaced 16 inches apart. Cut openings for windows, ventilation, and the main door.
- Install roof trusses: Simple gable trusses made from 2x4s provide good headroom and water runoff. Cover with plywood sheathing before adding roofing.
- Seal gaps: Use silicone caulk around joints and seams to keep out wind, rain, and insects.
Ensure all edges are sanded smooth. Chickens have delicate respiratory systems, and splinters or dust can cause health issues.
Step 4: Install Key Functional Features
A comfortable hen house supports natural chicken behavior. Include these essential features during construction:
- Roosting Bars: Place 2x2 wooden bars 2–4 feet off the ground. Allow 8–10 inches per bird. Hens prefer to sleep off the ground, and elevated roosts reduce parasite exposure.
- Nesting Boxes: One box for every 3–4 hens. Size: 12” x 12” x 12”. Angle the front lip upward to keep bedding inside. Place in a quiet, dark corner.
- Automatic Door (Optional): Timed doors open at dawn and close at dusk, protecting hens from nocturnal predators without daily manual effort.
- Ventilation System: Install louvered vents high on opposite walls. No direct airflow over roosts. Prevents ammonia buildup from droppings.
- Access Doors: Human door for cleaning, smaller pop hole (12\"x12\") for chickens to enter the run.
Step 5: Protect Against Predators and Disease
No matter how sturdy the structure, poor security turns a hen house into a target. Predators like raccoons, foxes, and rats exploit weak points.
Follow this predator-proofing checklist:
📋 Predator-Proofing Checklist- Use 1/2-inch hardware cloth (not chicken wire) on all openings, buried 12 inches underground in a “L” shape to prevent digging.
- Secure all doors with predator locks—simple latches can be opened by raccoons.
- Install motion-sensor lighting around the coop perimeter.
- Keep food in sealed metal containers away from the coop.
- Remove standing water and clean droppings regularly to avoid flies and mites.
“Over 70% of backyard flock losses occur due to preventable predation. A secure coop isn’t luxury—it’s necessity.” — Dr. Laura Simmons, Poultry Health Specialist
Real Example: Sarah’s Backyard Coop Upgrade
Sarah, a first-time chicken keeper in rural Oregon, built her initial coop from recycled pallets. While cost-effective, it warped within months, and a raccoon reached through flimsy mesh to kill two hens. After researching best practices, she rebuilt using pressure-treated lumber, hardware cloth, and a sloped metal roof. She added deep litter bedding and west-facing ventilation. Now in its third year, her coop remains dry, draft-free, and predator-proof—her hens produce eggs consistently, even in winter.
Her experience underscores a core principle: invest time and quality materials upfront to save money and heartache later.
Common Mistakes to Avoid
Even well-intentioned builders make errors that compromise hen health and coop lifespan.
- Overlooking drainage: Ensure the site slopes away from the coop to prevent pooling water.
- Too many windows: Light is good, but large glass panes create cold spots and predator entry risks.
- Ignoring insulation: In cold climates, insulate walls and ceiling with non-toxic foam or fiberglass (sealed behind plywood).
- Skipping maintenance access: Without a large door, cleaning becomes a chore, leading to neglected hygiene.
Frequently Asked Questions
How often should I clean the hen house?
Perform a full clean-out every 4–6 weeks. Use the deep litter method for ongoing maintenance: stir bedding weekly and add fresh carbon-rich material (like pine shavings) to compost droppings naturally.
Can I use an old shed as a hen house?
Yes, if it’s properly modified. Add ventilation, reinforce flooring, install hardware cloth, and include roosts and nesting boxes. Ensure it’s elevated and not prone to dampness.
Do chickens need heat in winter?
Most breeds tolerate cold well if the coop is dry and draft-free. Avoid heaters unless temperatures drop below -20°F. Moisture and poor air quality are greater threats than cold.
Final Steps: Test and Refine
After construction, spend a few days observing your hens’ behavior. Are they entering nesting boxes willingly? Do they avoid certain areas due to drafts? Adjust roost heights or bedding depth as needed. Monitor for condensation, which signals poor ventilation.
Apply a non-toxic wood sealant to exterior surfaces every 1–2 years to extend life. Keep gutters clear if your roof channels water.
Conclusion: Start Building with Confidence
Building a durable and comfortable hen house doesn’t require expert carpentry—just careful planning, quality materials, and attention to chicken needs. By following these steps, beginners can create a safe, functional home that supports flock health for years. A well-designed coop reduces stress, prevents disease, and makes daily care enjoyable rather than burdensome.


 浙公网安备
33010002000092号
浙公网安备
33010002000092号 浙B2-20120091-4
Comments
No comments yet. Why don't you start the discussion?