
A sound-reactive Christmas light curtain transforms any room into a dynamic holiday spectacle. By syncing LED brightness and color patterns to ambient sound—especially music or voice—the display becomes immersive and responsive. This project combines basic electronics, microcontroller programming, and audio signal processing to create a custom decoration that dances with the beat. Whether you're enhancing your living room ambiance or building a centerpiece for a seasonal party, this guide walks you through every step—from component selection to final calibration.
Understanding the Core Components
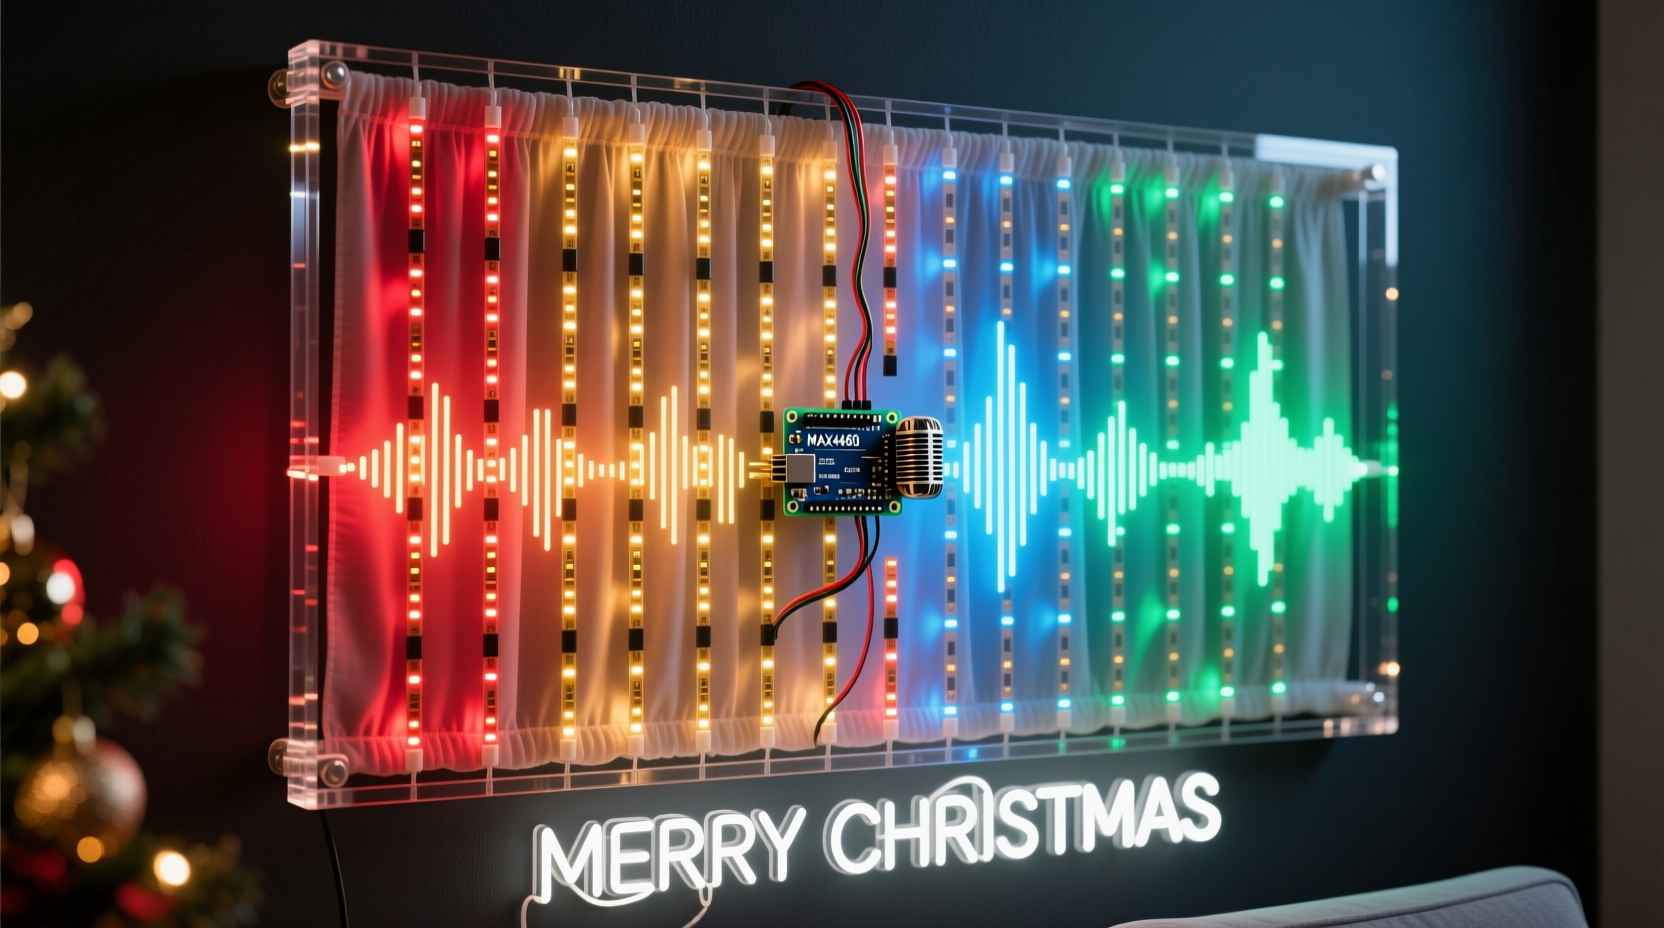
The foundation of a sound-reactive light curtain lies in three interconnected systems: audio input, signal processing, and visual output. Each system relies on specific hardware and software elements working in harmony.
- Microphone (Mic Input): Captures ambient sound and converts it into an electrical signal. Electret microphones are ideal due to their sensitivity, small size, and compatibility with microcontrollers.
- Microcontroller: Processes the incoming audio signal. The Arduino Uno is widely used for its ease of use, strong community support, and analog input capabilities.
- LED Strip: Serves as the visual output. Addressable LEDs like WS2812B (NeoPixels) allow individual control over color and brightness, enabling complex animations driven by sound levels.
- Amplification & Filtering Circuit (Optional): Enhances weak microphone signals and filters out background noise for more accurate response.
Data flows from the microphone to the Arduino’s analog pin, where it's sampled at regular intervals. The raw signal is then processed—typically by calculating amplitude or frequency components—and mapped to LED behavior such as intensity, color shifts, or animation speed.
Step-by-Step Assembly Guide
Follow this sequence to build a fully functional sound-reactive light curtain. Ensure all connections are secure and double-check polarity before powering up.
- Gather Materials: Obtain an Arduino Uno, WS2812B LED strip (60 LEDs/meter recommended), MAX4466 or INMP441 microphone sensor, breadboard, jumper wires, 5V power supply (capable of delivering sufficient current), and optionally a perfboard for permanent mounting.
- Connect the Microphone: Wire the mic module to the Arduino. For most analog modules:
- VCC → 5V
- GND → GND
- OUT → A0 (analog pin)
- Attach the LED Strip: Connect the data input (DIN) of the LED strip to digital pin 6 on the Arduino. Link the 5V and GND lines directly to the external power supply if using more than 30 LEDs; otherwise, the Arduino can power shorter strips.
- Power Configuration: When using long LED strips, connect both the Arduino and LED strip ground to the same power source to prevent voltage discrepancies. Never power the LED strip through the Arduino’s 5V pin when exceeding 500mA total draw.
- Upload Test Code: Begin with a simple FastLED or Adafruit_NeoPixel sketch that lights all LEDs white. Confirm communication before integrating audio logic.
Mounting the Curtain
Design the physical layout based on your window or wall dimensions. Attach the LED strip vertically along fabric mesh, acrylic sheet edges, or behind translucent diffuser material to create a “curtain” effect. Space rows evenly—typically 4–6 inches apart—to maintain uniform coverage. Secure connections with heat shrink tubing and insulate exposed solder joints.
Programming the Sound Response
The key to responsiveness is real-time analysis of the microphone signal. The Arduino reads voltage fluctuations from the mic and applies signal processing techniques to extract usable amplitude data.
Use the following algorithm structure:
1. Sample analog input from A0 at high frequency (~10,000 Hz).
2. Remove DC offset by subtracting the average baseline (typically ~512 for 10-bit ADC).
3. Calculate absolute deviation and apply smoothing (rolling average).
4. Map resulting amplitude to brightness level (0–255).
5. Update LED strip with new values via FastLED.show().
For richer effects, implement FFT (Fast Fourier Transform) to separate frequencies. Libraries like FHT or arduinoFFT enable bass, mid, and treble band detection, allowing different sections of the curtain to react to distinct musical ranges.
“Real-time audio visualization requires balancing sampling accuracy with loop execution speed. Prioritize consistent frame updates over perfect signal fidelity.” — Dr. Lin Zhou, Embedded Systems Engineer
Sample Code Snippet (Arduino + FastLED)
cpp #includeThis basic code creates a monochromatic pulse effect. To advance functionality, add color gradients based on volume thresholds or animate upward/downward waves synchronized to beat peaks.
Calibration and Optimization Table
Performance depends heavily on tuning parameters to your environment. Use the table below during testing to refine behavior.
| Parameter | Do | Don’t |
|---|---|---|
| Sampling Rate | Keep between 8k–12kHz for reliable amplitude tracking | Exceed 15kHz without optimizing other code sections |
| LED Brightness | Cap max brightness at 80–100 for energy efficiency and longevity | Run at full 255 continuously—can overheat LEDs |
| Noise Floor | Measure quiet-room average and subtract dynamically | Assume static baseline in noisy environments |
| Delay Usage | Use minimal delays; prefer non-blocking timing with millis() | Use long delays that stall signal capture |
| Power Supply | Use regulated 5V supply rated for 1.5x expected load | Daisy-chain power across multiple strips without reinforcement |
Real-World Example: Holiday Party Installation
In December 2023, a maker in Portland installed a 16-foot-wide, 8-row LED curtain across their living room bay window for a family gathering. Using an Arduino Nano (for smaller footprint), INMP441 I²C microphone, and 300 WS2812B LEDs powered by a 10A/5V supply, they achieved robust performance despite background chatter.
The challenge was avoiding false triggers from non-musical sounds. They implemented a dual-threshold system: low-level ambient noise triggered gentle pulsing, while sustained high-amplitude signals (>70% peak) activated strobing rainbows. Music genre detection was approximated by comparing short-term vs. long-term averages—fast transients indicated upbeat tracks.
Guests interacted naturally, clapping and singing to influence the display. Children especially enjoyed seeing their voices generate ripples of light. The unit operated reliably for six hours without overheating, thanks to proper power injection every 60 LEDs.
Essential Checklist Before Deployment
Before turning on your finished curtain, verify each item below:
- ✅ All solder joints are clean, secure, and insulated
- ✅ Grounds between Arduino, power supply, and peripherals are common
- ✅ LED strip length matches power supply capacity (max current = number of LEDs × 60mA @ full white)
- ✅ Microphone placement avoids direct airflow or vibration
- ✅ Code includes safeguards against buffer overflow or infinite loops
- ✅ Physical mounting prevents strain on wires
- ✅ Emergency power cutoff is accessible
Frequently Asked Questions
Can I use a computer’s microphone instead of a hardware sensor?
No—not directly. While PCs can analyze audio and send commands via serial, doing so introduces latency unsuitable for real-time lighting. Onboard mic modules provide immediate feedback essential for tight synchronization. However, advanced users may interface Raspberry Pi for desktop-based FFT processing and UDP-controlled LED strips using protocols like WLED.
Why do my lights flicker randomly even in silence?
This usually indicates electrical noise or poor grounding. Check that the microphone isn’t near PWM sources (e.g., motor drivers). Implement software filtering by averaging several samples or using a moving median filter. Also ensure the power supply isn't overloaded—voltage drops cause erratic behavior.
Is it possible to make the curtain respond only to certain frequencies, like bass?
Yes. Apply a digital band-pass filter or perform FFT to isolate low-frequency components (20–200 Hz). Libraries such as arduinoFFT allow decomposition of the audio signal into bins. You can then trigger flashing patterns only when bass energy exceeds a threshold, creating club-style effects tuned to holiday music.
Final Thoughts and Next Steps
Creating a sound-reactive Christmas light curtain merges creativity with technical skill, offering a personalized alternative to mass-produced decorations. Once mastered, the platform supports endless variations: voice-activated color themes, Bluetooth music streaming integration, remote control via smartphone app, or even multi-curtain synchronization across rooms.
Consider expanding your project by adding motion sensors for hybrid interaction, or linking multiple Arduinos via I²C for larger installations. Open-source frameworks like Hyperion.ng and DIY Perks’ Ambilight clones demonstrate how far these principles scale.


 浙公网安备
33010002000092号
浙公网安备
33010002000092号 浙B2-20120091-4
Comments
No comments yet. Why don't you start the discussion?